Pear Vanilla Jam

Pear Vanilla Jam

I can’t believe that October is almost over – where did this month go?  Time is just flying by, and I am seriously concerned if I blink, I might just miss something big.  October is my favorite season, and I love to savor every minute of it.  The farmer’s markets are just overflowing with amazing produce right now – and colors.  Even as busy as I have been, I have tried hard to carve out time each weekend to meander.  Usually my mind starts racing though…and I think of all the things I want to make.  Then I calm myself down, and decide if I can just make one favorite every weekend, that will be enough, but it never is…

Last spring when I was in Paris, we finally made it to this jam store that I had read about.  We walked in, and I was overwhelmed.  I thought I had a jam problem…but my pantry only has a few shelves full.  This place was overflowing with jam, all types.  It was incredible.  Then we started sampling, and I swear I was in some type of jam coma – because why on earth would I ever buy jam?  I could go into business myself.  But no, I couldn’t stop myself.  I ended up with this jar of Pear Vanilla Jam.  It was the most delicate yet sophisticated flavor of jam, and one that I just had to have.  The consistency was perfect – nice and runny.  I had to make it for myself.

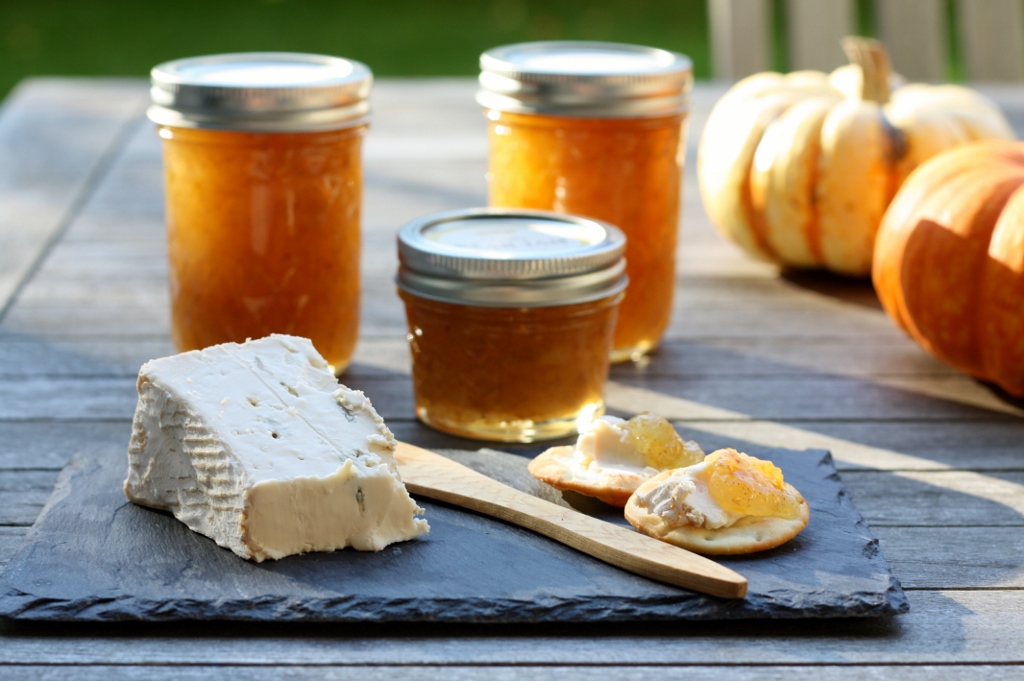
I have been waiting months to see if I could reproduce that delicious concoction of pear and vanilla, and finally the pears have hit the market in full force.  Last weekend I gave it a try – and the flavor is spot on – the problem is that the consistency is a little more firm than I would like.  I am fine with it though – once it gets on that warm English muffin, it softens right up.  Although I found another really good way to serve this jam…with some creamy blue cheese.  Wow.  Talk about savoring the season.  Just give me some cheese and this jam, and life can get as hectic as it needs to be.  I will be sitting on the side, savoring every minute.

Ingredients

  • 8 cups chopped Bartlett pears (or any smooth, thin-skinned pear. There’s no need to peel.)
  • 2 vanilla beans, split and scraped
  • 4 cups sugar
  • 1 packet liquid pectin

Preparation

In a large, heavy-bottomed pot, combine chopped pears, sugar and vanilla beans (and all that bean-y goodness you scraped out). Cook over medium heat until the fruit can easily be smashed with the back of a wooden spoon. Use a potato masher or immersion blender to break the fruit down into a mostly-smooth sauce (remove the vanilla bean solids before blending).

Add the pectin and bring to a rolling boil. Let boil for a full five minutes in order to active the pectin, so that the finished product will have a nice jammy consistency.

Fill jars, wipe rims to remove any residual jam, apply lids (heat canning lids in a small pot over very low heat while you’re preparing the jam to ensure a good seal) and screw on the rims.

Process the filled jars in a boiling water canner for 10 minutes (start the timer when the pot has returned to a boil). When the time has elapsed, remove jars from pot and place the jars on a towel-lined countertop. Let them cool undisturbed for at least two hours. During this time, the lids should seal. Check to ensure the jars have sealed by pushing down on the center of the lid. If it feels solid and doesn’t move, it is sealed.

For a printer-friendly version of this recipe, please click here:  Pear Vanilla Jam

Chicken-Broccoli Mac and Cheese with Bacon

Chicken-Broccoli Mac and Cheese with Bacon

I am trying to convince myself that there are really only 5 work days that stand between another weekend.  For some reason, I know that doesn’t mean anything.  These days the weekend doesn’t mean no work – it just means that I am not at work, and I guess if I think back to 16 years ago, before I had a laptop, when I had work to do – I actually had to drive to work.  It was a different world back then.  In a way, even though work never stops anymore, at least I am not wasting hours away sitting in the car.

When I think back to those times, I remember what I used to do about meal planning.  This was before kids – and my husband worked just as much as I did.  We would usually make it home around 8pm most nights, sometimes even later – and at that time, I couldn’t start making dinner from scratch. So – Sundays was my “cooking day.”  I would make 2-3 meals that I could put in the refrigerator and just stick in the oven when I got home.  In about 30 minutes, I would have a delicious meal for us – while I was sitting on the coach watching TV.  It was awesome.  This was also before the Big Green Egg.  We ate a lot of one dish meals back then – and we loved them.  I would usually make one casserole with rice, and one with pasta.  If I had enough time, I would also make a hearty soup.  When we ran out of the meals I had prepared, then we would order take out…but some weeks we had plenty to last until the weekend.

One of the dishes I used to make was a chicken-noodle casserole.  Each week it was slightly different – but always healthy, and always with fresh vegetables.  When I saw this recipe in Cooking Light – it reminded me of those days.  Now I am just too busy on the weekends to prepare meals for the week – and my husband actually does it for me – he will smoke up some extra chicken breasts or pork, that I will use in my recipes during the week.  It is definitely a huge time saver.

This mac-n-cheese was a huge hit – and it covered all the food groups.  For less than 400 calories a serving, you cannot go wrong.  And hey, it was awesome warmed up the next day.  So – even if you don’t have your act together to make your meals ahead of time – this one will feed a crowd…so enjoy the leftovers – particularly when it is warming up in the oven, and you are sitting on the couch recovering from the day, instead of slaving over a hot stove…

Ingredients

  • 6 ounces uncooked large or regular elbow macaroni
  • 3 cups chopped broccoli florets
  • 3 bacon slices, coarsely chopped
  • 12 ounces skinless, boneless chicken breasts, cut into 1/2-inch pieces
  • 1 teaspoon kosher salt, divided
  • 1 tablespoon minced fresh garlic
  • 1/8 teaspoon ground turmeric
  • 1 1/4 cups 1% low-fat milk
  • 1 cup unsalted chicken stock (such as Swanson)
  • 1/4 cup plus 1 teaspoon all-purpose flour
  • 5 ounces sharp cheddar cheese, shredded (about 1 1/4 cups)

Preparation

Preheat broiler to high.

Cook pasta according to package directions, omitting salt and fat. Add broccoli to pan during last 2 minutes of cooking. Drain.

While pasta cooks, place bacon in a large ovenproof skillet over medium-high heat; cook 4 minutes or until browned, stirring occasionally. Remove bacon from pan with a slotted spoon; reserve 1 1/2 teaspoons drippings in pan. Sprinkle chicken with 1/4 teaspoon salt. Add chicken to drippings in pan; cook 4 minutes. Sprinkle with garlic; cook 2 minutes, stirring occasionally. Sprinkle with turmeric; cook 30 seconds, stirring frequently.

Combine remaining 3/4 teaspoon salt, milk, stock, and flour, stirring with a whisk. Add milk mixture to pan; bring to a boil, stirring frequently. Cook 2 minutes or until thickened. Add pasta mixture and 2 ounces cheese; toss to coat. Sprinkle with remaining 3 ounces cheese and bacon. Broil 2 minutes or until cheese melts and just begins to brown.

For a printer-friendly version of this recipe, please click here:  Chicken-Broccoli Mac and Cheese with Bacon

Gluten-Free Peanut Butter Chocolate Chip Cookies

Gluten-Free Peanut Butter Chocolate Chip Cookies

Gluten-free cookies.  Right away there is a strike against the cookies when those words are involved.  I hate to admit that, because I am all for people being gluten-free, but there are some things that just need gluten to taste delicious, and in my opinion, cookies are one of them.  I thought I had made the one and only delicious gluten-free cookie already, and that there would be no others that could even compare.  Boy was I wrong, just WRONG.

I am sure someone has already thought of this – but one of the reasons why gluten-free cookies scare me is because there is notoriously some special ingredient or flour (made without gluten) that you have to use.  I walk down the baking isle in our market, and I see all those special flours – there are tons of them, but they don’t exist in my house.  That means I would actually have to plan to make them and buy the ingredients in the house, which would also require me to plan.  Seriously – do you know my life these days?  Planning is just not part of the routine.  “Just in time” is my new mantra. So back to where I started this paragraph – I am sure someone has thought of a gluten-free cookbook, where you use only regular ingredients.  Because seriously – you can make a delicious gluten-free meal without even thinking about it – we had one tonight.  Just fresh vegetables, some nice potatoes, and delicious meat smoked on the egg.  Magic.  No tapioca flour, sorghum, or arrowroot starch.

So, when I saw the title of these cookies in Cooking Light, I almost turned the page – but then my eyes wandered to the ingredients, and I couldn’t believe it.  Just like those chocolate brownie cookies, these also just used regular ingredients.  I thought it was too good to be true.  Well, that’s exactly what these cookies were.  You seriously would never know they lacked flour.  They were soft and chewy, yet crunchy on the outside.  I washed them down with some chocolate milk, and it was like eating a Reese Peanut Butter Cup – except a delicious one, since they are way too sweet for me.

I think the tides may be changing, and I may start taking that strike away when I see the words gluten-free.  Or maybe I should just write my own cookbook – gluten-free baking without the fancy ingredients.  Just rolls off the tongue, doesn’t it. I will put that on my list…let’s see, number 1,729.

Ingredients

  • 1/4 teaspoon salt
  • 1 large egg white
  • 1 cup reduced-fat chunky peanut butter
  • 1/3 cup granulated sugar
  • 1/4 cup brown sugar
  • 1/4 cup semisweet chocolate minichips

Preparation

Preheat oven to 375°.

Place salt and egg white in a medium bowl; stir with a whisk until white is frothy. Add peanut butter, granulated sugar, brown sugar, and chocolate chips, stirring to combine.

Divide dough into 20 equal portions (about 1 tablespoon each); arrange dough 2 inches apart on a baking sheet lined with parchment paper. Gently press the top of each cookie with a fork; press the top of each cookie again to form a crisscross pattern, and flatten to a 2-inch diameter. Bake at 375° for 10 minutes or until lightly browned.

For a printer-friendly version of this recipe, please click here:  Gluten-Free Peanut Butter Chocolate Chip Cookies

Spicy Bacon and Brew Muffins

Spicy Bacon and Brew Muffins

I know I have said this before, but food has magical powers – that is until there is a force that breaks those powers.  I haven’t seen it happen very often, but it does.  Why is it so important when you go to a all day meeting that there is good food to eat?  That’s because often, it puts you in a better mood.  You come back from lunch refreshed and ready to tackle anything – only then to look forward to snack time.

Normally my meetings have nothing to do with food – which is why it is such a treat every year to attend the Food Blogger’s conference.  Not only do you talk about food, listen to other people lecture about food – there is food EVERYWHERE.  It is quite something.  This year things were just a little different though.  The conference started on a Friday night – with a wonderful reception and the gift suite.  I brought home lots of great stuff to share with the family – snacks and treats galore – but I wasn’t staying at the hotel.  The next day they started us out with breakfast sponsored by Noosa Yoghurt.  Now, if you haven’t had Noosa Yoghurt yet, you are truly missing out.  I have been eating it for months now, and it is leaps and bounds better than any yoghurt I have ever had in the United States – it is closer to the wonderful yoghurt I can find in Europe.  So, needless to say, I was in my glory.  They had tons of toppings out for us so I went to town – and that pumpkin yogurt was just like eating pumpkin pie filling.  I was ready to sit and listen to people talk about food for hours.

After a few hours of that, I was actually hungry again – and I forgot to bring the snacks with me from the night before.  I was with hundreds of foodies – was I the only one that was hungry?  There was 4 hours in between breakfast and lunch, and I hate to say it, but that is just too long for me to wait.  I eat every couple of hours.  It is the only way for me to stay sane during the day.  Well, fortunately I ran out and bought myself a snack to keep me going, but I was definitely surprised by the whole thing.  I have to admit, that was the only part of the weekend that I was hungry in the least bit.  The rest of the weekend they kept the food coming.  Let me remind you how hard it is to watch a food demo when you are hungry…

That brings me back to these muffins.  My daughter loves muffins in the morning because they are quick and easy.  I have a different rational.  I can eat a couple of hard boiled eggs for my first breakfast, then have a muffin for my mid-morning snack.  Boy is life good when that happens.  Magic.  Fortunately for me, my daughter’s did not like these muffins from Cooking Light – but my husband and I LOVED them – they were mildly sweet with a touch of bacon on top.  OMG.  And I used margarine instead of butter, so they were dairy-free.  Now, if only I could just snap my hands and make those muffins appear…now that would be magic.

Ingredients

Streusel:

  • 3 tablespoons dark brown sugar
  • 2 teaspoons water
  • 1/2 teaspoon ground red pepper
  • 3 applewood-smoked bacon slices
  • 3 tablespoons old-fashioned rolled oats
  • 1 tablespoon all-purpose flour
  • 1 tablespoon unsalted butter, melted

Muffin:

  • 7.9 ounces all-purpose flour (about 1 3/4 cups)
  • 1/2 cup packed dark brown sugar
  • 2 teaspoons baking powder
  • 1/4 teaspoon salt
  • 1/4 teaspoon baking soda
  • 2/3 cup Guinness Stout or other stout beer
  • 3 tablespoons canola oil
  • 1 teaspoon vanilla extract
  • 1 large egg, lightly beaten

Preparation

Preheat oven to 400°. Line a baking sheet with foil; place a wire rack on the baking sheet.

To prepare streusel, combine 3 tablespoons sugar, 2 teaspoons water, and pepper in a small bowl. Spread mixture evenly over both sides of bacon. Place coated bacon on rack; bake for 18 minutes or until done. Cool; finely chop.

Combine oats and 1 tablespoon flour in a small bowl. Stir in butter. Stir in 2 tablespoons chopped bacon; reserve remaining bacon. Set aside.

Reduce oven temperature to 350°. Line 12 muffin cups with paper liners.

To prepare muffins, weigh or lightly spoon 7.9 ounces (about 1 3/4 cups) flour into dry measuring cups; level with a knife. Combine 7.9 ounces flour, remaining bacon, 1/2 cup sugar, baking powder, salt, and baking soda in a large bowl; stir well. Combine beer, oil, vanilla, and egg in another bowl, gently stirring with a whisk. Add beer mixture to flour mixture, stirring just until combined. Evenly divide batter among muffin cups. Sprinkle streusel evenly over batter.

Bake at 350° for 18 minutes or until a wooden pick inserted in the center of muffins comes out clean. Cool in pan 5 minutes. Remove muffins from pan; serve warm, or cool completely on a wire rack.

For a printer-friendly version of this recipe, please click here:  Spicy Bacon and Brew Muffins