Chocolate-Caramel Tart with Raspberries

Chocolate Caramel Tart

The monthly calendar.  I am sure all families have one – and they take lots of different forms.  Years ago when I started the family calendar in the office (a big white board calendar where I write down different events/appointments), I had no idea that it would be something the girls would look forward to each and every month.  At the end of the month, they start asking me when I am going to do the calendar for the next month.  They always want to help also – I write the appointments and events down in different colors – and will draw little pictures when it is really a special day (like their birthdays).  I love working on it when they are in bed – so when they see it the next morning, they are super excited.  I guess I never really thought about it – but it tells them what they have to look forward to for the entire month.  I often find them in the office studying the calendar – which I never do, since my phone tells me exactly where I need to be at all times.  Good thing for technology…  This month is exceptionally busy – in fact this week, we had something going on every night.  Ugh.  Am I ever going to be able to cook again??

A while ago I posted these…and it has taken me all this time to show you what they were used for.  Yes, life is really that busy.  Every year my temple has an auction, and for the past several years, I have offered to bake something for the Dessert Dash.  The first year I really went crazy – and made a Tower of Treats – it took me a few weekends to make all of the treats for that special tower.  After that, I tried to find something very fancy, but that was doable in one day.  This year I did it – not only did it only take one day – I swear it only took a couple of hours.  I remember actually sitting down that Saturday…that may have been the last Saturday I did indeed sit before going to bed.

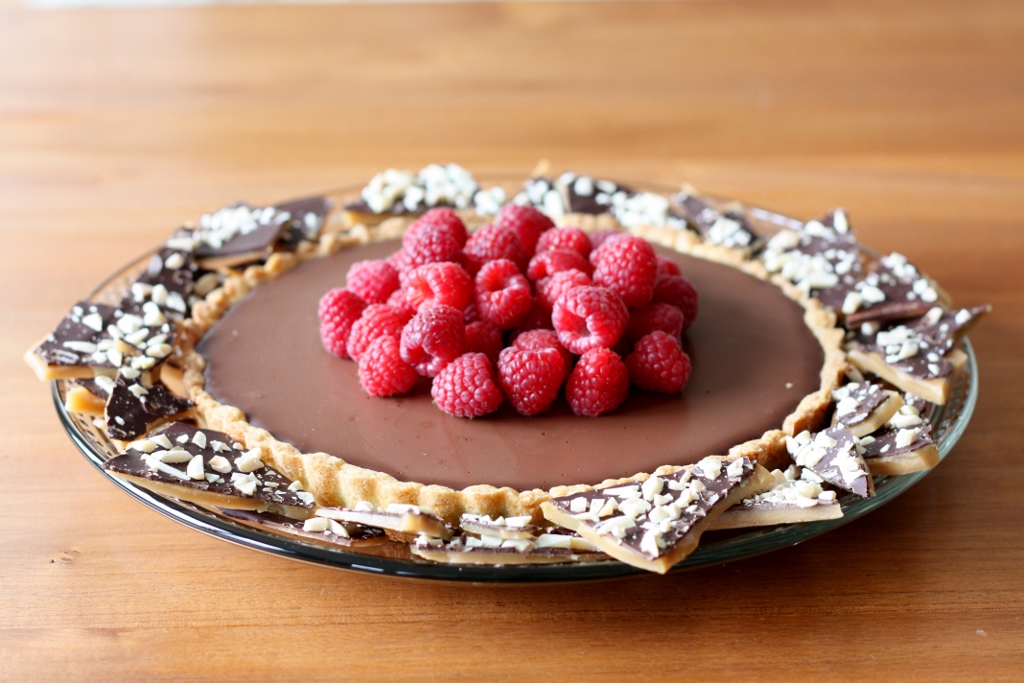
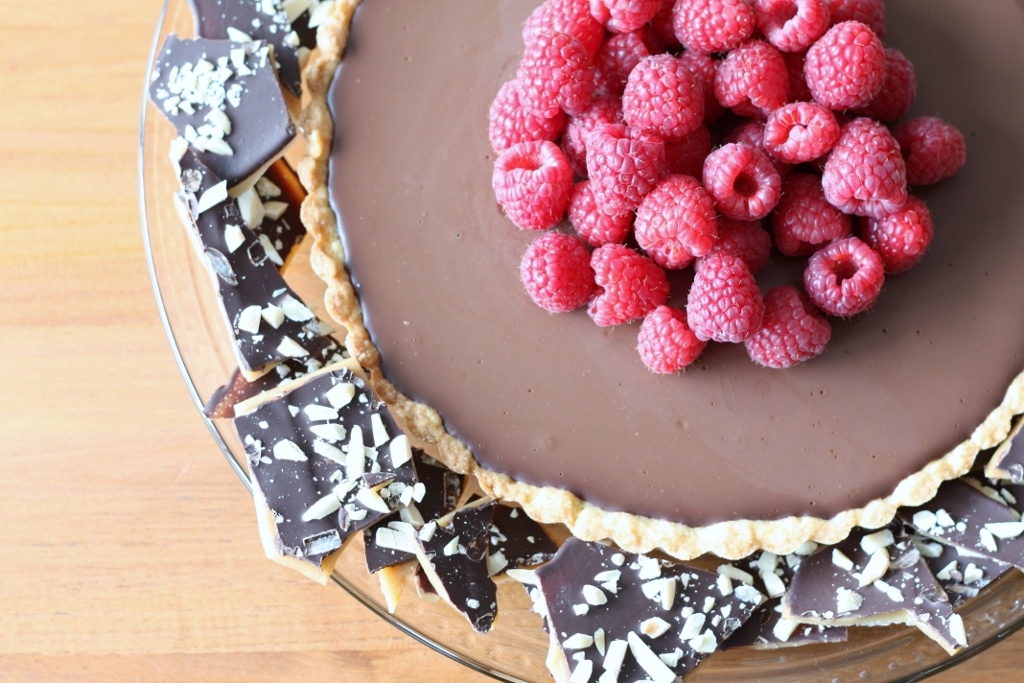
I knew I was going to make the chocolate-almond toffee – but I was looking for just the perfect dessert to go with it.  The dessert I was trying to find was this amazing chocolate caramel pie that we had at Mama’s Fish House in Maui – I swear it was one of the best desserts I have ever had (ok, I have had a lot of really good desserts – but this definitely ranks high).  I found this recipe in Bon Appetit, and although it wasn’t completely the same – it sounded delicious.  The caramel came out beautifully – and that chocolate over the top – WOW.  I really wished I was going to the auction so I could buy this baby.  Unfortunately I don’t know the lucky people who ended up with this – but I am sure it was worth it.  Let’s hope anyway…  So – if you are as busy as I am this month, but need to make something really special – here it is.  Hey – Mother’s Day is coming up – what a perfect excuse!

Ingredients

Crust

  • 1 cup all-purpose flour
  • 3 tablespoons sugar
  • 1/2 teaspoon salt
  • 1/2 cup (1 stick) chilled unsalted butter, cut into  1/2-inch cubes
  • 2 large egg yolks

Caramel  Filling

  • 1 cup sugar
  • 1/4 cup water
  • 1/4 cup heavy whipping cream
  • 1/4 cup (1/2 stick) unsalted butter, cut into 4  pieces
  • 1/2 vanilla bean, split lengthwise
  • 1/4 teaspoon finely ground fleur-de-sel or fine sea  salt

Chocolate Ganache

  • 1 cup heavy whipping cream
  • 5 ounces high-quality bittersweet chocolate,  chopped
  • raspberries for garnish

Preparation

For Crust:

Position  rack in center of oven; preheat to 375°F. Butter 9-inch tart pan with removable  bottom. Blend flour, sugar, and salt in processor. Add 1/2 cup butter; process  until mixture resembles coarse meal. Add egg yolks; process until moist clumps  form. Press dough onto bottom and  up sides of prepared pan. Bake until crust is golden brown, about 20 minutes.  Cool in pan on rack while preparing caramel filling.

For Caramel Filling:

Combine sugar and 1/4 cup water in heavy medium saucepan. Stir over medium-low  heat until sugar dissolves. Increase heat to high and boil without stirring  until mixture is deep amber, occasionally brushing down sides of pan with wet  pastry brush and swirling pan, about 7 minutes. Remove from heat; add cream  (mixture will bubble vigorously). Add butter and stir over low heat until  caramel is completely smooth. Scrape in seeds from vanilla bean; stir in salt.  Cool 10 minutes. Pour warm caramel into crust. Let stand at room temperature  until completely cool, about 45 minutes.

For Ganache:

Bring  cream to simmer in small saucepan. Remove from heat; add chocolate. Whisk until  smooth. Let stand until slightly cooled but still pourable, about 10 minutes.  Pour ganache evenly over caramel filling. Refrigerate tart uncovered until  chocolate is firm, about 2 hours.

Do ahead: Can be made 2 days ahead. Cover and  refrigerate.  Top with raspberries before serving.

For a printer-friendly version of this recipe, please click here:  Chocolate-Caramel Tart with Raspberries

Chocolate-Caramel Tart 2

Advertisement

Granola Cookie Wedges

Granola Cookie Wedge 2

We are nearing the end of our vacation, and what a week we have had.  Every year it gets better and better – and each year my daughter is able to appreciate the food more and more.  I can’t wait to bring my younger daughter here next year – I really think she is going to love it.  I am fortunate that they are both adventurous eaters, and can definitely appreciate a very good dessert…

Today we had a magnificent lunch – and my parents have gotten to know the Directeur of the restaurant.  He told us today that he loves cookies and brownies – and in particular, he loves a good pumpkin pie.  With all of the amazing pastries in Paris, it is hard to believe that someone would rather have a good cookie or brownie – if you ask me, I would vow to never eat those again, if I could have pain au sucre and tarte au fraises outside my front door whenever I wanted.  He told us there is nothing better than a nice chocolate cookie with some coffee in the morning.  I guess the grass is always greener on the other side.  I know the grass is greener on their side.

The other week I decided that I would try and make something homemade each weekend that I could easily pack in the girls lunches for treats.  The packaged treats are garbage – and if you are going to eat a cookie, why not make it good with real ingredients?  I found this recipe in Cooking Light – and it went with my whole simplicity theme – making cookies in a pie pan instead of individually – brilliant!!  I have had skillet cookies before (wow…) but have never thought to make them like this to store.  The girls LOVED them, and they lasted the entire week, and still tasted good.

So – these are not Paris pastries, but as I go back to my real life – this is what we are stuck with for now.  Seriously though, things could be a lot worse…and then again, there is always Paris to look forward to in the future.

Ingredients

  • 1/3 cup packed dark brown sugar
  • 2 tablespoons canola oil
  • 1 tablespoon butter, melted
  • 1/2 teaspoon vanilla extract
  • 1/4 teaspoon salt
  • 1/4 teaspoon baking soda
  • 1  large egg white
  • 2.25 ounces all-purpose flour (about 1/2 cup)
  • 1/2 cup quick-cooking oats
  • 1/4 cup chopped pecans, toasted
  • 2 tablespoons semisweet chocolate chips
  •   Cooking spray

Preparation

Preheat oven to 350°.

Combine first 7 ingredients in a large bowl; stir until well combined. Weigh or lightly spoon flour into a dry measuring cup; level with a knife. Add flour, oats, nuts, and chocolate chips to sugar mixture; stir until just combined.

Scrape the dough into a 9-inch glass pie plate coated with cooking spray, and spread to edges using a spatula. Bake at 350° for 13 minutes or until set. Cool slightly on a wire rack. Cut into 8 wedges.

For a printer-friendly version of this recipe, please click here:  Granola Cookie Wedges

Granola Cookie Wedge Test

Cream Puffs

Cream Puffs

When I studied in France many years ago – I was enamored by the Patisseries.  This was over twenty years ago, when the dollar was very strong – and it cost less than a dollar for a beautiful looking éclair – or a tarte au fraise, one of my older daughter’s favorites.  So – every week I would treat myself to a different pastry in the shops – I wanted to make sure I was able to try each and every one by the time I left.  I actually think I came pretty close.  Still – the one that I kept coming back to was the éclairs.  There were a few different varieties, but it didn’t matter to me – it was not the filling that I craved, it was the pastry.  It was not sweet, and the outside was just slightly crisp, while the inside was soft and egg-like.  Just amazing.

Now when I visit France, I am still just as enthralled with the Patisseries, but the pastries cost much more than a dollar – and now it is my daughter who is on a mission to try as many as she can. I usually just get a couple of bites of whatever she chooses – which is fine by me – there is so much good food to eat in Paris – I have to save room for everything.  She is definitely into the éclairs as well – and would you believe, we actually have a favorite spot?  It is on the Isle St. Louis, and their chocolate éclairs are the best I have had.  They serve them fresh and cold, and the filling is just as bit as delicious as the pastry.

I am not sure why it has taken me so many years to make these – but for some reason it has.  I saw this recipe in Bon Appetit, and decided it was finally time.  I have a friend who thinks these are a snap to make – she whips them up all the time – well, she must have some seriously strong arms.  That was the hardest part – mixing in all those eggs.  Once I got past that part – the rest was pretty easy.  I may have taken them out of the oven a little too soon, because mine deflated slightly – but it didn’t matter a bit.  They were amazingly delicious, I was smiling from ear to ear.  So – the next time I need a little taste of France, I guess I can just whip these up – pretty soon I will have monster arms too…then maybe I could fly myself to France and get the real thing?  Good thing I have another trip planned.

Ingredients

  • 1/2 cup whole milk
  • 1/2 cup (1 stick) unsalted butter, cut into 8 pieces
  • 1 teaspoon plus 2 tablespoons sugar
  • 1 teaspoon kosher salt
  • 1 cup all-purpose flour
  • 6 large eggs
  • 2 1/2 cups heavy cream
  • Powdered sugar (for dusting)

Special Equipment:

  • Two pastry bag tips, 1/2-inch and 1/2-inch open star

Preparation

Line 2 baking sheets with parchment paper. Fit 1 large pastry bag (or a plastic freezer bag with 1/2-inch cut from one bottom corner) with plain 1/2-inch tip.

Bring milk, butter, 1 tsp. sugar, salt, and  1/2 cup water to a boil in a medium sauce-pan over medium heat, stirring occasionally. Add flour all at once; reduce heat to medium-low. Stir vigorously with a wooden spoon until a dough forms and pulls away from sides of pan, 1–2 minutes. Continue beating vigorously until a thin dry film forms on bottom and sides of pot, about 1 minute. Transfer to a bowl.

Add 1 egg and stir vigorously with wooden spoon until egg is incorporated  and dough looks dry again, about 2 minutes. Repeat with 4 more eggs, adding one at  a time and stirring vigorously to incorporate before adding the next. Dough should be smooth, shiny, and thickened.

Spoon dough into prepared pastry bag; pipe out 2 1/2-inch-diameter rounds on prepared sheets, leaving 2 inches between rounds.

DO AHEAD: Freeze the piped dough rounds on the baking sheets, then transfer to resealable plastic bags and freeze for up to 1 month. Place on parchment paper-lined baking sheets, spacing apart (do not defrost) before continuing with recipe.

Arrange racks in upper and middle thirds of oven and preheat to 450°. Whisk remaining egg with 2 tsp. water and  brush dough rounds all over with egg wash.

Transfer baking sheets to oven; turn  oven off. After 10 minutes, heat oven to 350° and bake for 10 minutes. Rotate pans front to back and top to bottom; continue baking until deep golden brown all over, about 10 minutes longer (puffs will deflate if removed from oven before fully baked). Transfer  puffs to a wire rack and let cool completely.

Using a serrated knife, gently slice the  top quarter off each puff; transfer tops to a plate. With your finger, gently push down the  soft film of cooked dough inside each puff.

Prepare a second pastry bag (or freezer bag) with 1/2-inch open-star tip. Beat heavy cream and remaining 2 Tbsp. sugar in a large bowl until soft peaks form. Spoon whipped cream into prepared pastry bag. Fill each puff with cream, finishing with a generous ring  of cream on top. Dust tops of cream puffs with powdered sugar; place atop puffs.

For a printer-friendly version of this recipe, please click here:  Cream Puffs

Cream Puffs 2

Watermelon Lime Jello Shots

Summer decided to come on the 4th of July, and it couldn’t have come at a better time.  I looked at the 10 day forecast, and we are supposed to have the nicest stretch of weather we have since seen last fall.  You can hear the people cheering in the streets, so much so that they kept my husband awake last night.  So, what did I make to celebrate the fact that summer is finally here?  I think you can see by the picture…I definitely had some fun with this one.

The other day my husband was talking about watermelon – and how reminiscent it was of summertime when he was growing up.  We don’t usually have watermelon in the house – mostly because there are only 4 of us, and I am not a huge fan – and really, there is only so much watermelon you can eat.  It is not like these, where there really is no limit.  So, instead of playing the watermelon game, and trying to make sure my family eats it all before it goes bad, I choose smaller quantity of fruits to keep in the house.  Last year, I remember seeing these – and I went nuts.  I have been waiting for the perfect time to make these all year – and the day finally arrived.  They were fantastic – such a big hit.  Of course everyone was afraid to have more than 1 or 2, but really, you need to have 10 to equate to one drink.  They were a perfect little treat.  Next time I will make them for the kids without alcohol – because they were all looking at them longingly.   The chocolate chips really make them look adorable, but I was also going with taste – and the thought of chocolate chips, cherry and vodka, just didn’t sound that appealing – but that is another option.

So – go have some fun with summer, and try these little cuties – with or without alcohol they are sure to give everyone a smile – and the bonus?  They won’t last long enough to worry about them going bad…

Ingredients

  • 10 limes, pulp removed
  • 1 small box red Jello (I used cherry – does watermelon jello exist?)
  • 1 cup boiling water
  • 1 cup cold vodka (or if you are going non-alcoholic, just plain water)
  • Mini chocolate chips (optional)

Preparation

Cut the limes in half, then squeeze out the juice (which will make getting the rest of the pulp out easier).  I then used my fingers to scrape out the rest of the pulp.  This is not an easy task, and will take time, but the cleaner your limes are, the better they will look.  I was actually able to get all the lime pulp out, like I was peeling an organge.

Take a mini-muffin tin, and place a couple of damp paper towels over the wholes, with slack.  This will give the limes a way to sit in the tins without rolling around.  Set lime halves empty side up on top of the towels, one in each muffin mold.

Add 1 cup of boiling water to the Jello powder, and stir for 2 minutes until fully dissolved.  Stir in cup of cold vodka (or water, if non-alcoholic).  Pour mixture into lime halves, filling all the way to the top.

Chill the jello-limes in the fridge for at least 2 hours.

One at a time, turn the jello-limes over on a cutting board, and using a sharp knife, carefully cut each lime half in half again, making wedges.

Stick in chocolate chips, if desired.

For a printer-friendly version of this recipe, please click here:  Watermelon Lime Jello Shots

Chocolate Peanut Butter Tag-A-Dos Cheesecake

It is almost that time again…that time we all love…yes, Girl Scout Cookie season!!  It is definitely one of the highlights of winter.  A few weeks ago, a woman on my team (who just happens to be a Girl Scout Troop Leader) told me about this recipe contest that the Girl Scouts of Western Washington were holding.  I gave it a quick glance, but thought of all the things going on in my life right now, and politely declined.  Well, she didn’t give up that easily – and pretty soon recipes started floating around in my head.  I couldn’t get them out, they were haunting me.  I knew what I had to do.

My first thought was Thin Mints, everyone’s favorite – but I just couldn’t come up with anything that original.  Then I moved onto Peanut Butter.  There were two cookies of that variety, and I decided I had to come up with something that had both.  I was inspired by this blog, but decided to go the cheesecake route.  I finally decided on a chocolate cheesecake with a Do-Si-Dos crust – but then I needed some type of ganache or frosting on top, so I could put 1/2 Tagalong cookie on top.  I settled on a cream cheese peanut butter ganache.

I brought them to a Super Bowl party tonight, and they were a hit.  The best quote of the night was “I feel like I am biting into a giant Tagalong cookie.”  He was right – as soon as I tried one, that was exactly my feeling as well.  So – right now I am hoping to be a finalist.  If I am, I would like to do something I have never done with my blog before.  If I win the grand prize, I would like to donate the money to a charity – and I am going to ask you – my readers – to choose the charity.  That’s right – so stayed tuned for more on that – no sense in giving more details if I am not a finalist.  I will be keeping my fingers crossed – but in the meantime, Angie – these are for you – and there will be plenty to taste at work tomorrow!  For everyone else – Girl Scout Cookies are on sale from March 2nd to the 18th – and they have even created a cookie locator, as well as an app, that tells you exactly where girls are selling cookies in your neighborhood – so then you too can support your local Girl Scouts!!

Ingredients

Cheesecakes

  • 20 Do-si-dos (1 box)
  • 1/2 cup butter, melted, divided
  • 1/2 cup Hershey’s cocoa
  • 3 (8 oz.) packages cream cheese
  • 14 oz. sweetened condensed milk
  • 3 eggs, lighted combined
  • 2 teaspoons vanilla extract

Ganache

  • 6 ounces cream cheese
  • 1/3 cup confectioners’ sugar
  • 1/2 teaspoon salt
  • 1 cup creamy peanut butter (not natural)
  • 1/2 teaspoon vanilla extract
  • 1/2 cup heavy cream
  • 12 Tagalong Cookies, cut in half

Makes 24 standard cupcakes sized cheesecakes

Preparation

Cheesecakes

Pre-heat the oven to 300 degrees F.  Line standard muffin tins with cupcake liners.

Place Do-si-dos in a food processor and blend until the mixture resembles fine crumbs.  Mix with 1/4 cup of melted butter to make a crust.  Press 1 scant tablespoon of crumbs into the bottom of each cup.  Press down using the back of a wooden spoon.  Bake for 6-8 minutes, or until lightly browned.  Let cool.

Stir together the cocoa and rest of the melted butter (1/4 cup).  Beat cream cheese until fluffy.  Add the cocoa and butter mixture.  Gradually mix in the sweetened condensed milk.  Lightly mix the egg and vanilla, then add to the cream cheese mixture until combined well.  Spoon into the cups (about 3/4 full).  Bake 30 – 35 minutes, or until set.  Cool.

Ganache

Beat cream cheese and confectioners’ sugar with a mixer on medium speed. Add salt, then peanut butter, then vanilla. Add the cream and blend well.  Chill the mixture in the refrigerator for about an hour.  Once the cheesecakes are completely cooled, pipe the ganache onto the cheesecakes, leaving a nice border around the edge.  Place a Tagalong cookie (that has been cut in half) in the center.

Keep the cheesecakes chilled until ready to serve.

For a printer-friendly version of this recipe, please click here:  Chocolate Peanut Butter Tag-a-dos Cheesecake

Add to FacebookAdd to DiggAdd to Del.icio.usAdd to StumbleuponAdd to RedditAdd to BlinklistAdd to TwitterAdd to TechnoratiAdd to Yahoo BuzzAdd to Newsvine

Pumpkin Bread Pudding

Happy Thanksgiving everyone!!  What a day – I hope everyone ate very well today, I know I did.  I actually didn’t feel like I cooked that much, I had lots of helpers – including my husband who made an incredible smoked turkey on the Big Green Egg.  I can’t wait for leftovers tomorrow.

So – what did I make for Thanksgiving?  Pretty much the usual – and like I said, I had a lot of help.  My mother baked a pie and made the stuffing and gravy, my sister brought cheese from LA, my friends brought the vegetables and a delicious chocolate pecan pie, and I filled in the rest – mashed potatoes, apple pie, pumpkin bread, and don’t forget about the pre-dinner cocktails.  I did make something different last night though for dessert – something I hadn’t made in a long time (at least a couple of years) – pumpkin bread pudding.  I remember making this and absolutely loving it – not only was it easy, it tasted like you slaved over it all day, and boy was it creamy and delicious.  Since I have a house full of people to feed, I figured it was time again.  Everyone loved it – and again, it was so easy – it baked while we ate dinner, and was warmed when I served it.  Even though pumpkin season is basically over, you can make an exception for this one.

I hope everyone had a marvelous day celebrating whatever you are thankful for – I am thankful for my family and friends, the people I work with everyday, and for food – because if it wasn’t for that, I wouldn’t be sitting here writing tonight…and you wouldn’t be reading this right now.

Ingredients

  • 2 cups half and half
  • 1 15-ounce can pure pumpkin
  • 1 cup (packed) plus 2 tablespoons dark brown sugar
  • 2 large eggs
  • 1 1/2 teaspoons pumpkin pie spice
  • 1 1/2 teaspoons ground cinnamon
  • 1 1/2 teaspoons vanilla extract
  • 10 cups 1/2-inch cubes egg bread (about 10-ounces)

Preparation

Preheat oven to 350°F. Whisk half and half, pumpkin, dark brown sugar, eggs, pumpkin pie spice, cinnamon and vanilla extract in large bowl to blend. Fold in bread cubes. Stir in golden raisins. Transfer mixture to 11×7-inch glass baking dish. Let stand 15 minutes. Bake pumpkin bread pudding until tester inserted into center comes out clean, about 40 minutes.

Serves 10-12

For a printer-friendly version of this recipe, please click here:  Pumpkin Bread Pudding

Add to FacebookAdd to DiggAdd to Del.icio.usAdd to StumbleuponAdd to RedditAdd to BlinklistAdd to TwitterAdd to TechnoratiAdd to Yahoo BuzzAdd to Newsvine

Margarita Ice-Cream Sandwiches

Years ago I had an idea…I should open a store where I sell different types of cookies, and different flavors of ice-cream, and you can choose the top, bottom, and insides of your custom ice-cream sandwich.  I thought it was brilliant, but I wasn’t about to quit my day job, so it just ended up being a fantasy.  Over the years, I have seen glimpses of this idea come to fruition – but nothing exactly like it until my last trip to New York City.

New York City is a food lovers mecca – and I have to go every year to get my fix.  I love spending weeks figuring out exactly where we are going to eat, and carefully planning each meal.  This last trip went extremely well, I am not sure we had a bad dish all week – and we even stumbled upon some bonus places that we were not anticipating (Eataly being one that is not to be missed).  A week before we were leaving, I heard about The Meatball Shop – and even though I didn’t have a meal to spare – once I read about this place, I had to switch some things around.  We had to go…and we were so glad we did.  The meatballs were amazing, seriously, the best I have ever had – but get the dessert – exactly my store.  They had 6 different cookies, 6 different ice-creams, and you chose the top and bottom cookie, then your ice-cream – and you have created your very own creation.  For $4, it could not be beat.  The entire week we were thinking about how we could go back.

I saw this recipe in Cooking Light, and I really felt like they were thinking outside the box with this one.  I loved the salted sugar cookies along with the lime sherbet mixed with vanilla ice-cream – it was genius.  The flavors were perfect together, and if you closed your eyes, you thought you were drinking a margarita.  My daughter on the other hand, was not too excited when she bit into the cookie and realized that it was not just sugar on top, it was also salt.  She was not pleased.  But for adults who love that combination, it cannot be beat.  So – if you can’t get to NYC anytime soon, and you are craving a creative ice-cream sandwich, here is a great one for you – although it might just be too good for kids…they need to acquire the taste first.

Ingredients

  • 1/2 cup unsalted butter, softened
  • 1 cup sugar
  • 1 large egg
  • 5 teaspoons grated lime rind, divided
  • 2 tablespoons fresh lime juice
  • 11 1/4 ounces all-purpose flour (about 2 1/2 cups)
  • 1 1/2 teaspoons baking powder
  • 1/8 teaspoon table salt
  • 1 teaspoon turbinado sugar
  • 1/2 teaspoon coarse sea salt
  • 2 cups vanilla reduced-fat ice cream, softened
  • 2 cups lime sherbet, softened

Preparation

Place butter and sugar in a large bowl; beat with a mixer at medium speed for 5 minutes or until light and fluffy. Add egg, 1 tablespoon lime rind, and lime juice; beat 2 minutes or until well combined.

Weigh or lightly spoon flour into dry measuring cups; level with a knife. Combine flour, baking powder, and 1/8 teaspoon table salt; stir with a whisk. Add flour mixture to butter mixture, and beat just until combined.

Divide dough into 2 equal portions. Shape each portion into a 6-inch log. Wrap logs individually in plastic wrap; chill 3 hours or until firm.

Preheat oven to 350°.

Cut each log into 16 (about 1/3-inch-thick) slices, and place 1 inch apart on baking sheets lined with parchment paper. Sprinkle the cookies evenly with remaining 2 teaspoons lime rind, turbinado sugar, and sea salt. Bake at 350° for 10 minutes or until edges are lightly browned. Cool for 2 minutes on pans on a wire rack. Remove from baking sheets, and cool completely on wire rack.

Place vanilla ice cream and sherbet in a medium bowl; lightly fold and swirl together. Scoop 1/4 cup ice cream mixture onto bottom of one cookie, and top with one cookie. Cover each sandwich with plastic wrap; freeze 4 hours or until firm.

For a printer-friendly version of this recipe, please click here:  Margarita Ice Cream Sandwiches

Add to FacebookAdd to DiggAdd to Del.icio.usAdd to StumbleuponAdd to RedditAdd to BlinklistAdd to TwitterAdd to TechnoratiAdd to Yahoo BuzzAdd to Newsvine

Oven Crespella with Nutella Sauce

For many of us, our days are flanked by sweets on either side.  Along with morning tea or coffee, the first food many people put into their body in the morning is something sweet.  Then the last thing many people eat before going to bed, is also a sweet.  I know it definitely gets my kids going in the morning – even though we try to limit the syrup intake.  I saw this recipe in Gourmet a long time ago, and it was one that I knew I would get to eventually.  A pancake for dessert – sounds perfect!  I have always wanted to make a pancake in the oven – a big giant one, and this was my chance.  I told the girls that we were going to have a “special dessert” that was like a pancake – and they were so excited they ate up their dinner in record time.  When the crespella came out of the oven, it looked amazing.  I cut it up and drizzeled the Nutella sauce on top – and I just couldn’t wait to dig right in.  It was warm, sweet, tender, delicious – and the Nutella sauce on top was just perfect.  I had seconds, and then thirds…it was fabulous.

The next morning when I woke up – I went right to the refrigerator, and what did I eat?  The leftovers…

Ingredients

  • 3/4 cup all-purpose flour
  • 2 large eggs
  • 1/4 cup granulated sugar
  • 1 teaspoon pure vanilla extract
  • 1/2 teaspoon salt
  • 1 1/2 cups plus 3 tablespoons whole milk, divided
  • 2 tablespoons unsalted butter
  • 1/2 cup chocolate-hazelnut spread such as Nutella
  • Confectioners sugar

Preparation

Put a 12-inch ovenproof heavy skillet in middle of oven and preheat oven to 450°F.

Whisk together flour, eggs, sugar, vanilla, salt, and 1 1/2 cups milk in a bowl.

Add butter to skillet and heat in oven until golden, about 1 minute. Pour batter into skillet and bake until puffed, set, and golden, 20 to 25 minutes.

Meanwhile, whisk together Nutella and remaining 3 tablespoons milk until smooth. Thin sauce with additional milk if necessary.

Cool pancake in skillet on a rack 5 minutes (it will sink). Dust with confectioners sugar and drizzle with sauce.

For a printer-friendly version of this recipe, click here:  Oven Crespella with Nutella Sauce

Add to FacebookAdd to DiggAdd to Del.icio.usAdd to StumbleuponAdd to RedditAdd to BlinklistAdd to TwitterAdd to TechnoratiAdd to Yahoo BuzzAdd to Newsvine