Samoas Ice Cream Pie

Somoas Ice-Cream Pie

Yes, it is that time again – not just Super Bowl time, but GIRL SCOUT COOKIE TIME!!!  How can you resist those beautiful colored boxes filled with deliciousness, and sold by girls who are learning to be leaders. Last year I decided to skip the Girl Scout Cookie Recipe Contest, I was just too busy, and I couldn’t fit it in.  This year I am even busier, but when I saw the email that they were going to be celebrating the 40th Birthday of the Samoas Cookie, I just had to make time.  That combination of chocolate, caramel, coconut and shortbread is a winner…and just happens to be my favorite cookie.

The Girl Scouts are an amazing organization.  Their mission is building girls of courage, confidence, and character, who make the world a better place, by helping them discover their inner strength, passions, and talents. Working at a company that is predominantly male has really taught me how important it is for women to be heard – and without that confidence and courage, it can be difficult.  Fortunately this organization is teaching girls at a young age how important it is, so when they grow up and are in the workplace, they won’t even have to think about it.  They will hold their head high, proud of what they are able to accomplish.

As in the past, if I win the grand prize, I would like to donate the money to a charity – and I am going to ask you – my readers – to choose the charity.  That’s right – so stayed tuned for more on that – no sense in giving more details if I am not a finalist.  This competition is stiff – I know from experience – so let’s hope that I can at least make it as a finalist this year.

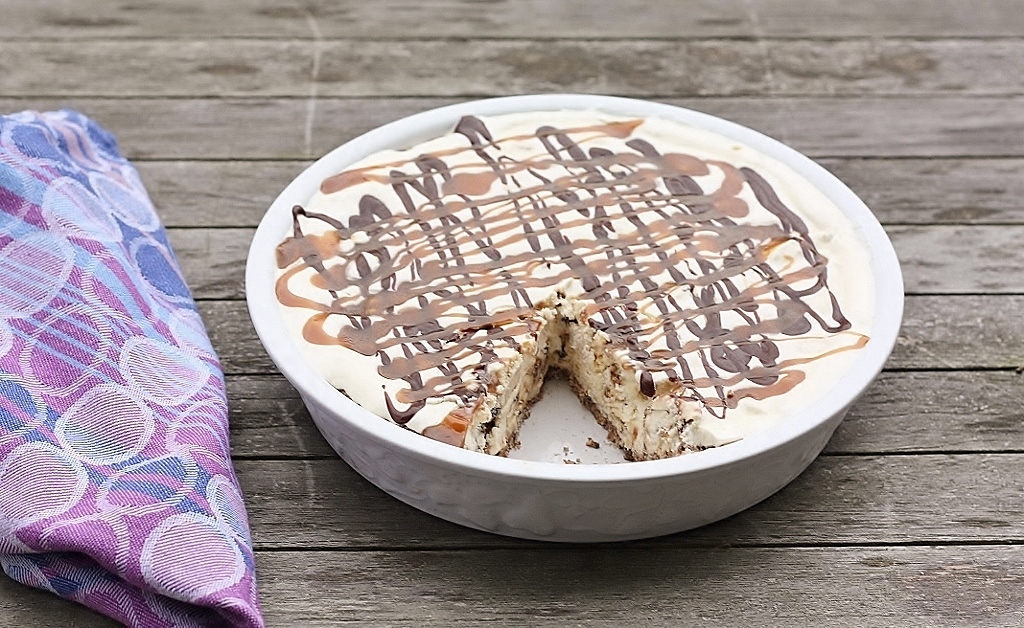
So why did I choose this pie?  Well, I had a lot of different ideas, but ice-cream just kept coming back to me.  I think it’s because I have secretly always wanted to make Samoas ice-cream.  And oh boy is it amazing.  Although the crust on this pie really was the kicker – once I took those cookies and put them into the food processor – I knew they would make an unbelievable crust – and I was right.  So not only do you have a cookie bottom, you have cookies in the ice-cream as well, and then with some of my grandmother’s chocolate sauce, and a caramel sauce that was easy as pie to make – you have an ice-cream pie that is absolutely over the top.  If you don’t have an ice-cream maker, you can definitely just buy some vanilla ice-cream, and fold in the coarsely chopped cookies, before adding it to the pie.  Darigold was nice enough to put in some coupons with the cookies, so I decided to go home-made.  YUM.

If after reading this post, you are ready to go get yourself some cookies – don’t fret – you can find the cookies here!  Unfortunately you will have to wait a little bit, as the cookie sales happen from February 27 – March 15 – but it will be here before you know it.  Happy Birthday Samoas!!

Ingredients

crust

  • 1 1/2 boxes Samoas Cookies
  • 2 tablespoons melted butter

ice-cream

  • 2 eggs
  • 3/4 cup sugar
  • 2 cups heavy cream
  • 1 cup whole milk
  • 2 teaspoons vanilla
  • 1/2 box Samoas Cookies, coarsely chopped

fudge sauce

  • 1/4 pound butter
  • 2 oz. unsweetened chocolate
  • 1/2 cup cocoa powder, sifted
  • 1 1/2 cups sugar
  • 1 cup evaporated milk
  • 1 teaspoon vanilla extract

caramel sauce

  • 1 cup Brown Sugar
  • 1/2 stick Butter (4 Tablespoons)
  • 1/2 cup Half-and-half Or Cream (cream Will Make It Thicker)
  • 1 Tablespoon Vanilla
  • Pinch Of Salt

Preparation

Make the crust.  Pre-heat the oven to 350 degrees.  Put the Samoas into the food processor and pulse until the cookies are finely ground.  Add to a bowl.  Melt the butter and pour over the cookie crumbs.  Mix well, so that the butter is evenly distributed.  Press the cookie mixture into a 9″ pie pan, and press up the sides of the pan evenly.  Bake for 8 minutes, and then cool completely.

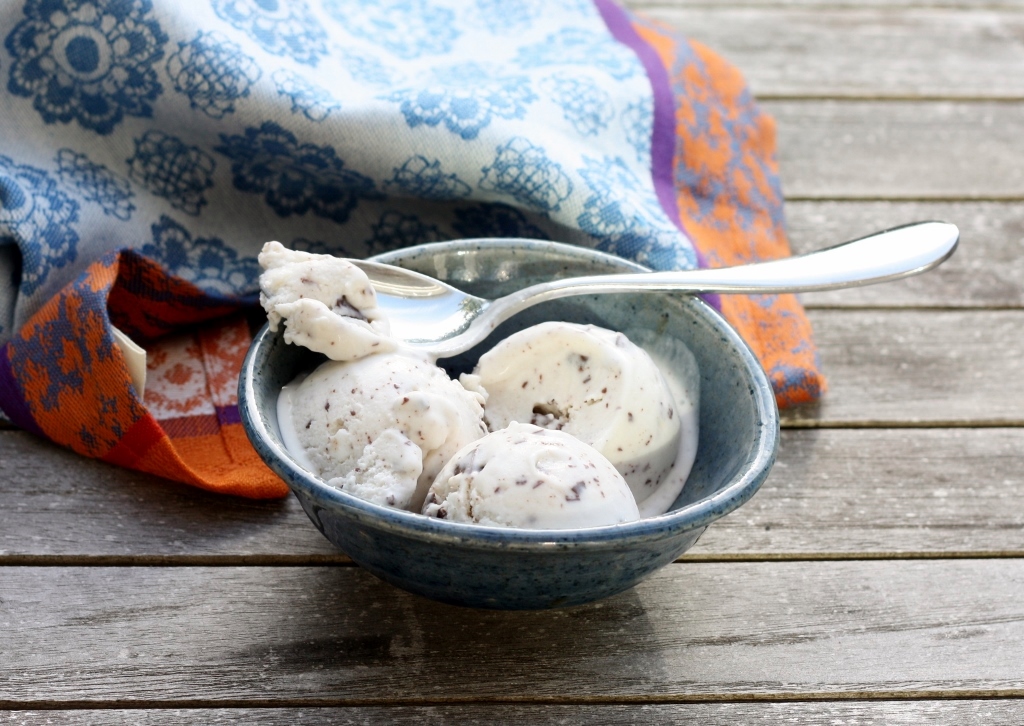
Make the ice-cream.  Whisk the eggs in a mixing bowl until light and fluffy, 1 to 2 minutes. Whisk in the sugar, a little at a time, then continue whisking until completely blended, about 1 minute more. Pour in the cream, milk, and vanilla and whisk to blend.  Transfer the mixture to an ice cream maker and freeze following the manufacturer’s instructions.  When the ice-cream is done, add the coarsely chopped Samoas and fold into the ice-cream.  Put into the freezer for at least 1 hour.

Make the fudge sauce.  Melt butter over medium heat.  Add unsweetened chocolate & melt, stirring. Add cocoa, sugar, and milk and stir well to combine. Boil a few minutes, stirring. Turn off the heat then add vanilla and salt. Stir to combine.  Heat GENTLY in microwave to soften & serve.

Make the caramel sauce. Mix all ingredients in a medium saucepan over medium-low to medium heat. Cook while whisking gently for 5 to 7 minutes, until thicker. Turn off heat. If sauce is thin, just continue cooking for a few more minutes.

Put the pie together.  Add the ice-cream to the pie pan with the cooled crust – spreading evenly on top.  Soften the fudge sauce and caramel in the microwave, and drizzle on top of the pie.  Put back in the freezer until you are ready to serve.  Let the pie sit on the counter for about 10 minutes before serving so it is easier to cut.

For a printer-friendly version of this recipe, please click here:  Samoas Ice-Cream Pie

Samoas Ice-Cream Pie

Advertisement

Nan’s Fudge Sauce

Ice Cream Pie with Chocolate Sauce

Nothing says Happy New Year quite like a good cocktail, or a nice piece of ice cream cake.  At least that’s what we decided this year.  After a week off from work, and we still had New Year’s to look forward to, things were looking good.  We had ample time to really think hard about the dessert we would prepare.  Normally I put that kind of thought into the cocktails that I make, but this year things were a little different.  I really put together the cocktail list in a matter of minutes, but we spent hours going back and forth on the dessert.

The dessert was really created around a centerpiece, and that was my grandmother’s chocolate sauce.  My mother had made some when she was visiting, and we still had a lot left over.  This is not your ordinary chocolate sauce either – I seriously could eat it with a spoon, it is so perfectly balanced.  So, it was not crazy at all that we had to create a dessert in order to incorporate her sauce.  Ice cream was of course the first thing we thought of – but it was New Year’s Eve – a special celebration – it had to be outrageous.  I am not sure whose idea it was to create a brownie bottom, but we debated the brownie bottom vs. the chocolate chip cookie bottom for quite some time – at one point we even had both in the dessert – but we ended up settling for the brownie.  Then it was time to choose the ice cream.  Mint chocolate chip was the clear winner for a while, but I just couldn’t get past the fact that some people don’t like mint.  Also – I thought that the richness of the brownie needed some type of vanilla in the ice cream.

It wasn’t until we were at the store – after spending 15 minutes with multiple selections in our cart, that we ended up with chocolate chip cookie dough.  We added a little whipped cream on top, and then poured the chocolate sauce all over.  Wow. That is just about all I can say.  Here’s to a New Year filled with health, happiness, delicious food and creative cocktails.  What more could you want?

Ingredients

Brownie

  • 3 19/50 ounces all-purpose flour (about 3/4 cup)
  • 1 cup granulated sugar
  • 3/4 cup unsweetened cocoa
  • 1/2 cup packed brown sugar
  • 1/2 teaspoon baking powder
  • 1/4 teaspoon salt
  • 1 cup bittersweet chocolate chunks, divided
  • 1/3 cup fat-free milk
  • 6 tablespoons butter, melted
  • 1 teaspoon vanilla extract
  • 2 large eggs, lightly beaten
  • Cooking spray

Chocolate Sauce

  • 1/4 pound butter
  • 2 oz. unsweetened chocolate
  • 1/2 cup cocoa powder, sifted
  • 1 1/2 cups sugar
  • 1 cup evaporated milk
  • 1 teaspoon vanilla extract


  • half-gallon chocolate chip cookie dough ice cream
  • whipped cream

Preparation

Preheat oven to 350°.

Weigh or lightly spoon flour into dry measuring cups; level with a knife. Combine flour and next 5 ingredients (through salt) in a large bowl. Combine 1/2 cup chocolate and milk in a microwave-safe bowl; microwave at HIGH 1 minute, stirring after 30 seconds. Stir in butter, vanilla, and eggs. Add milk mixture and 1/2 cup chocolate; stir to combine.

Pour the batter into a 9-inch square metal baking pan with a piece of parchment paper that over hangs on two of the sides – then butter the parchment. Bake at 350° for 19 minutes or until a wooden pick inserted in center comes out with moist crumbs clinging. Cool in the pan on a rack.

When brownies are completely cool, let the ice cream sit on the counter until it is slightly softened (so it is spreadable).  Spread the ice cream on top of the brownie in the pan.  Cover with plastic wrap, and put back in the freezer until frozen solid.

To make the fudge sauce, melt butter over medium heat.  Add unsweetened chocolate & melt, stirring. Add cocoa, sugar, and milk and stir well to combine. Boil a few minutes, stirring. Turn off the heat then add vanilla and salt. Stir to combine.  Keeps in refrigerator for a few weeks. Heat GENTLY in microwave to soften & serve.

When you are ready to serve, you can lift on the parchment paper and place the entire cake on a cutting board and cut into 16 squares.  Put some whipped cream on each piece, and top with warm chocolate sauce.  Enjoy!

For a printer-friendly version of this recipe, please click here: Nan’s Fudge Sauce

Vegan Mint Chocolate Chip Ice Cream


Vegan Mint Chip

We didn’t have much of a Junuary this year, and I am not complaining.  Summer eased in nicely from Spring, and it has been just spectacular.  We have that dark blue sky, and Mt. Rainer looks like a vanilla ice cream come, with little flecks of chocolate chips.  At least that’s what my husband and I both think – and whenever we look at it, we start craving ice cream.

Aside from cooking on the Egg, my husband doesn’t spend a ton of time researching recipes.  In fact, I am not sure I have ever seen him show much interest in doing that until the egg came along, and it has been so nice to see that we have just one more thing in common.  I am not worried at all about what we will do with our time someday when we retire…the problem will be that we will want to do too much.

So imagine my surprise when he came into the kitchen with a recipe he had found for dairy-free ice cream.  One of our local shops has a vegan flavor at all times, and my husband has developed quite an addiction.  He decided instead of spending $4 on a scoop, that maybe he should just make some himself.  He found this recipe on a blog called The Nourishing Gourmet, and I must say, I was extremely impressed.  Of course I couldn’t let him make it though – I wanted to be the one!  I got super excited to try out this coconut milk ice cream, it looked and sounded delicious.

We ended up making this in a two step process – I wanted to taste it without the mint flavoring first – to really taste that coconut flavor.  Now it was good, but once we added that mint, it took it to a different level.  You would never have known that it was dairy-free.  Now of course, you need to let this thaw slightly on the counter after it has been in the freezer for a while, because it really becomes solid in the freezer – but if you do that, you will not be disappointed.  So now the big question – is Mt. Rainer really Mint Rainer??  Wouldn’t that be something…

Ingredients

  • 2 14 ounce cans of full fat coconut milk
  • 1/3 to 1/2 cup of honey
  • 1 teaspoon organic vanilla extracts, optional
  • 2 teaspoon organic peppermint extract
  • 3 ounces of dark chocolate

Preparation

In a medium size bowl, whisk together the coconut milk, honey, and extracts. Freeze in ice cream maker according to instructions. Meanwhile, finely chop the dark chocolate and add to the ice cream maker the last 30 seconds or so. Freeze to “ripen” or eat right away, soft serve style. If you leave in the freezer for more than a few hours, let it sit at room temperature for about 10-15 minutes to soften before serving. Enjoy!

Meyer Lemon and Mango Sorbet

Meyer Lemon and Mango Sorbet

Sometimes you just need a little mango in your life.  It is spring, and the markets are starting to carry all the different produce that just make you want to have a picnic, or open your windows and let that spring air come through.  Of course in Seattle we get a few days here and there, but for the most part it stays cold and rainy until July.  So, we have to do other things to make us think that the sun is shining brightly outdoors.

My daughters love dessert – but what they love even more is getting dessert at a fancy restaurant.  They don’t get to go to fancy restaurants all that often, in fact, hardly ever.  I think because of that, it is even more special.  It just so happens that recently my younger daughter had the privilege of eating somewhere very unique – and for dessert she ordered mango sorbet.  Well, that in and of itself would have been exciting enough, but they brought the sorbet with a beautiful assortment of fresh fruit, and a delicious madeleine.  I swear she has never looked more excited.  She was almost squealing with delight at the thought of digging into this.  She enjoyed it immensely, and it was so much fun to watch.

The other week I was at the market and they had the most beautiful meyer lemons you have ever seen.  They were almost orange in color, and just as soft as can be.  I immediately grabbed them and then slowly walked around the produce section deciding what to do with them.  It was when I saw the pile of mangos that it hit me.  A meyer lemon and mango sorbet – yes!  It was so easy to make up this recipe, I basically just threw the ingredients in a blender then off to the ice cream maker.  It was delicious – entirely spring tasting, and just such a treat.  There is nothing like being able to whip up a batch of sunshine whenever you need to…

Ingredients

  • 2 mangos (about 2 cups of cut up mango)
  • 1/2 cup simple syrup
  • 1/4 cup freshly squeezed meyer lemon juice

Preparation

To make the simple syrup, put 1/2 cup of sugar with 1/2 cup of water in a small saucepan.  Heat until all the sugar has dissolved.  Cool completely.  Add mangos, simple syrup and lemon juice in a blender and puree until smooth.  Put in the refrigerator until nicely chilled.  Add the mango mixture to an ice-cream maker and follow the manufacturer’s instructions.  Freeze for about 4 hours before serving.

For a printer-friendly version of this recipe, please click here: Meyer Lemon and Mango Sorbet

Ice Cream Sandwiches

Ice Cream Sandwiches

I can’t believe it has actually been ice-cream weather all summer.  Ice-cream weather is when it is so hot after dinner, that you need something to cool yourself off with before going to bed.  I didn’t have a ton of ice-cream growing up, except for when I spent time at the beach.  The ice-cream man was definitely the highlight of the day.  I swear that music will always go down in history as the music that makes kids go absolutely nuts.  There is almost a panic that goes on – kids running around yelling “ICE-CREAM MAN!!!”, parents frantically trying to find money, and then the mad rush to the truck – just in case they run out.  One of these summers I will need to take a video of the chaos.

But wait…I have another idea.  What if I was the ice-cream man?  What if I got a big cooler, filled it with homemade ice-cream bars, and walked around to the people sitting on the beach.  No music, no panic, no pressure.  That does sound like fun, doesn’t it.  I always envisioned making different cookies, filing them with different ice-cream – your ice-cream sandwich, your way.  But to tell you the truth, that is really not my ideal ice-cream sandwich.  I am a traditionalist when it comes to ice-cream sandwiches – I still absolutely love those vanilla ones with the thin chocolate cookies – am I the only one?  Don’t get me wrong, I have made some delicious (ok, tremendous) ice-cream sandwiches for this blog, but my heart still has a special place for the traditional ones.

So – when I saw this recipe in Bon Appetit for Ice-Cream Sandwiches, and saw that the recipe was for making very thin cookies, I could hardly wait.  Of course, when I was done with the cookies, and asked the girls what kind of ice-cream I should use – it was a unanimous vote for mint chip.  I would have actually gone for vanilla, but I have to admit, mint chip sounded pretty darn good.  Wow, these were definitely the real deal.  They were chocolaty, slightly crunchy but soft at the same time, and just the perfect wrapper for the mint chip.  I think I could do pretty well on the beach with these – hey, a girl can dream, right?

Ingredients

  • 3/4  cup plus 2 tablespoons all-purpose flour
  • 1/4  cup natural unsweetened cocoa powder
  • 1/2 teaspoon baking  soda
  • 1/2 teaspoon kosher  salt
  • 6  tablespoons (3/4 stick) unsalted butter, room temperature
  • 1/2 cup sugar
  • 1 tablespoon light  corn syrup
  • 1 large egg yolk
  • 1 teaspoon pure  vanilla extract
  • 1 tablespoon sour  cream
  • 1 pint ice cream (any flavor)

Preparation

Whisk flour, cocoa powder, baking soda, and salt in a medium  bowl. Using an electric mixer, beat butter, sugar, and corn syrup in another  medium bowl until light and fluffy, about 3 minutes. Add egg yolk and vanilla;  beat until combined.

Reduce mixer speed to low, add dry ingredients, and mix until  just combined. Mix in sour cream. Form dough into a 3/4-inch-thick square, wrap  tightly in plastic, and chill until firm, 2–3 hours.

Preheat oven to 350°. Roll out dough between 2 sheets of  parchment to about 1/8-inch thickness. Transfer dough (still between parchment)  to a large baking sheet and chill until firm, at least 30 minutes. Remove top  sheet of parchment (it will come away easily if dough is well chilled) and trim  to a 14×10-inch rectangle. Bake cookie until dry and just set at edges, 8–10  minutes. Transfer baking sheet to a wire rack; let cookie cool.

Trim cookie to a 12×9-inch rectangle, then cut into twelve  3-inch squares. Scoop ice cream into a medium bowl and mix just until softened,  2–3 minutes. Turn 6 cookies bottom side up. Dividing evenly, scoop ice cream on  top and flatten slightly; top with remaining cookies, pressing down gently.  Place sandwiches on a parchment-lined baking sheet and freeze until firm, at  least 4 hours. Cut sandwiches in half on a diagonal to make triangles. Wrap in  parchment, if desired, and freeze until ready to serve.

DO AHEAD: Ice cream sandwiches can be  made 1 week ahead. Keep frozen.

For a printer-friendly version of this recipe, please click here:  Ice Cream Sandwiches

Roasted Strawberry-Buttermilk Sherbet

Roasted Strawberry-Buttermilk Sherbet

Weddings come in all forms, but there is usually a few things that are common in all (aside from a bride and groom), and that is the food.  In fact, what large celebratory gathering does not involve food?  Food seems to bring people together…for good reason.

When I got married almost 17 years ago, we had a lot going on.  We were moving from Denver to Seattle, with new jobs, and we had just purchased our first house.  I needed something simple, somewhere my grandparents who were not extremely mobile could get to, and since we had to get married in November…someplace inside.  We found the right balance, with a lot of help from my mother, and it was a spectacular night, with the food being definitely one of the highlights.

My sister got married this weekend, and her goal was not to have a wedding, but an experience.  As busy as she is, she really put a lot of thought into her big day, and it was definitely a night to remember, for more reasons than just the food.  The setting was overlooking LA, there were beautiful spaces around the property to sit in comfort, special cocktails created for the evening, a photo both, a dance floor over the swimming pool, and a spread of food that was unique and delicious.  Of course no family function could be complete without the usual family drama, but she stayed out of it, and looked like she was having the time of her life.

The food was what I would describe as comfort food at its finest.  The dessert table though was really something else.  There was nothing complicated about it, just simple rustic treats – chocolate chip cookies, hand pies, and a strawberry trifle.  My mother couldn’t get over how delicious everything was, and the trifle reminded me of this recipe I found in Bon Appetit last month.  The roasted strawberries were something else, and I knew as I tasted them coming out of the oven, they would make the most perfect base for this sherbet.  This is summertime at its finest – and hopefully you can still find some fresh strawberries around to try this one before next summer.

Here’s to my sister – who waited a long time to marry the perfect man for her.  If the wedding is any indication of the rest of their lives together, they are looking forward to a lot of fun times ahead with beautiful surroundings, and simply delicious food.

Ingredients

  • 4 cups strawberries (about 1 pound), hulled, halved  or quartered if large
  • 1 cup sugar
  • 1/2 vanilla bean, split lengthwise
  • 1 1/2 cups buttermilk
  • 1/3 cup sour cream
  • Pinch of kosher salt
  • Special equipment: An ice cream  maker

Preparation

Preheat oven to 425°F.  Combine strawberries and sugar in a 13x9x2″ baking pan. Scrape in seeds from  vanilla bean and add pod; toss to combine. Roast berries, stirring occasionally,  until juices are bubbling, 15-20 minutes. Let cool.

Discard pod. Purée  berries, buttermilk, sour cream, and salt in a blender until smooth. Process  mixture in an ice cream maker according to manufacturer’s instructions. Transfer  sherbet to an airtight container and freeze until ready to serve.

DO AHEAD: Sherbet can  be made 1 week ahead. Keep frozen. Let soften at room temperature 15 minutes before serving.

For a printer-friendly version of this recipe, please click here:  Roasted Strawberry-Buttermilk Sherbet

Chocolate, Cinnamon, and Coffee Ice Cream Sandwiches

Chocolate, Cinnamon and Coffee Ice Cream Sandwiches

Summer came and hit us all in the head this weekend – I must say, there wasn’t much of a Junuary this year, which is a good thing, and a bad thing.  Of course we had our share of rainy days, but nothing like our normal kick-off to summer vacation.  I am sitting here typing at almost 8pm, sweating bullets in my non-air conditioned home, where the temperature on the thermostat is reading 83 degrees (and that is on the main floor, it is hotter upstairs).  Ok, yes, I am officially a wimp.  After almost 18 years in Seattle – I have forgotten what it is like to live with hot weather.  The funny thing is each summer when we travel back-east for the summer grandparent tour – if it is not in the 90s, I am disappointed.  But I am usually on vacation at that time, and most places have AC…unlike here.

Last night my husband and I had a date night – it was the first in many weeks, and we were really looking forward to it.  We decided to try a new place – a new restaurant opened by a Chef/Restaurateur that we really love – it got a lot of local hype, and the space and menu looked amazing.  The space was even more beautiful in person, really high ceilings, more of a modern rustic feel, and extremely bright – but when we got there our table wasn’t ready so we decided to sit at the bar.  This was actually the highlight of our meal.  The bartender did a really nice job with the drinks – the bar was not extensive, which again proves, you don’t need a lot to make really good drinks.  The problem was the bar stools were too low – and the counter came up to my upper chest.  I felt like a kid.  If it wasn’t for that, we probably would have just eaten at the bar (which is definitely something we love to do), but I didn’t think I could comfortably eat my meal – so we waited for our table to be ready.  45 minutes after our reservation, they finally sat us.  If we were not paying for a babysitter, it probably would have been fine – but the one drink they took off the bill, didn’t really make it even.

The biggest disappointment was the food – although it tasted good, it was not noteworthy – I would rather eat my husband’s chicken on the egg any day of the week – and the pork he had was fine, but nothing to write home about.  Even though we had 2 appetizers and 2 main courses, we were still hungry at the end of the meal.  At that point we were both sweating – there was no air-conditioning (which is not uncommon), and the delay in getting our table and the slow service afterwards just made things a bit worse.  There was no way we were waiting for dessert – especially when the 3 choices didn’t really appeal to us.

So, what is the best dessert for a hot summer’s night – what would have actually gotten me to sit there longer and endure the heat and slow service?  Definitely these ice-cream sandwiches from Bon Appetit.  We changed the recipe slightly to appeal to our cinnamon loving tastes – and all I can say is WOW.  The cookies are on the softer side, so they are perfect for ice-cream sandwiches, and that coffee ice-cream with that chocolate and cinnamon cookie, it is exactly what this summer weather needs.  Who needs air-conditioning when you can cool off with a summer treat like these.

Ingredients

  • 8 ounces semisweet or bittersweet chocolate 60%–72% cacao), chopped
  • 3  tablespoons  unsalted  butter
  • 1 cup sliced almonds
  • 1/2 cup all-purpose flour
  • 1/2 teaspoon baking  powder
  • 1/2 teaspoon fine  sea salt
  • 1/2 teaspoon ground  cinnamon
  • 2 large eggs
  • 1 cup sugar
  • 1 teaspoon vanilla  extract
  • 1 quart coffee ice cream

Preparation

Arrange racks in upper and lower thirds  of oven; preheat to  325°. Line 2 large baking sheets with parchment paper. Combine chocolate and  butter in a medium heatproof bowl; set over a medium saucepan of simmering  water. Stir until chocolate is melted and mixture is smooth.

Combine almonds, flour, baking powder, salt, and cinnamon in a  food processor. Pulse until almonds are finely ground.  Using an electric mixer, beat eggs, sugar, and vanilla in a  medium bowl until pale and fluffy, 3–4 minutes. Add chocolate mixture in 3  additions, mixing well between additions. With motor running, gradually add dry  ingredients; mix well.  Scoop out a rounded tablespoonful  of dough. Use another spoon  to help push dough onto a prepared baking sheet. Repeat with remaining dough to  make 27 more portions, dividing between sheets and spacing dough 1-inch apart.

Bake, rotating sheets halfway through, until tops begin to  crack and cookies are set, 12–14 minutes (don’t overcook; cookies will firm up  as they cool). Transfer cookies  to wire racks and let cool completely.

DO AHEAD: Cookies can be made 3 days ahead. Store airtight  at room temperature.

Place a large scoop of ice cream on flat side of 1 cookie. Top  with another cookie, flat side down; press down lightly. Freeze on a baking  sheet while preparing remaining sandwiches. Repeat with remaining cookies and  ice cream.

DO AHEAD: Ice cream sandwiches can be made 30  minutes ahead. Keep frozen until ready to  serve.

For a printer-friendly version of this recipe, please click here:  Chocolate, Cinnamon, and Coffee Ice Cream Sandwiches

Snickerdoodle Ice-Cream Sandwich

Food trucks seem to be the biggest rage in Seattle these days.  Down in South Lake Union, where the new Amazon campus is located, the food trucks have decided to set up camp.  My husband has been working in that area for almost 16 years – long before the Amazon Campus moved, and he has watched this neighborhood develop into a food lover’s paradise.  At some point, when I actually have time to take a long lunch someday, I am going to meet him down there and we are going to take a tour of the food trucks.  Supposedly they even have small bites, so you can really sample your way through.

As I mentioned in this post last year,  I always had a vision of an ice-cream sandwich shop, where you sell different types of cookies and different types of ice-cream, and it is up to you to choose.  Last summer we actually found a place in New York City that did just that…and I swear the word is spreading.  I heard that they now have an ice-cream truck in South Lake Union with the same idea.  I missed my calling…

So what is so great about these ice-cream sandwiches?  Well, they were made with the most delicious Martha Stewart Snickerdoodle cookies – which go with just about any ice-cream you can find.  We chose Cinnamon Ice-Cream, but seriously – what doesn’t go well with a Snickerdoodle cookie?  Since my idea for the make-your-own ice-cream sandwich store is foiled, I might as well let you in on my other secret.  This is the best make-ahead summer dessert you can find.  I usually make a big batch, and individually wrap each one.  I stick them in the freezer, and I am set – they are there when you need them.  Sometimes I make my own ice-cream, and sometimes I am short on time (or forget to put the ice-cream insert into the freezer) so I go with Dreyer’s Slow Churned – YUM!!!  So – this summer, why not open your own ice-cream shop?  Or if that is too much trouble, just make a batch of these.  Your friends will come over, and it will be just like you have your own ice-cream shop.  Or you can drive around and hand them out to all your friends…a food truck is born!

Ingredients

  • 2 3/4 cups all-purpose flour
  • 2 tsp baking powder
  • 1/2 tsp coarse salt
  • 1 cups (2 sticks) unsalted butter, room temperature
  • 1 1/2 cups sugar
  • 2 large eggs
  • 2 tbsp sugar
  • 2 tsp ground cinnamon
  • Dreyers Ice-Cream, softened

Preparation

Preheat oven to 350F. Sift together flour, baking powder and salt into a bowl. Put butter and 1 1/2 cups sugar in the bowl of an electric mixer fitted with the paddle attachment. Mix on medium speed until pale and fluffy, about 3 minutes. Mix in eggs. Reduce speed to low; gradually mix in flour mixture.

Stir together cinnamon and remaining 2 tablespoons sugar in a small bowl. Shape dough into 24 (1 1/2-inch) balls; roll in cinnamon sugar. Space 3 inches apart on baking sheets lined with parchment paper.

Bake cookies, rotating sheets halfway through, until edges are golden, 12 to 15 minutes. Let cool on sheets on wire racks.

Match up similar sized cookies – take a scoop of ice-cream, and place it on one half.  Place the other cookie on top, and slowly press together.  Individually wrap in plastic or foil and stick in the freezer until ready to eat.

Makes about one dozen.

For a printer-friendly version of this recipe, please click here:  Snickerdoodle Ice-Cream Sandwich

Coconut Brownie Sundaes

This is the story of my life in one sentence:  I can always do more…  Unfortunately this sentence plagues me day in and day out.  I don’t like to waste a minute of time, and what that means is I am constantly running from one thing to the next, leaving very little time in between.  If I feel like I have a little extra time, I take that time and run with it – and then that usually makes me late for the next task.  It is a curse, although on the other hand, I am extremely productive!  And tired.

The other week we were invited to our neighbor’s house for dinner, and was asked to bring dessert.  I really had all day to prepare something, but I wanted to get errands done, and pretty soon I had an hour left to prepare.  I looked in the refrigerator and saw that there was some extra creme of coconut in a container…and that got me thinking about this recipe I found in Bon Appetit ages ago, but never had an opportunity to make it – Coconut Caramel Sauce.  I quickly found the recipe, and decided to try it out – I also had vanilla ice-cream in the freezer, so I decided that ice-cream and caramel would make an excellent dessert.  When I looked at the recipe, it looked so simple, that I knew I would have a little extra time – and wouldn’t brownies just taste delicious with that ice-cream and caramel?  They are super quick, and ridiculously delicious – and the last time I made them, I remember thinking about how awesome they would be with caramel.

So – I got to work, and within an hour, both were ready and waiting.  The caramel was amazing – it was just perfect with those brownies and ice-cream, you would have thought I had been baking all day!!  So, I got lucky, and the problem is that when things work out so well, it gives me no incentive to change…but then again, I have been living my life this way for over 20 years, and as long as I can make brownies and home-made caramel sauce in under an hour, the future is looking brighter and brighter.

 Ingredients

  • 1 cup sugar
  • 1/4 cup water
  • 1 cup heavy whipping cream
  • 1/4 cup sweetened cream of coconut (such as Coco López)*
  • Classic Fudge Brownies
  • 1 1/2 pints purchased French vanilla ice cream

* Sweetened cream of coconut is available in the liquor section of most supermarkets.

Preparation

Place sugar and 1/4 cup water in heavy deep medium saucepan. Stir over medium-low heat until sugar dissolves. Increase heat to high. Boil until mixture turns dark amber, occasionally swirling pan and brushing down sides with wet pastry brush, about 9 minutes. Remove from heat. Immediately add cream and sweetened cream of coconut (mixture will bubble vigorously). Whisk over low heat until caramel sauce is blended and smooth and any caramel bits dissolve. do ahead Can be made 1 day ahead. Cool, cover, and chill. Rewarm slightly over medium heat, stirring often, before using.

Scoop ice cream on top of a brownie. Spoon some of warm caramel sauce over.

For a printer-friendly version of this recipe, please click here:  Coconut Brownie Sundaes

Add to FacebookAdd to DiggAdd to Del.icio.usAdd to StumbleuponAdd to RedditAdd to BlinklistAdd to TwitterAdd to TechnoratiAdd to Yahoo BuzzAdd to Newsvine

Pina Colada Sorbet

First day of school, and we made it…whew!  My older daughter started fourth grade today, and my younger one started kindergarten, what a milestone!  My older daughter was thrilled that she was given a low locker in the high school they moved her program into – and the cushion we brought in to put on the chair actually propped her up enough to reach the desk.  It’s the little things that count…  My younger one was ecstatic about her teacher, and the fact that I got to pack her a lunch today.  Even though her pre-school friends were split up into separate classrooms, she made a new friend today and was so proud.  Aside from the fact that the bus dropped my older daughter off an hour late, at least they picked her up this morning, which was more than other people could say.  All in all, it was a very good day.

Now, back to the weather, my favorite blog topic of late.  All summer we were waiting for the sun to come out, and in the last two weeks, we have not seen a cloud.  The schools are not air-conditioned, and those poor kids coming out of my younger daughter’s classroom, they all looked completely droopy by the end of the day.  The ice-cream man could have made a fortune coming by the school when the bell rang today.  Well, I didn’t have any ice-cream in the house – but this Pina Colada Sorbet from Cooking Light sure was perfect for a day like today.  The pineapple really made this sorbet, and I used very ripe, fresh stuff – as sweet as can be.  For a dairy-free dessert – this cannot be beat.  So – I asked both my girls today if they had any homework today – and they said, “No, but you do”…now I have to get back to the mountain of papers to fill out – lucky me!!  I thought they were the ones in school?

Ingredients

  • 3 cups cubed fresh pineapple
  • 1 cup coconut water
  • 1/2 cup sugar
  • 1 cup light coconut milk
  • 2/3 cup cream of coconut

Preparation

Place first 3 ingredients in a blender, and process until smooth and sugar dissolves. Combine pureed pineapple mixture, coconut milk, and cream of coconut in a bowl; stir with a whisk. Cover and refrigerate until thoroughly chilled.

Pour mixture into the freezer can of an ice-cream freezer, and freeze according to the manufacturer’s instructions. Spoon sorbet into a freezer-safe container; cover and freeze for 2 hours or until firm.

For a printer-friendly version of this recipe, please click here:  Pina Colada Sorbet

Add to FacebookAdd to DiggAdd to Del.icio.usAdd to StumbleuponAdd to RedditAdd to BlinklistAdd to TwitterAdd to TechnoratiAdd to Yahoo BuzzAdd to Newsvine