Pumpkin Bundt Cake with Chocolate Glaze

pumpkin-bundt-cake-with-chocolate-glaze

My daughter has joined the blogging generation – and she is only 10.  She has been watching me do this almost her entire life, but the other week she came home from school and told us that she decided she is starting a blog.  What kind of blog you wonder?  Well, not a food blog – a bunny blog.  A blog dedicated to all things bunny related – called Bunnies 101.  It is adorable – and some would say that she is learning and loving every minute of it.  She researches her topics, writes them up like she is writing an “essay,”  finds fun colorful pictures, practices her typing – and then waits to see what people think.  I love it.

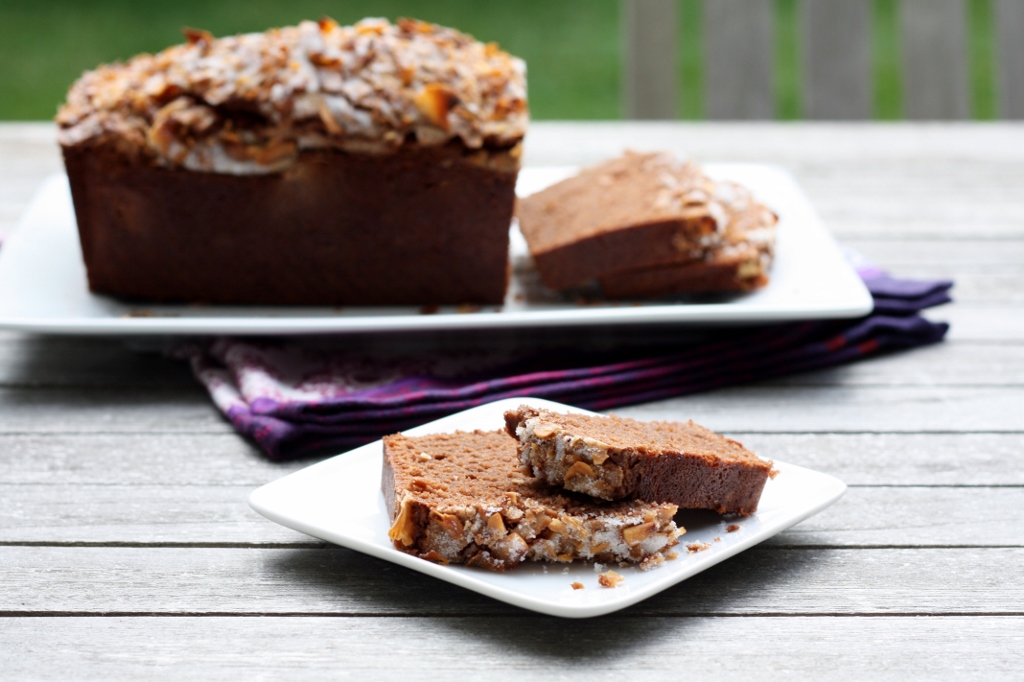
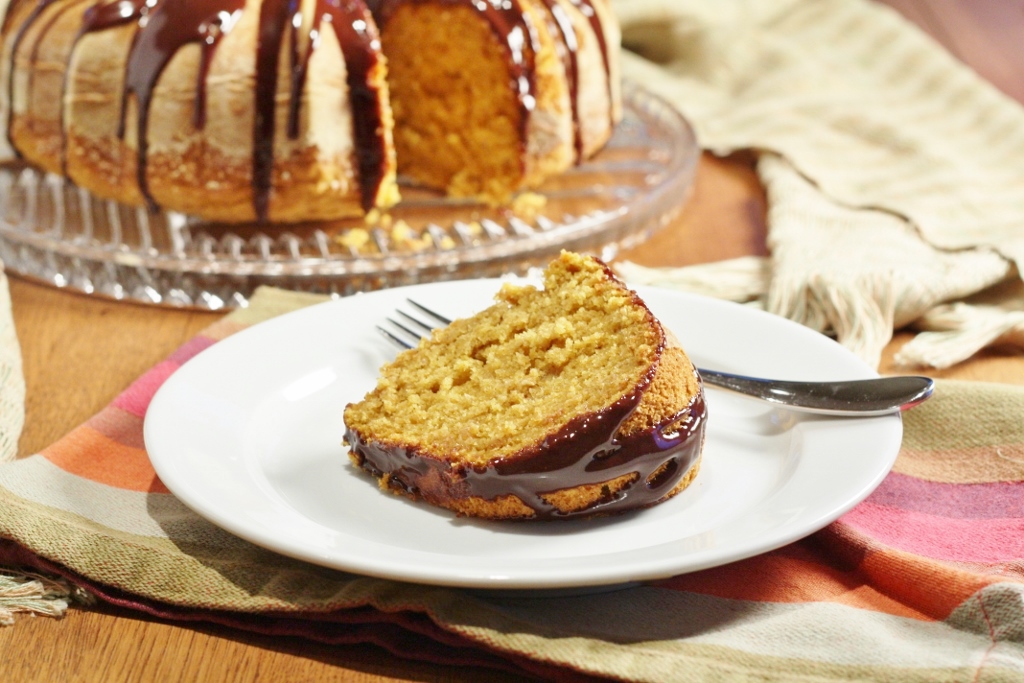
If you can take a break from all of your Thanksgiving planning, check out her blog.  The little bunnies will put a smile on your face.  And here is something else that will put a smile on your face – a nice pumpkin bundt cake.  Yep, it is still that time of year – thank goodness.  I love a good bundt cake, and this one definitely did not disappoint.  This month the folks at King Arthur sent over a couple of different varieties of flour for me to try.  Little did they know, I am already completely sold on their products.  I have tried other varieties of flour, but none compare to King Arthur.  In addition to my favorite flour, this bundt cake recipe I found in Cooking Light has less than half the amount of butter normally found in a bundt cake, and just a small amount of yogurt (Stonyfield Farms of course) to keep it moist.  With the addition of the whole wheat flour – I actually felt like I was eating something good for me – which is perfect going into the Thanksgiving holiday!

Please note: As a Team Stonyfield ambassador, I am being compensated. All opinions about Stonyfield Farm’s products and King Arthur’s products are always my own.

Ingredients

  • 9 ounces all-purpose King Arthur flour (about 2 cups)
  • 7.1 ounces white whole-wheat King Arthur flour (about 1 1/2 cups)
  • 1 tablespoon baking powder
  • 1 1/2 teaspoons ground cinnamon
  • 1/2 teaspoon baking soda
  • 1/2 teaspoon kosher salt
  • 1/4 teaspoon ground ginger
  • 1/4 teaspoon ground nutmeg
  • 7 tablespoons unsalted butter, softened
  • 3/4 cup granulated sugar
  • 1/2 cup packed light brown sugar
  • 2 teaspoons vanilla extract
  • 3 large eggs
  • 1/2 cup plain Smooth & Creamy Stonyfield Farms yogurt
  • 1 (15-oz.) can pumpkin
  • Baking spray
  • 1/4 cup whole milk
  • 2 tablespoons light-colored corn syrup or golden cane syrup (such as Lyle’s)
  • 4 ounces bittersweet chocolate, finely chopped

Preparation

Preheat oven to 325°F.

Weigh or lightly spoon flours into dry measuring cups; level with a knife. Combine flours, baking powder, and next 5 ingredients (through nutmeg) in a large bowl.

Place butter and sugars in a bowl; beat with a mixer at medium speed until light and fluffy (about 5 minutes). Beat in vanilla. Add eggs, 1 at a time, beating well after each addition. Combine yogurt and pumpkin in a bowl, stirring with a whisk. Add flour mixture and pumpkin mixture alternately to butter mixture, beginning and ending with flour mixture. Spoon batter into a 12-cup Bundt pan coated with baking spray. Bake at 325°F for 1 hour or until a wooden pick inserted in the center comes out clean. Cool in pan on a wire rack 30 minutes; remove cake from pan. Cool completely on wire rack.

Combine milk, corn syrup, and chocolate in a microwave-safe bowl; microwave at MEDIUM (50% power) 1 minute or until melted, stirring every 20 seconds. Slowly pour chocolate mixture over cooled cake.

For a printer-friendly version of this recipe, please click here:  pumpkin-bundt-cake-with-chocolate-glaze

Peanut Butter Chocolate Chip Yogurt Cake

Peanut Butter Chocolate Chip Yogurt Cake 2

Before I get into this post – I want to apologize again for my sporadic postings these days…and although I might not post as much as I used to, I am posting a lot more on Instagram.  So please, if you are as excited as I am these days about Instagram, please take a look @firstlookthencook.  I will often preview what I will be posting…like this weekend’s Fig and Fennel Shrub.

I have been baking cakes for a long time – I started when I was very little with my Easy Bake Oven – but there have only been a couple of cakes over the years that have really rocked my world.  One of them is a coconut cake that is exceptional, but it is a little stressful to make.  Whenever you are dealing with more than one layer, things can get a little dicey.  One day I remember making this cake, then having to drive 13 miles to work in the hot sun – by the time I got there, the cake looked like the leaning tower of Pisa. Of course it still tasted great, but I definitely grew some gray hairs during the process.

This is the other cake that falls in that category – I have made this cake more times than I can count.  It is my go-to-cake for any occasion because it is quick, easy, and unbelievable moist and delicious.  I haven’t done much experimenting with this cake – but when I was asked to come up with a recipe that incorporates Justin’s All-Natural Peanut Butter with Stonyfield yogurt, there was only one idea that I kept coming back to…it was time to change it up a bit.  This cake was every bit delicious with yogurt than it is with milk – and using Justin’s Peanut Butter took off a little bit of the sweetness, which in my mind is always a good thing.  Once again, this cake did not disappoint – and now I have a great excuse to make another with the leftover ingredients…

Please note: As a Team Stonyfield ambassador, I am being compensated. All opinions about StonyField Farm’s products and Justin’s All-Natural Peanut Butter are always my own.

Ingredients

Preparation

Preheat oven to 350°F. Butter 13x9x2-inch metal baking pan. Combine first 4 ingredients in large bowl. Using electric mixer, beat on low speed until streusel is blended and crumbly. Transfer 1 cup lightly packed streusel to small bowl and reserve. Add eggs, yogurt, vanilla, baking powder, and baking soda to remaining streusel in large bowl. Beat at low speed until evenly moist. Increase speed to medium and beat until well blended, scraping bowl occasionally, about 3 minutes. Stir in 1 cup chips. Transfer batter to prepared pan. Sprinkle with reserved 1 cup streusel and remaining 1 cup chips.

Bake cake until tester inserted into center comes out clean, about 35 minutes. Cool cake in pan on rack.

For a printer-friendly version of this recipe, please click here: Peanut Butter Chocolate Chip Yogurt Cake

Mini-Chocolate Chip Bundt Cakes

Mini-Chocolate Chip Bundt Cakes

Hard work really does pay off.  I tell my kids this all the time, and I actually think that they are finally starting to believe it.  Hard work is not easy though – which is why they call it hard…and I often see them on the brink of just throwing in the towel.  All it takes though is for one win, and it gives them the strength to keep going.  It is just one of the many reasons that I love being a parent.

Fortunately it doesn’t always take a lot of hard work to make a delicious dessert that the entire family can enjoy.  I found this recipe in Cooking Light many moons ago, and the other weekend I decided to dust off my mini-bundt pan to test these babies out.  I have such limited time these days to bake, and this recipe looked like one that I could actually fit into my schedule.  These were so good, I made them the next weekend as well.  It is not often that I do that, but these were that good.  The glaze was not very thick, but it didn’t need to be – it offered just the right amount of sweetness to brighten up the cake.

So choose wisely what you want to focus your hard work on – you don’t have to be good at everything.  But when you focus your attention and it actually pays off, the victory is sweeter than you can imagine…just like a delicious dessert.

Ingredients

  • 9 ounces white whole-wheat flour (about 2 cups)
  • 1 teaspoon baking powder
  • 1/2 teaspoon baking soda
  • 1/2 teaspoon salt
  • 1/2 cup unsalted butter, softened
  • 1 teaspoon vanilla extract
  • 2 large eggs
  • 1 cup reduced-fat buttermilk
  • 1 cup mini-chocolate chips
  • Baking spray with flour or butter and flour
  • 1 cup powdered sugar
  • 2 to 3 teaspoons water

Preparation

Preheat oven to 350°.

Weigh or lightly spoon flour into dry measuring cups; level with a knife. Combine flour, baking powder, baking soda, and salt in a bowl, stirring well with a whisk.

Place butter and remaining 1 cup granulated sugar in a bowl; beat with a mixer at medium speed until fluffy (about 5 minutes). Beat in vanilla. Add eggs, 1 at a time, beating well after each addition. Add flour mixture and buttermilk alternately to butter mixture, beginning and ending with flour mixture.  Fold in mini-chocolate chips.

Divide batter into each of 4 mini-bundt loaf cups coated with baking spray (or coated with butter than flour), spreading into an even layer. Bake at 350° for 25-30 minutes or until a wooden pick inserted in centers comes out clean. Cool in pans on a wire rack 10 minutes; remove cakes from pans. Cool completely on wire rack.

Combine powdered sugar and 2 to 3 teaspoons water in a small bowl, stirring until smooth. Drizzle glaze evenly over cakes.

For a printer-friendly version of this recipe, please click here:  Mini-Chocolate Chip Bundt Cakes

Almond-Chocolate-Espresso Coffee Cake

Almond-Chocolate-Espresso Coffee Cake 2

It’s hard to get yourself out of a rut, particularly when you have been doing something a certain way for years, and it works.  We all know the phrase – if its not broken, don’t fix it.  Well, it’s not always that easy.  Sometimes if you keep doing things one way, you are missing out on something better.  That is one of the reasons why I love to cook – I am always searching for the perfect recipe – one that is better than the one I previously thought was perfect.  And I think of my kitchen as my lab – I am always experimenting.

Many months ago, I signed up to be a Stonyfield ambassador by applying to be in their blogger club.  When I was accepted, I almost wrote back and said thanks, but no thanks.  My life is like one of those duffle bags that is completely stuffed – I can’t fit even one more sock in.  But if I need that sock, I have to figure out what I am going to take out.  I still haven’t quite figured that out, but all I know is I never did decline the invitation, so here I am, stuffing one more thing in.

The good news is that it doesn’t seem like it is going to be that time consuming, especially because I love cooking and baking with yogurt – and this February’s opportunity also included Devine Chocolate.  Yum!

My girls had been asking me to make a coffee cake for a while, and all of a sudden it hit me – why do you need to use sour cream or buttermilk in a coffee cake, why couldn’t you use yogurt instead?  So I started researching a little – and I learned that it is a perfect substitution, and with a little milk, you have basically created your own buttermilk.  So, I heavily adapted this recipe that I found in the Back in the Day Bakery Cookbook, and I created my own perfect coffee cake.  The yogurt made the cake super moist, with a slight tang – and the chocolate bar – oh my word.  That was just perfect as the topping.

So the next time you go through the motions, doing the same thing you have always done – think more broadly – be creative, and think about ways in which you can make it better.  There is always a way…

Please note: As a Team Stonyfield ambassador, I am being compensated. All opinions are always my own.

Ingredients

  • 2 cups unbleached all-purpose flour
  • 1 cup packed light brown sugar
  • 1/2 cup granulated sugar
  • 8 tablespoons (1 stick) unsalted butter, at room temperature
  • 3/4 teaspoon salt
  • 3.5 ounce Devine Chocolate with Whole Almonds Bar, finely chopped
  • 2 teaspoons espresso powder*
  • 1 teaspoon baking soda
  • 3/4 cup Stoneyfield Farms plain yogurt
  • 1/4 cup milk
  • 1 large egg
  • 1/2 teaspoon pure vanilla extract
  • 1/2 teaspoon pure almond extract

Preparation

Position a rack in the lower third of the oven and preheat the oven to 350˚F.  Spray a 9-inch square baking pan with vegetable oil spray and line the bottom with parchment.

In the bowl of a stand mixer fitted with the paddle attachment (or in a large mixing bowl, using a handheld mixer), mix together the flour, both sugars, the butter and the salt until the mixture resembles coarse meal.

To make the crumb topping, transfer 3/4 cup of the mixture to a small bowl and stir in the chocolate and espresso.  Set aside.

Sprinkle the baking soda into the remaining butter-sugar mixture.  Whisk the yogurt together with the milk. Add the yogurt/milk mixture, egg, vanilla, and almond extract to the butter-sugar mixture, and mix just until combined.  Scrape the batter into the prepared baking pan, spreading it evenly.  Sprinkle the crumb topping evenly over the batter.

Bake for 40 to 50 minutes, until the top is golden brown and a cake tester inserted in the center of the cake comes out clean.  Remove to a wire rack and allow to cool in the pan.

* If you find yourself without espresso powder, replace it with 1 teaspoon cinnamon for an equally delicious cake.

For a printer-friendly version of this recipe, please click here:  Almond-Chocolate-Espresso Coffee Cake

Burmese Semolina Cake

Bermese Semolina Cake

I am going to try and get this post out before my head falls onto the keyboard in utter exhaustion.  I am not sure which time zone I am in at the moment, but I know that I am not really in my own.  It is somewhere between here and Madrid – but I still managed to get all my errands done this weekend – and drive the kids all around the city.  Yes, I am finding that I am not only a Mom with a full-time job, I now have a part-time role as a chauffer.

Coconut anything still fascinates me.  I love that tropical flavor it has – and all of a sudden I close my eyes, and I am on the beach wearing my straw hat (the sun is not good for you).  I am also a sucker for simple yet strange recipes – which this one definitely qualifies for.  I saw this recipe in Bon Appetit months ago.  At first glance, there were not a lot of ingredients, and one of them was coconut milk.  Then I read the description – I could almost taste the cake before I made it.  The thought of a creamy and custardy cake was exactly what I was in the mood for.

This cake was very interesting.  Without the coconut ice-cream, I was not overly impressed. I did like the texture of the cake – although it didn’t have ton of flavor – that was until the coconut ice-cream went on top – then I felt like I was on vacation.  It’s just amazing how food can do that, and boy do I need a vacation – with some coconut ice-cream on the side please.

Ingredients

  • 2 tablespoons unsalted butter, melted, cooled slightly, divided, plus more
  • cups semolina flour
  • 1 large egg
  • 1 14-oz. can coconut milk
  • cups half-and-half
  • cup sugar
  • 1 teaspoon kosher salt
  • Coconut ice cream and toasted unsweetened coconut flakes (for serving)

Preparation

Preheat oven to 425°. Butter an 8×8” baking dish. Toast semolina in a large dry skillet over medium-high heat, stirring, until darkened and nutty-smelling, about 2 minutes. Let cool.

Whisk egg, coconut milk, half-and-half, sugar, salt, and 1 Tbsp. butter in a large saucepan. Gradually whisk in semolina and bring mixture to a boil over medium-high heat, whisking, until mixture is very thick and pulls away from the sides of saucepan, about 4 minutes. Scrape batter into baking dish.

Bake cake until golden brown and a tester inserted into the center comes out clean, 45–50 minutes. Transfer dish to a wire rack. Brush cake with remaining 1 Tbsp. butter; let cool slightly. Serve with coconut ice cream, topped with coconut flakes.

For a printer-friendly version of this recipe, please click here:  Burmese Semolina Cake

Chocolate-Coconut Pound Cake


Chocolate Coconut Pound Cake 2

I feel like I have been lacking a little in the baking department lately.  I have been very focused on jams, getting a healthy dinner on the table, and not as much focused on the baked goods.  My family has been very patient with me, but I can tell that they are anxious for me to get back into my baking routine.  Fortunately I have lots of great recipes to try, and as long as it doesn’t get to hot next weekend – I am definitely looking forward to the 3-day weekend to catch up.

A lot of my friends have been dropping their kids off at sleep away camp this year – of course out here, it is not nearly as popular as it is on the east coast – and fortunately for me, my older daughter was still not dying to sign up just yet – but I know the time is coming.  I loved sleep away camp – when I came home after the first year, I cried until my mother promised I could go again the next summer.

Months ago I found this recipe in Bon Appetit, and coconut is one of those ingredients that always makes me look twice.  I looked at the recipe, and I was seriously intrigued.  I have been eyeing the coconut oil in the super market for quite some time, and now I had an opportunity to buy it.  Unfortunately this was not one of those dairy-free recipes that makes me (but mostly my husband) so happy, but I decided to go for it anyway.  I wish I could say that I made this today, but this was made a about a month ago, and I have been patiently waiting  to post it.  As I am writing this, I am remembering this moist, delicious, flavorful – pretty much killer – pound cake.  I cannot say enough about this cake.  I had one piece, and it wasn’t enough – the kids went nuts for it also.  There was just a hint of chocolate, combined with a hint of coconut, but it just had this overwhelmingly comforting taste.

I would be kidding myself if I said that the kids needed some comfort food right now – even if they are homesick – I think it is the moms that are in real need of some comfort.  Instead of watching the time go by wanting to talk to your kids, how about trying this cake instead?  Eat half now, and freeze the rest for when your kids return.  If you can actually get half into the freezer before it is all gone…

Ingredients

  • ¼ cup unsalted butter, room temperature, plus more
  • cups all-purpose flour
  • ½ cup unsweetened cocoa powder
  • 1 teaspoon kosher salt
  • ¾ teaspoon baking powder
  • ½ cup virgin coconut oil, room temperature
  • cups plus 1 tablespoon sugar
  • 3 large eggs
  • 1 teaspoon vanilla extract
  • cup buttermilk
  • ¼ cup unsweetened coconut flakes

Preparation

Preheat oven to 325°. Butter an 8×4” loaf pan; line with parchment paper, leaving a generous overhang on long sides. Whisk flour, cocoa powder, salt, and baking powder in a medium bowl; set aside.

Using an electric mixer on medium-high speed, beat oil, ¼ cup butter, and 1½ cups sugar until pale and fluffy, 5–7 minutes. Add eggs one at a time, beating to blend between additions; beat until mixture is very light and doubled in volume, 5–8 minutes. Add vanilla.

Reduce mixer speed to low and add dry ingredients in 3 additions, alternating with buttermilk in 2 additions, beginning and ending with dry ingredients (do not overmix; it will cause cake to buckle and split). Scrape batter into prepared pan and run a spatula through the center, creating a canal. Sprinkle with coconut and remaining 1 Tbsp. sugar.

Bake cake, tenting with foil if coconut browns too much before cake is done (it should be very dark and toasted), until a tester inserted into the center comes out clean, 70–80 minutes. Transfer pan to a wire rack; let cake cool in pan 20 minutes before turning out.

DO AHEAD: Cake can be baked 5 days ahead. Keep tightly wrapped at room temperature.

For a printer-friendly version of this recipe, please click here:  Chocolate-Coconut Pound Cake

Blueberry Coffeecake with Streusel

Blueberry Coffee Cake

Everyone needs a break now and then.  I am not just talking about a small 15-minute walk around the block brake, I am talking about a break from life. Ok, yes, those 15-minute walks are important – after what I experienced this week, sometimes you just need to get a little air.  The problem is that you have to come to that conclusion yourself – no one can tell you that it has to be done.  But believe me, it is amazing what it can do for you…

To say that things are hectic right now is an understatement.  Thursday was the last day of school for the year, although this year it was a little bittersweet.  For my younger daughter, it was a big party – but for my older daughter it was not the usual feeling.  Unfortunately I had an all-day meeting, and was extremely preoccupied – all my brain cells were focused at the time.  That was until I got the text.  The last day was fun, except for the end – everyone was crying, even the boys.  Getting that text was heart breaking.  Later I found out the teachers were crying too.  All because the school board decided to split these kids up.  I won’t get into it again, because I can no longer dwell on this horrible decision.  This summer I am working on an attitude adjustment – I am going to have a positive outlook on my daughter’s new school – and so will she.  We agreed to it.

So as I sat there in that meeting, thinking about my daughter – it hit me, I was not the only one with a life outside that room.  Life is hard – and most of the time, you really have no idea how hard it is – particularly for everyone else.  Fortunately for me, I can always turn to food – and that’s exactly what I did this weekend.  I didn’t just dabble – I was hard core – I was on a power cooking/baking frenzy, trying to get all my stress out in the kitchen.  I actually think it worked…or I am just utterly exhausted.

This was just one of the many things going on in my kitchen – a good old fashioned blueberry coffeecake.  Now, I have a favorite recipe from my mother – that just happens to be dairy-free.  I just had to see though if this dairy version from Cooking Light was better – and you know what, it wasn’t.  Don’t get me wrong, this was absolutely moist and delicious – but I actually like my mother’s recipe better – ok, who is really surprised by that?  Yes, my mother tests her recipes more than anyone else I know.  And Mom, you win again.

So I hope that I was not the only one that was able to take a break this weekend – in whatever form that is.  Even if you just took a few deep breaths…I know it will help.  Monday, I am ready for you – bring it on.

Ingredients

  • 9 ounces unbleached all-purpose flour (about 2 cups)
  • 1 1/2 teaspoons baking powder
  • 1/2 teaspoon baking soda
  • 1/2 teaspoon salt
  • 2 cups fresh blueberries
  • 1/3 cup packed brown sugar
  • 1/4 cup old-fashioned rolled oats
  • 2 tablespoons sliced almonds
  • 1 tablespoon unbleached all-purpose flour
  • 1/4 teaspoon ground cinnamon
  • 2 tablespoons butter, melted
  • 3/4 cup granulated sugar
  • 1/4 cup butter, softened
  • 2 tablespoons canola oil
  • 1 large egg, lightly beaten
  • 1 cup nonfat buttermilk
  • 2 teaspoons grated lemon rind
  • 1 tablespoon fresh lemon juice
  • Cooking spray

Preparation

Preheat oven to 375°.

Weigh or lightly spoon 9 ounces flour into dry measuring cups; level with a knife. Combine 9 ounces flour and next 3 ingredients (through salt), stirring with a whisk. Remove 2 tablespoons flour mixture; sprinkle over blueberries, tossing to coat.

Combine brown sugar and next 4 ingredients (through cinnamon) in a medium bowl. Drizzle with 2 tablespoons melted butter; toss to combine.

Place granulated sugar, 1/4 cup butter, and oil in a large bowl; beat with a mixer at medium speed until blended (about 2 minutes). Add egg; beat well. Add flour mixture and buttermilk alternately to sugar mixture, beginning and ending with flour mixture; mix after each addition. Stir in rind and juice.

Spoon half of batter into a 9-inch square light-colored metal baking pan coated with cooking spray (do not use a dark or nonstick pan). Sprinkle evenly with 1 cup blueberry mixture. Spoon remaining batter over blueberries. Sprinkle evenly with remaining 1 cup blueberry mixture. Sprinkle with brown sugar mixture. Bake at 375° for 45 minutes or until a wooden pick inserted in center comes out clean. Cool in pan 10 minutes on a wire rack; remove from pan. Cool completely on a wire rack.

For a printer-friendly version of this recipe, please click here:  Blueberry Coffeecake with Streusel

Hawaiian Dessert

Hawaiian Dessert


I am not sure what is going on right now with my blog, but I am going to try and ignore it. The picture looks super small, and I can’t figure out why. Well, at least it is not an ordinary Sunday night – and tomorrow, I can try and get to the bottom of this. I have no idea how this blog post will look when publishing, but I will keep my fingers crossed.

I am big on short cuts, but not big on using prepared foods – and that includes boxed cake mixes. Although there are certain times when it actually does make sense. I have to admit, I love a good boxed cake every once in a while – but it doesn’t belong on my blog…that is until now. The other week I had signed up to bring a dessert to book group. I didn’t have a ton of time that day, and remembered this recipe that people on our food alias at work were talking about. Someone was looking for a dessert to bring to a Hawaiian themed party – and this is what people recommended. It came from the website Yummly, and it looked super simple, yet fed a crowd.  Even though I was not going to a Hawaiian themed party, I needed something simple that fed a lot of people.

I had no intention of putting this on the blog – with a boxed cake and vanilla pudding, it was not really something I figured would be blog worthy.  Wrong.  My friends loved the cake – and I did as well.  It was creamy on the top, with a nice layer of cake that almost seemed like a soft crust – they all thought I was crazy not to post the recipe.  So here we are – and hopefully you won’t give up on me – but we all need a break from time to time, and this was certainly a delicious one. Here’s to simplicity, feeding many…and Hawaii.

Ingredients

  • 1 package yellow cake mix (regular size)
  • 3 packages (3.4 ounces each) instant vanilla pudding mix
  • 4 cups cold milk
  • 1-1/2 teaspoons coconut extract
  • 1 package (8 ounces) cream cheese, softened
  • 1 can (20 ounces) crushed pineapple, well drained
  • 2 cups heavy whipping cream, whipped and sweetened
  • 2 cups flaked coconut, toasted

Directions

Mix cake batter according to package directions. Pour into two 9×13 in. baking pans. Bake at 350° for 15 minutes or until the cakes test done. Cool completely. In a large bowl, combine pudding mixes, milk and coconut extract; beat for 2 minutes. Add the cream cheese and beat well. Stir in pineapple. Spread over the cooled cakes. Top with whipped cream; sprinkle with coconut. Chill for at least 2 hours.

Yield: 24 servings.

For a printer-friendly version of this recipe, please click here:  Hawaiian Dessert

Oatmeal Chocolate Chip Scones

Oatmeal Chocolate Chip Scones

I know it is Sunday, but I am already looking forward to Thursday.  That market basket that my husband got me for Mother’s Day is quite something.  It is like Christmas morning every Thursday night – as we unpack the beautiful wooden box with all sorts of goodies.  This week’s basket came with this wonderful box of pistachio apricot granola.  I can’t wait to put some on my yogurt in the morning.  It’s the little things that get me through this end-of-the-year chaos.

Since I was set for breakfast this week, I thought it was only fair if I made some treats for the girls.  They do love granola – but I know they love scones even more.  I have gone through many ways of saving recipes over the years.  I started by keeping every single food magazine and marking the pages where I liked a recipe.  That worked for a little while, but after I had over 20 magazines, I couldn’t remember what was in each issue.  Then I started cutting out the indexes, and had a binder of them – with the highlighted recipes that I liked.  Again, not very practical as I had to look through hundreds of pages to find what I was looking for.  The next plan was to cut out the recipe and put it in a photo album, where I had dividers of the different types of recipes.  After I filled up two binders, I was done with that method.  At that point I decided I needed to use technology, and that’s when I started my blog.  I tell you, I love being able to Bing a recipe from my blog and get to it instantly.  Technology can be quite awesome.

Instead of going to my usual stack for a scone recipe (knowing that I didn’t have any lingering around that I wanted to make), I went to one of the binders I created – and flipped to the “Breakfast” tab.  I found this recipe that I probably cut out ages ago from either Gourmet or Bon Appetit and decided to see if it had stood the test of time.  Boy did it ever – these scones were crunchy on the outside, soft and pillowy on the inside, with a touch of oat flavor, but nicely sweetened.  I could have scarfed a couple of them down, except that I reminded myself they were for the girls – I already had my treat waiting.  So, we will all be eating well this week, and we need to – if we are going to get through these last 5 weeks.  Ugh!

Ingredients

  • 1 2/3 cups all-purpose flour
  • 1/4 cup plus 2 tablespoons sugar plus additional for sprinkling
  • 1 tablespoon baking powder
  • 3/4 teaspoon baking soda
  • 1/2 teaspoon salt
  • 1 1/3 cups old-fashioned oats
  • 1 1/2 sticks (3/4 cup) cold unsalted butter, cut into tablespoon pieces
  • Finely grated zest from 1 large navel orange
  • 2/3 cup well-shaken buttermilk plus additional for brushing
  • 1/2 cup mini chocolate chips
  • Special equipment: a 2 1/4-inch round cookie cutter

Preparation

Preheat oven to 425ºF.

Sift together flour, sugar, baking powder and soda, and salt into a food processor, then add oats and pulse 15 times. Add butter and pulse until mixture resembles coarse meal with small (pea-size) lumps, then transfer to a bowl.

Stir together zest and buttermilk. Toss chocolate chips with oat mixture, then add buttermilk, stirring with a fork just until a dough forms. Turn dough out onto a lightly floured surface  and gently knead 6 times.

Pat dough into a 1-inch-thick round, dusting surface with more flour if necessary. Cut out as many scones as possible with cutter, dipping it in flour before each cut, and transfer scones to a lightly buttered large baking sheet. Gather scraps into a ball, then pat into a round and cut out more scones in same manner.

Brush tops of scones with buttermilk and sprinkle lightly with sugar. Bake in middle of oven until golden brown, 15 to 18 minutes, and transfer to a rack.

Serve warm or at room temperature.

For a printer-friendly version of this recipe, please click here: Oatmeal Chocolate Chip Scones

Cream Cheese Danish Braid

Cream Cheese Danish Bread

Happy Mother’s Day to all you mothers out there!  I hope everyone had a wonderful day, and as my mother told me to do, indulge just a little.  Speaking of indulging…in going with the theme of over the top that I started last weekend, I decided to continue that trend just a bit…particularly in honor of mother’s day.

I don’t make bread very often anymore – it was something I was fascinated in when I lived in Denver – mostly because of the high altitude.  Bread would rise much faster, and it was just exciting to watch.  For the past 18 years, I can count how many times I have attempted a yeast dough on one hand – just because I don’t want to spend a day waiting for it to rise.  A couple of years ago, I noticed that my oven had a proof setting – and all of a sudden I realized that I had my own little proofing oven right in my house.  But even that added incentive was not enough.

The other month in Cooking Light they had a section on cooking and baking like the professionals.  Basically they tried to tell you that you didn’t have to be an expert to make different things.  I know better than that, and didn’t fall for it for a minute.  But here I was cutting out this delicious cream cheese Danish braid and sticking it in my recipe pile.  Note to self – if you don’t want to make something, do not put it in that pile.  Of course placing anything in that pile means that it is visible for my daughters to see – and when my older one saw that it was an option, that’s all she talked about.

So – I attempted the Danish braid.  I was not expecting much, but that dough was heavenly.  Figuring out exactly how to make the braid just by reading the instructions was a little tricky – but it turned out beautifully.  I was a hero.  My daughter was completely amazed.  The filling was a little sweet for us – but the bread was out of this world.  Just amazing, and I can’t wait to try the dough on cinnamon buns.

Here’s to all you heroes out there – but especially the moms today – even the little things you do go a long way…it is your day to celebrate.

Ingredients

Sponge:

  • 6 tablespoons very warm 1% low-fat milk (120° to 130°)
  • 1 teaspoon sugar
  • 1 package quick-rise yeast (about 2 1/4 teaspoons)
  • 2 tablespoons unbleached all-purpose flour

Dough:

  • 7.9 ounces unbleached all-purpose flour, divided (about 1 3/4 cups)
  • 2.25 ounces whole-wheat pastry flour (about 1/2 cup)
  • 1/4 cup sugar
  • 1/4 cup light sour cream
  • 3 tablespoons butter, softened
  • 3/4 teaspoon salt
  • 1 teaspoon vanilla extract
  • 1 large egg
  • Cooking spray

Filling:

  • 4 ounces 1/3-less-fat cream cheese
  • 1/3 cup part-skim ricotta cheese
  • 2 tablespoons honey
  • 2 teaspoons fresh lemon juice
  • Dash of salt

Remaining ingredients:

  • 1 teaspoon water
  • 1 large egg
  • 1/3 cup powdered sugar
  • 2 teaspoons 1% low-fat milk
  • 2 tablespoons sliced almonds, toasted

Preparation

To prepare sponge, combine first 4 ingredients in a medium bowl, stirring well with a whisk. Cover loosely with plastic wrap; let stand 15 minutes.

To prepare dough, weigh or lightly spoon 6.75 ounces (about 1 1/2 cups) all-purpose flour and pastry flour into dry measuring cups; level with a knife. Combine 1/4 cup sugar, sour cream, butter, salt, vanilla, 1 egg, and sponge in a large bowl; beat with a mixer at medium speed 1 minute or until well combined. Add flours; beat at low speed 3 minutes or until a soft dough forms. Turn dough out onto a lightly floured surface. Knead until smooth and elastic (about 4 minutes), adding remaining 1.15 ounces all-purpose flour, 1 tablespoon at a time, to prevent dough from sticking. Place dough in a large bowl coated with cooking spray. Cover and let rise in a warm place (85°), free from drafts, 1 hour and 15 minutes or until doubled in size. (Gently press two fingers into dough. If indention remains, dough has risen enough.)

To prepare filling, combine cream cheese and the next 4 ingredients (through dash of salt) in a medium bowl; beat with a mixer at medium speed until smooth.

Punch dough down; roll dough into a 12 x 15-inch rectangle on lightly floured parchment paper. Spread cream cheese mixture down center of dough, leaving about a 5-inch border on each side and a 1-inch border at top and bottom of rectangle. Make 5-inch cuts about 1 inch apart on both sides of dough to meet filling using a sharp knife or kitchen shears. Remove 4 outer corner strips of dough from rectangle; discard. Fold top and bottom 1-inch portions of dough over filling. Fold strips over filling, alternating strips diagonally over filling. Press ends to seal. Transfer braid and parchment paper to a baking sheet. Cover and let rise 45 minutes.

Preheat oven to 375°. Combine 1 teaspoon water and 1 egg; stir with a whisk. Brush braid with egg mixture. Bake at 375° for 20 minutes or until golden. Cool on wire rack 10 minutes.

Combine powdered sugar and 2 teaspoons milk in a bowl, stirring until smooth. Drizzle glaze over braid; sprinkle with nuts.

For a printer-friendly version of this recipe, please click here:  Cream Cheese Danish Braid