Caramel Popcorn

Caramel Corn

I feel like it was just yesterday when my daughter wrote this post about getting her braces on.  Wow, time sure does fly by, because this week, she got her braces off!  She was so thrilled, she had been looking forward to the date for months.  She actually did quite well with the braces, but there were certain foods that she was really missing…popcorn and caramel.  It was hilarious when she came out to see me for the first time at the orthodontist’s office, with a bag of caramel corn in her hand.  Yes, the orthodontist gives it out as a present when you get your braces off!  She had a big beautiful smile on her face.

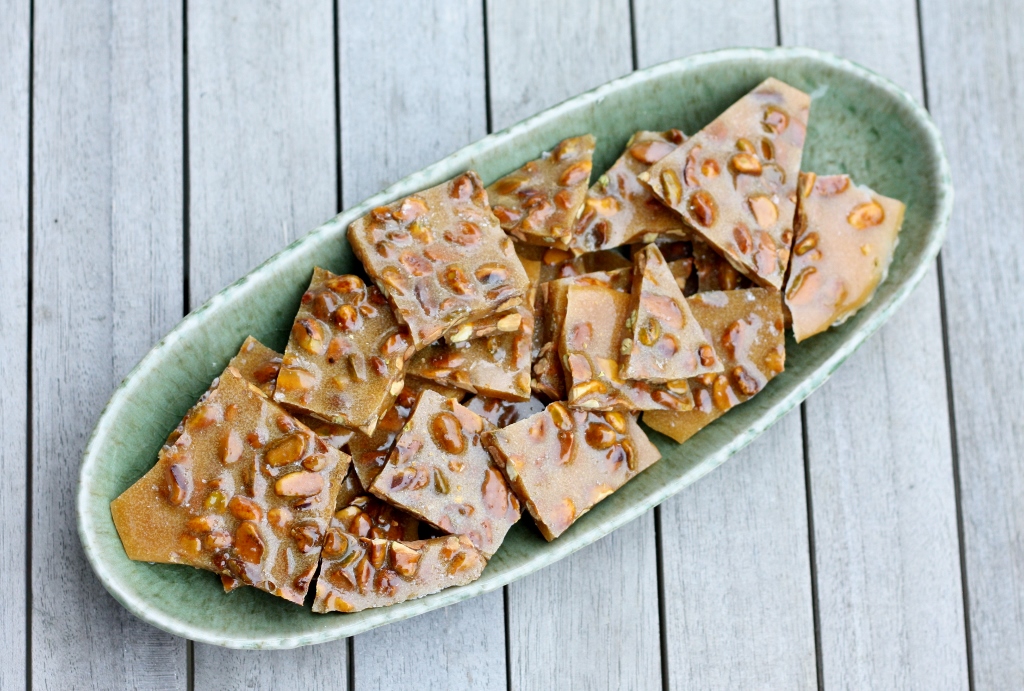
So I decided today that I would make her a little treat.  It was a recipe from Bon Appetit that had been sitting in my pile for almost 2 years – yep, caramel popcorn.  It was super easy to make, and so delicious, it was light and crispy, exactly how caramel corn should be – and those little bites of peanuts gave it that extra perfect flavor.  YUM!!  I am so glad she gave me an excuse to make this…

On another note, if you have been following my blog, you know that I won the Girl Scouts of Western Washington Recipe Contest for the Samoas 40th Birthday.  I was actually on local television this week to demonstrate the recipe.  That was quite something, let me tell you – the usual host was on vacation, so these other two hosts were filling in.  No one told me that one of them was a big jokester, so needless to say, I was quite surprised with some of the antics.  Fortunately I was able to stay composed…but I was freaking out, hoping that no one would notice.  You can check it out here if you are interested.

Now for the exciting news – as I mentioned in my previous post, I will be donating my prize money to charity.  Thanks to all of you who wrote in your favorite organizations.  I decided to split the winnings between two charities – and I randomly selected the following:  PANCAN and Imerman Angels.  Both charities will each receive a $250 donation!!  Thanks Girl Scouts for the opportunity!

Ingredients

  • 6 tablespoons unsalted butter, cut into ½-inch pieces, plus more for pan
  • 3 cups popped popcorn
  • ½ cup salted roasted peanuts
  • ¾ cup sugar
  • 2 tablespoons light corn syrup

Preparation

Coat a rimmed baking sheet with butter; set aside. Combine popcorn and peanuts in a large mixing bowl.

Bring sugar, corn syrup, and 2 tablespoons water to boil in a medium saucepan, stirring to dissolve sugar. Add 6 tablespoons butter and stir until melted. Continue cooking, stirring often, until caramel is a deep amber color, 10-12 minutes.

Working quickly, pour caramel over popcorn and peanuts and, using a heatproof spatula, mix to coat. Transfer to prepared baking sheet and let cool completely. Break into pieces.
Advertisement

Maple Caramel Corn

Maple Caramel Corn

It is hard to believe there are just a few more days until the holidays, I feel like the lights and festivities have just begun!   I hope everyone is completely prepared, with all your shopping done – and you are just relaxing this weekend…right.  I know how it goes, it is never that easy.  All I have to say is I am so glad I started making jam last spring, it really made my gift giving a lot easier this year.  Of course I didn’t make nearly as much as I usually do – but I still made enough to make it through.

If you are trying to decide what to make for your friends, family and neighbors, I am here to help.  I decided to post just a few of

my favorites for you – and all of these are easy enough to bang out in a day – and you still have 5 days until Christmas!

Here are a few of my favorites:

1)  Pear Vanilla Jam

2)  Chocolate Almond Toffee

3)  Salted Pistachio Brittle

4)  Vanilla Bean Caramels with Fleur de Sel

5)  Rocky Rods

And now for a new one to add to the list – this Maple Caramel Corn that we made at The Pantry Holiday Gift Making class – with kids.  We couldn’t stop snacking on this, it is quite addicting.  Boy would I be happy with this as a gift.

I wish all of you a very happy holiday – I hope you spend it with the people you love, and with food that you have been craving.  And most of all, I hope you can relax just a little…that would be the best gift of all.

Ingredients

  • 1/4 cup popcorn kernels
  • 3 tablespoons high-heat oil
  • 1/4 cup maple syrup
  • 2 1/2 ounces unsalted butter, chopped
  • 3/4 teaspoon kosher salt
  • 1 teaspoon cinnamon
  • pinch of cayenne pepper (optional)
  • 2 tablespoons water
  • 1/2 teaspoon baking soda
  • 1 teaspoon vanilla extract
  • flaky sea salt for finishing

Preparation

Preheat the over to 250 degrees.  Line a rimmed baking sheet with parchment paper.

Heat the oil in a 3-quart saucepan on medium-high heat.  Put 3 or 4 popcorn kernels into the oil and cover the pan.  When the kernels pop, add the rest of the 1/4 cup of kernels in an even layer.  Cover, remove from heat and count 30 seconds.  Note:  this method first heats the oil to the right temperature, then waiting 30 seconds brings all of the other kernels to a near-popping temperature so that when they are put back on the heat, they all pop at about the same time.

Return the pan to the heat.  The popcorn should begin popping soon, and all at once.  Once the popping starts in earnest, gently shake the pan by moving it back and forth over the burner.  Keep the lid slightly ajar to let the steam from the popcorn release; this makes the popcorn slightly drier and crisper.  Once the popping slows to several seconds between pops, remove the pan from the heat.  Coat a large mixing bowl with nonstick cooking spray, and transfer the popcorn from the pan to the bowl, taking care to pick out and discard any unpopped kernels.

In a medium saucepan, whisk together the maple syrup, brown sugar, corn syrup, butter, salt, spices and water.  Bring to a simmer over medium-high heat.  Continue to summer, whisking often, until the mixture reads 250 degrees on a candy thermometer, about 3-4 minutes.  Immediately remove the pan from the heat, and whish in the baking soda and vanilla.

Quickly pour the hot caramel over the popcorn.  Use a rubber spatula to gently fold the caramel into the popcorn, taking care to distribute it as evenly as you can.  Transfer the mixture to the prepared baking sheet.  Bake for 1 hour, stirring and turning the popcorn with a spatula every 20 minutes.

Remove from the oven and sprinkle lightly with flaky sea salt.  Place on a cooling rack for 20 minutes.  Gently break up the popcorn and serve.

Keeps in an airtight container for up to 5 days.

For a printer-friendly version of this recipe, please click here:  Maple Caramel Corn


Milk Chocolate and Almond Butter Cups

Milk Chocolate and Almond Butter Cups

Are you ready for the holidays?  My holiday is long gone, and I am still not ready.  Today my plan was the take the day off and catch up on some stuff – but unfortunately the weather got in the way, and with the girls only at school for 3 hours – I was not all that productive.  We woke up to snow, and in Seattle, that means either no school, or a 2-hour delay.  Ok – so instead of working on my stuff, I want to help all of you.  It is the season of giving, and whether you want to make something or buy something – I am offering up suggestions.

If you are in the market of buying – here are my top 5 all time favorite kitchen gadgets:

1)  Oxo 1/4 cup Measuring Cup

2)  Extra-large Spatula

3)  Ice-cream Scoop for Cookies

4)  Immersion Blender

5)  Silicon Pastry Brush

Now – if you are like me, and like to make treats for friends and neighbors – here are my top 5 favorite gifts from the kitchen:

1)  Mulled Cider Jelly

2) Basic Tomato Salsa

3) Chocolate Truffles

4) Vanilla Bean Caramels with Fleur de Sel

5) Rocky Rods

Now – I will be honest – I love all my jams and jellies like children – they are all special in their own way – but I choose one that I thought was just a little extra special.  Seriously though, you can’t go wrong.  And now I have one more to add to that list for next year – the Milk Chocolate and Almond Butter Cups that we made at The Pantry Holiday Gift Making class – with kids.  These are definitely an extra special treat – and for those people allergic to peanuts – have no fear – they are even better made with almond butter.

So – hang in there, just another few days to go – but you have an entire weekend to all your last minute shopping and baking.  HAVE FUN!!!

Ingredients

  • 4 ½ ounces (1/2 cup) creamy almond butter
  • ½ teaspoon vanilla extract
  • 2 tablespoons (1 ounces) butter, soft
  • ¼ teaspoon kosher salt
  • 2 ounces (1/2 cup) powdered sugar
  • 1 pound milk chocolate

Preparation

Combine the almond butter, vanilla extract, butter, salt and powdered sugar in a small bowl.  Mix well.

Melt the chocolate in a microwave (30 second intervals and stir) or a double boiler.  While the chocolate is melting, line a mini-muffin pan with 36 wrappers.  Place 1 teaspoon of the almond butter mixture on top of the melted chocolate then cover the almond butter with more melted chocolate.

Place the pan into the refrigerator to set.  Store the almond butter cups in a well-sealed container in the refrigerator for up to two weeks.

Makes 2 dozen.

For a printer-friendly version of this recipe, please click here:  Milk Chocolate and Almond Butter Cups

Milk Chocolate and Almond Butter Cups 2

Chocolate Peanut Butter Acorns

Chocolate Peanut Butter Acorns

Not only it is Thanksgiving at our house tomorrow – we are also celebrating the first day of Hanukkah – and my younger daughter’s 8th Birthday.  It is quite the celebration, the trifecta to end all trifectas.  There has been a lot of activity in the house this week – with the birthday party this weekend – and then guests arriving for the week.  It has been quite something – but the best is yet to come.

One of our special visitors this week is my sister-in-law – she is a “real” foodie (where I just play one on TV) – she does this for her career, so she actually knows what she is talking about.  One of the treats I made for Niela’s birthday party were these cute little acorns.  For the life of me, I can’t remember where I saw these, but I remembered there were 3 ingredients, and I knew they would be adorable.  I usually make treats from scratch, but occasionally I find something like this that I can’t resist.  When I saw her pop one in her mouth – I was a little worried, but she had the same reaction as me.  Wow, what a combination.  Nutter butter’s are not my favorite cookies – but stick a Hershey’s kiss on top, with a chocolate chip on the bottom, and boy do you have yourself a delectable morsel.  That got us talking about how there are certain combinations of foods that are just meant to go together.  Hands down – these win.  I can pass of a peanut butter cup any day of the week – but these babies are in a different league.

So, as you celebrate Thanksgiving tomorrow, take some time to remember what this holiday is all about.  I am so thankful for my family and friends, and the food I am always surrounded by.  I am thankful that I have a beautiful kitchen to cook in tomorrow, and my family around me to share the bounty.  I am thankful that my children understand they will not get Hanukkah presents tomorrow, but at some point this month they will…and I am thankful that my daughter’s birthday party this past weekend was a complete success, and that she is thrilled to be sharing her day with a turkey and a menorah tomorrow.  Happy BirthGivakkah everyone!!

Ingredients

  • Mini Nutter Butter Sandwich Cookies
  • Hershey Kisses
  • Chocolate Chips

Preparation

Place 1/2 cup chocolate chips in a microwave safe bowl.  Melt the chocolate in the microwave in 30-second intervals, stirring each time, until melted.  Dip the bottom of the Hershey Kiss in the melted chocolate, and stick onto one side of the cookie – do the same with the chocolate chip on the other side.  Let sit until the chocolate gets hard.

For a printer-friendly version of this recipe, please click here:  Chocolate Peanut Butter Acorns

Double Chocolate Crispie Treats

Chocolate-Espresso Rice Krispie Bars

I am off on another adventure.  I am hoping that this one is even better than the last one.  India was quite an experience.  It was a place that I have been fascinated with for years.  I knew that eventually there would be a need for me to go there, but I really had no idea what I was in for.  Whenever I travel anywhere – it is always important for me to connect with the food.  It started in college when I travelled and I have continued that tradition.  Supermarkets are my museums, and finding just the right specialties of the region is what I am after.

When we were in India, we had a free night for dinner.  I didn’t want to go to a fancy restaurant, or someplace at the hotel – I wanted to experience some good local cuisine.  Fortunately at work, there are plenty of other people just like me, and when you work for a global company where people are always travelling, you can get some really good recommendations if you use your resources wisely.  There is an alias called “Food & Wine Enthusiasts” where there are over 1000 foodies just waiting to give you their thoughts and preferences on food and wine.  I sent a mail to the alias, and got exactly what I was looking for.  The restaurant actually had a website, although it pretty much just explained their safety precautions in cooking.  It was a vegetarian restaurant, so I felt safe about my seafood allergy.

The restaurant was in the old part of Bangalore.  It was actually an old house with 2 different restaurants inside.  There was a snack section, an a-la-carte area, and then a set menu where they just bring you food.  People hardly spoke English there, and so it took us a while to figure out that we were standing in the set menu area – we kept asking questions about the menu, and they kept saying “ALL”.  Finally we had figured it out.  When we asked how much it was – they told us 175 Rupies.  That equates to about $2.80.  How could we say no?  We were served bottled water, soup, curries, breads, rice dishes – it went on and on, and even bananas and ice cream for dessert.  It was a feast – and everything was absolutely delicious.

When I came home, I was craving simple food – and my girls were craving sweets.  Normally Rice Crispie treats is not where I would usually land, but I was up for something exactly like this.  Cooking Light had a whole section of these with all sorts of different options, and we decided to give one a try.  These were exactly what the doctor ordered – and the girls were super happy about having these in their lunches.

Ok – I have to go catch my flight – can’t wait to see what food is in store for me this week!

Ingredients

  • 2 tablespoons butter
  • 10 ounces marshmallows
  • 1/4 cup unsweetened cocoa
  • 6 cups rice cereal
  • 4 ounces bittersweet chocolate

Preparation

Melt butter and marshmallows over medium-low heat.  Add the cocoa into the melted marshmallows and cook for 3 minutes.  Add cereal, and toss well to combine.  Press cereal mixture into a 13×9-inch pan coated with cooking spray.  Heat chocolate in microwave at HIGH for 30 seconds, stir, and repeat until completely melted.  Drizzle over cereal mixture. Chill 10 minutes before slicing.

For a printer-friendly version of this recipe, please click here: Double Chocolate Crispie Treats

Chocolate-Almond Toffee

Chocolate-Almond Toffee

I have to admit, I have been rather fascinated with making candy lately.  It started a while ago, but any chance I get, I seem to be making more candy.  First of all, everything I have made so far has been super easy, if you know how to use a candy maker.  Which reminds me…I remember years ago – I was deathly afraid of using a candy thermometer.  If I came upon a recipe that called for one – I would just skip it.  I didn’t own a candy thermometer, and had no desire to.  I was in serious denial.

I am not sure when I actually broke down and bought one, somehow I have blocked that out of my memory – but all of a sudden I ran out of excuses.  I knew that I couldn’t put it off any longer, I had to start using the candy thermometer.  One of the first really successful candies I made were these…and boy did these give me the bug.  Now, I look for reasons to make candy.  Mostly I have been focused on the hard candy – aside from those caramels.  I can’t wait until I have some time (someday), and I can start making things out of this cookbook that I got a few months back.  Everything looks so darn good.

I saw this recipe in Cooking Light (yes, I know, seriously??) and couldn’t wait to give it a try.  I finally made it to go with a special tart – just to put it over the top – which hopefully it did.  I know that these candies were to die for.  I was eating the scraps, and I almost didn’t want to call the girls down to share – yes, these were that good.  They were not to hard, but just perfectly crisp – with that nice thick layer of chocolate, and then the slivered almonds.  My mouth is watering now.  Good thing I was making these for an event, or I would have eaten the entire batch.

Sometimes it is good to do something that scares you – I take that back – it is always good to do something that scares you – just like change, it helps you to grow.  So, why not do something that scares you – and end up with this in the end?  Come on…I dare you.

Ingredients

  • 1 cup sugar
  • 1/4 cup water
  • 4 tablespoons butter, softened
  • 1/2 teaspoon vanilla extract
  • Dash of salt
  • 2 ounces bittersweet chocolate, finely chopped
  • 1/2 cup chopped or slivered almonds, toasted

Preparation

Combine first 3 ingredients in a small, heavy saucepan over medium-high heat, stirring just until combined; bring to a boil. Cook, without stirring, until a candy thermometer registers 325° or until syrup begins to caramelize. Stir in vanilla and salt. Working carefully and quickly, pour sugar mixture onto a baking sheet covered with parchment paper; spread to desired thickness. Let toffee stand 5 minutes. Sprinkle chocolate over warm toffee; let stand 5 minutes. Spread melted chocolate in a thin, even layer over toffee; immediately sprinkle with chopped or slivered almonds. Let stand 1 hour or until completely cool. Break toffee into pieces.

For a printer-friendly version of this recipe, please click here:  Chocolate-Almond Toffee

Salted Pistachio Brittle

Pistachio Brittle 2

I made it – I actually dove into the pool and survived.  Yes, I have entered the 21st century, and the world has not come to an end.  I can’t believe what a breeze it was to use Windows Photo Gallery for my entire photo editing process.  I can’t believe how many hours (probably days) I have lost moving from program to program.  I am shaking my head as I am typing.  Pretty soon I will have my new wireless printer (that actually is wireless) and nothing will stop me.

That is…until September.  That is truly when the world will come to an end.  Tonight I took my older daughter to the Middle School open house.  Wow.  That is just about all I can say.  Wow. (Moms – any guesses on where that is from??  Yes, just about the greatest book ever.)  Chaos – that’s exactly what it was – in one word or less.  Before we left, she asked me if she should bring her cell phone in case we get separated.  What??  Of course we will not get separated.  Right.  There were more people in that school tonight than I ever could have imagined.  At one point I thought I was going to lose it – I hate crowds.

Then we both had a little freak-out session in the car on the way home, except that I pretended to be nice and calm, like a good mom should – and I let her freak out about how it is going to be so crowded, and so hard to find all the classes, and what if my locker sticks?  Then I told her about our dear friend and neighbor down the street – who couldn’t get into his locker for the first week of school, and had to carry all of his books around the entire week – including his lunch – and then one night told his mom he wasn’t going back to school.  That made her feel better – good job mom.

So – what is just about the only thing that can make anyone feel better after that?  Salted Pistachio Brittle.  This stuff is like crack, not that I have ever tried that – but it is ridiculously addicting, and amazingly delicious.  You can’t just have one bite, oh no sir-e-sir.  Good thing I had a nice pile to come home to.  This recipe from Bon Appetit is just about the best candy I have ever made – and just about the easiest.  No rolling caramel wrappers, you just break and serve.  I feel better already.

Here we go – the world is changing so fast, and my girls are growing up – but there will always be salted pistachio brittle in my life – that I know will be true.  Please remind me of that in September – I am definitely going to need some then, as I kiss my baby good-bye that fall morning…and let her into that chaotic world.  Wow.

Ingredients

  • Nonstick vegetable oil  spray
  • 1 cup sugar
  • 1/2 cup light corn syrup
  • 1 cup unsalted, shelled raw natural pistachios, very coarsely  chopped
  • 1 tablespoon unsalted  butter
  • 1 teaspoon kosher  salt
  • 3/4 teaspoon baking  soda
  • Coarse gray sea salt (such as  fleur de sel or sel gris)

Special Equipment

  • A candy thermometer

Preparation

Line a rimmed baking sheet with parchment paper; spray with  nonstick spray and set aside. Whisk sugar, corn syrup, and  3 tablespoons water  in a medium saucepan. Stir over medium heat until sugar dissolves. Fit saucepan  with candy thermometer, bring mixture to a boil, and cook until thermometer  registers 290°, 3-4 minutes.

Using a heat-proof spatula, stir in pistachios, butter, and  kosher salt (syrup will seize initially, but will melt as it heats back up).  Continue to cook syrup, stirring often, until thermometer registers 300°  and  pistachios are golden brown, 3-4 minutes. Caramel should be pale brown  (it will  darken slightly as it cools). Sprinkle baking soda over and stir quickly to  blend caramel thoroughly (mixture  will bubble vigorously).

Immediately pour caramel onto pre-pared baking sheet and,  using a heat-proof spatula, quickly spread out as thin as possible. Sprinkle  sea salt over and let caramel cool completely. Break brittle into pieces.

DO AHEAD: Brittle can be made 1 week ahead. Store airtight  between sheets of parchment paper (to prevent sticking) at room temperature. 

Pistachio Brittle

For a printer-friendly version of this recipe, please click here:  Salted Pistachio Brittle

Espresso Marshmallows with Dark Chocolate

Espresso Marshmallows

I have to say, I have been putting off this post for a few days now.  Friday’s news really hit a little too close to home for me.  On Friday, it was bad enough learning about what happened – in the state where I went to elementary school.  But Saturday, when I learned that it was two first grade classrooms, it was a little too much to swallow.  My younger daughter is in first grade, and I just can’t imagine what a nightmare those poor families are living right now.  I tried to stay away from the computer all weekend – and we didn’t have the television on except for football on Sunday – but today I couldn’t avoid it any longer.  It was hard enough leaving the house knowing my kids would be at school today.  I got to my office and just cried.  I wanted to call the schools, and make sure they were going to start locking the doors during the day – but I decided they would get many hysterical calls today, and I wouldn’t add to the chaos.  This is just part of the world we live in, and it makes me sick.  We have to enjoy every minute we have – especially with our little ones.  My heart goes out to all the people suffering from this horrendous tragedy.  I hope we can look back at this as the event that changed things in this country.  We can always hope.

——————————————————————————————————————————

Last week I took a Holiday Gift Making class at my favorite community kitchen – The Pantry.  It was awesome, although I really didn’t need any more edible gifts.  I have about 80 jars of jam I made this summer and fall…  It was really fun, and I came home with 12 more nicely wrapped gifts from the kitchen.  As if that wasn’t enough – my older daughter asked when we were going to make our annual holiday pretzels.  Seriously?  Did we need more treats – of course we did, how could a holiday season go by without making those?  So – on Sunday afternoon, we got out the supplies, and the girls and I hammered out another 7 bags of gifts.  I swear we could go into business at this point.  Does anyone need any?

These marshmallows were one of the treats we made at the class last week – and what an incredible treat they were.  I was snacking on them the entire time.  There were not the easiest of the holiday treats, but they were definitely worth the trouble.  Be careful if you make these with kids – they need to watch you pour the syrup into the egg whites.  They will have great fun decorating though!

Ingredients

  • 1 tablespoon vegetable oil
  • 1/4 cup powdered sugar
  • 1/4 cup cornstarch
  • 1 tablespoon sugar
  • 1 vanilla bean
  • 1/4 cup instant espresso
  • 1/2 cup water
  • 1 ounce powdered gelatin
  • 14 ounces sugar
  • 1 tablespoon corn syrup
  • 3/4 cup water
  • 2 1/2 ounces egg whites, room temperature
  • 1/4 teaspoon kosher salt
  • good quality dark chocolate for decorating

Preparation

Mix the cornstarch and powdered sugar together.  Prepare a 9×13″ pan by greasing it lightly with the vegetable oil.  Dust it with half of the powdered sugar mixture and lightly shake off any excess.

Mix together the vanilla bean seeds and sugar.  Rub with your fingers until the seeds are incorporated into the sugar.  Mix the water and vanilla sugar in a small saucepan and bring to a boil.  Stir in the instant espresso until it is completely dissolved.  Transfer to a bowl and place in the fridge until thoroughly chilled.

When the coffee is chilled, slowly sprinkle the gelatin on top, stirring it in to keep it from clumping.  Place this over a pot of hot water to melt the gelatin, stirring occasionally.

Combine the sugar, corn syrup and 3/4 cup of water in a pot over low heat.  Stir until the sugar is dissolved.  Stop stirring and bring to a boil.  You want the syrup to eventually reach 260 degrees.  When the syrup reaches 240 degrees, begin beating the egg whites until they begin to look like meringue.  The goal is to get the egg whites to whip up at the same time the sugar syrup reaches 260 degrees, adjusting the speed of the mixer as needed.  Once they are stiff and syrup is at 260 degrees, begin slowly pouring in the syrup while continuing to beat the whites on medium high-speed.

If needed, re-warm the gelatin mixture and then pour it into the meringue.  Continue whipping until the marshmallow mixture is glossy, tripled in volume and doesn’t visibly have steam rising from it.  Immediately pour into the prepared pan and quickly smooth the top flat.  Let the marshmallow sit, uncovered, for at least 3 hours at room temperature.

Dust a work surface with the rest of the sugar cornstarch mixture.  Run a knife along the edges to loosen the marshmallow and turn out onto the surface.  Cover with a layer of powdered sugar and rub in with your fingers.  Cut the marshmallow up into squares and toss the squares in the powdered sugar mixture.  Decorate the marshmallows with the melted chocolate.  Store in an airtight container for up to a week.

For a printer-friendly version of this recipe, please click here: Espresso Marshmallows with Dark Chocolate

Honeycomb

My husband is the jingle king.  He knows every jingle that was ever created – seriously.  He can’t seem to remember when I ask him to take out the garbage, yet when I ask him about a jingle that is 30 years old, it flows out of his mouth like he watched it on television yesterday.  So, when I found this recipe in Bon Appetit for honeycomb, what do you think came next?  You got it…and of course for days, there it was, stuck in my head.

This was quite an adventure.  I was actually making this to go with a dessert I was making for an auction.  More on that later in another post…  So it was time to make the honey comb – and I had about 4 hours left before the dessert had to be sitting at the auction.  I had never made honeycomb before, but I make caramel all the time, so I thought I was prepared.  I read somewhere that you have to use a really large pot, because once you add in the baking soda, it really foams up.  So, I used my large 8 quart saucepan.  That was challenge number one – the pan was so big that I couldn’t use the candy thermometer to make sure I took it off at the right time.  Now, the recipe didn’t say to use one, but I wanted to be safe – I only had 4 hours left.  Instead I decided to go without the thermometer.  I let the sugar turn just golden amber, but it was too late.  By the time I added the baking soda, it smelled like burnt sugar.  I tried to pour it out and see if I could salvage it – but the honeycomb was inedible.

Honeycomb Take 2.  Now I was down to about 3 1/2 hours, and starting to sweat.  It was painful making the first batch.  The pot was so hot and heavy, it was almost impossible to pour the honeycomb out – and I was so worried about burning myself.  I had to have a better plan.  Also – I had to take it off the heat much earlier in the process – this is not like making caramel.  As soon as the sugar starts to turn color – that’s it.  So – I went with that, and it worked.  It was not as hard the second time, and the honeycomb came out perfect.  It tasted almost like burnt marshmallows, which is seriously one of my most favorite tastes ever.  This was sweet and crunchy, and amazingly delicious.  Just like in the jingle…honeycomb’s big, yeah yeah yeah!

Ingredients

  • 1 1/2 cups sugar
  • 3 tablespoons corn syrup
  • 1 tablespoon honey
  • 1 tablespoon baking soda, sifted

Preparation

Line a baking sheet with parchment paper or foil. Combine  sugar, corn syrup, honey, and 1/4 cup water in a heavy deep saucepan. Stir over  medium-low heat until sugar dissolves. Increase heat to high; bring to a boil.  Cook without stirring, occasionally swirling pan and brushing down sides with a  wet pastry brush, until sugar turns pale amber. Working quickly, add baking soda  (mixture will foam up dramatically); whisk quickly just to combine. Immediately  pour candy over prepared sheet (do not spread out). Let stand undisturbed until  cool, about 20 minutes. Hit candy in several places with the handle of a knife  to crack into pieces.

For a printer-friendly version of this recipe, please click here:  Honeycomb

Add to FacebookAdd to DiggAdd to Del.icio.usAdd to StumbleuponAdd to RedditAdd to BlinklistAdd to TwitterAdd to TechnoratiAdd to Yahoo BuzzAdd to Newsvine

Matzo-Almond Roca

I am very frustrated right now…I have been typing away for a while, I hit the save button, and there it went – everything I typed was gone.  I am SO FRUSTRATED!!!

Ok, I will try to calm down as I try to recreate this post.  I was really on a role, and now my mind is blank.  It is time for me to post my annual Passover recipe, although I am not sure anything can top my grandmother’s Matzo Ball Soup – this actually comes close.  But before we get to that…let’s talk about what we call today in our house – Bunny Day!!!

My younger daughter is OBSESSED with bunnies.  It all started when she was born, and a good friend of my mother’s sent her some things from this darling store north of Seattle, called Bunnies by the Bay.  They actually sell their stuff all around the country (my mother’s friend lives in Tennessee), but it is a local business for us.  She sent her a bunny blanket which is her favorite bedtime buddy, best friend, and the one thing she goes to when she is sad.  Her whole world now revolves around bunnies – so you would understand when she received an invitation to a Bunny Birthday Party, that her head just about exploded.  At this birthday party, each girl got to hold their very own bunny for the entire party – she could hardly contain herself.  Needless to say, it was one of the best days of her life.  Even though we don’t celebrate Easter, she wore her bunny ears all day today to celebrate.

So, back to Passover.  There are not many Passover recipes that warrant you to drop everything and run to the kitchen.  This happens to be one.  My neighbor introduced me to this recipe years ago – she is a fabulous cook, and always has such perfect recipes for the holidays.  She made a batch of these, and I fell in love.  I am telling you – you do not have to celebrate Passover to enjoy these babies.  A few years ago, she sent me this…the first blog post I ever read.  It was after I read this post, that I started thinking about creating my own blog.  So please enjoy my other favorite Passover recipe – I only wish my grandmother was still alive so I could share it with her – she would have loved it.  All you need is some Matzo Ball Soup and some Matzo-Almond Roca – who needs anything more than that?

Ingredients

  • Nonstick vegetable oil spray
  • 5 sheets matzo
  • 1 3/4 cups sugar
  • 3/4 cup butter or margarine
  • 1/4 cup honey
  • 1/3 cup sliced almonds, lightly  toasted
  • 5 ounces semisweet or bittersweet chocolate  (do not exceed 72% cacao), melted
  • 1 1/2 teaspoons coarse sea salt

Preparation

Line a rimmed baking sheet with parchment paper; coat with  nonstick spray. Place matzo on sheet in a single layer, breaking as needed and  overlapping slightly, leaving no gaps.

Stir sugar, margarine, honey, and 1/4 cup water in a heavy  saucepan over low heat until sugar dissolves. Increase heat  to medium-high and  boil without stirring, occasionally swirling pan and brushing down sides with a  wet pastry brush, until caramel is a deep amber color, 13–15 minutes. Pour  caramel evenly over matzo. Immediately sprinkle almonds over. Let cool.

Drizzle melted chocolate over caramel. Sprinkle salt over. Let stand until chocolate sets, about 30 minutes. Break into pieces.

For a printer-friendly version of this recipe, please click here:  Matzo-Almond Roca

Add to FacebookAdd to DiggAdd to Del.icio.usAdd to StumbleuponAdd to RedditAdd to BlinklistAdd to TwitterAdd to TechnoratiAdd to Yahoo BuzzAdd to Newsvine