Maple Caramel Corn

Maple Caramel Corn

It is hard to believe there are just a few more days until the holidays, I feel like the lights and festivities have just begun!   I hope everyone is completely prepared, with all your shopping done – and you are just relaxing this weekend…right.  I know how it goes, it is never that easy.  All I have to say is I am so glad I started making jam last spring, it really made my gift giving a lot easier this year.  Of course I didn’t make nearly as much as I usually do – but I still made enough to make it through.

If you are trying to decide what to make for your friends, family and neighbors, I am here to help.  I decided to post just a few of

my favorites for you – and all of these are easy enough to bang out in a day – and you still have 5 days until Christmas!

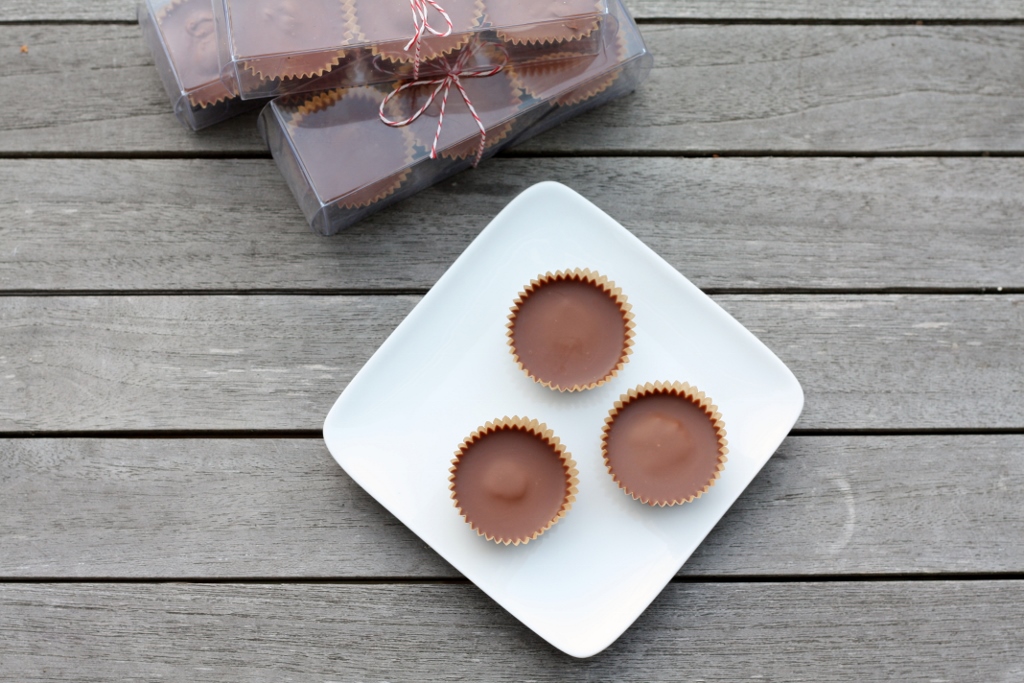
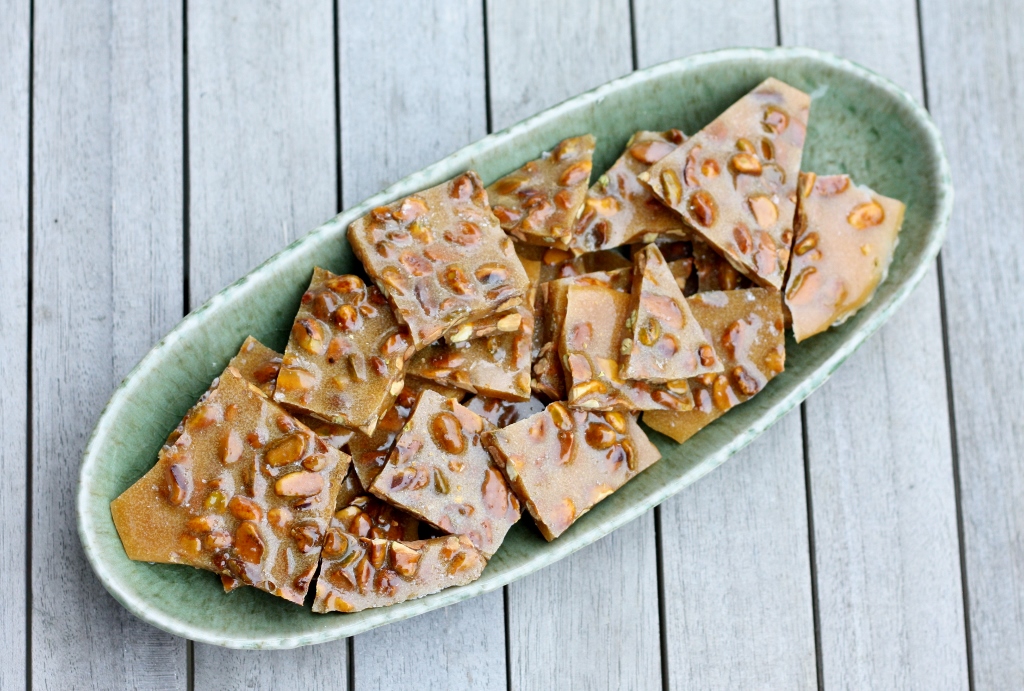
Here are a few of my favorites:

1)  Pear Vanilla Jam

2)  Chocolate Almond Toffee

3)  Salted Pistachio Brittle

4)  Vanilla Bean Caramels with Fleur de Sel

5)  Rocky Rods

And now for a new one to add to the list – this Maple Caramel Corn that we made at The Pantry Holiday Gift Making class – with kids.  We couldn’t stop snacking on this, it is quite addicting.  Boy would I be happy with this as a gift.

I wish all of you a very happy holiday – I hope you spend it with the people you love, and with food that you have been craving.  And most of all, I hope you can relax just a little…that would be the best gift of all.

Ingredients

  • 1/4 cup popcorn kernels
  • 3 tablespoons high-heat oil
  • 1/4 cup maple syrup
  • 2 1/2 ounces unsalted butter, chopped
  • 3/4 teaspoon kosher salt
  • 1 teaspoon cinnamon
  • pinch of cayenne pepper (optional)
  • 2 tablespoons water
  • 1/2 teaspoon baking soda
  • 1 teaspoon vanilla extract
  • flaky sea salt for finishing

Preparation

Preheat the over to 250 degrees.  Line a rimmed baking sheet with parchment paper.

Heat the oil in a 3-quart saucepan on medium-high heat.  Put 3 or 4 popcorn kernels into the oil and cover the pan.  When the kernels pop, add the rest of the 1/4 cup of kernels in an even layer.  Cover, remove from heat and count 30 seconds.  Note:  this method first heats the oil to the right temperature, then waiting 30 seconds brings all of the other kernels to a near-popping temperature so that when they are put back on the heat, they all pop at about the same time.

Return the pan to the heat.  The popcorn should begin popping soon, and all at once.  Once the popping starts in earnest, gently shake the pan by moving it back and forth over the burner.  Keep the lid slightly ajar to let the steam from the popcorn release; this makes the popcorn slightly drier and crisper.  Once the popping slows to several seconds between pops, remove the pan from the heat.  Coat a large mixing bowl with nonstick cooking spray, and transfer the popcorn from the pan to the bowl, taking care to pick out and discard any unpopped kernels.

In a medium saucepan, whisk together the maple syrup, brown sugar, corn syrup, butter, salt, spices and water.  Bring to a simmer over medium-high heat.  Continue to summer, whisking often, until the mixture reads 250 degrees on a candy thermometer, about 3-4 minutes.  Immediately remove the pan from the heat, and whish in the baking soda and vanilla.

Quickly pour the hot caramel over the popcorn.  Use a rubber spatula to gently fold the caramel into the popcorn, taking care to distribute it as evenly as you can.  Transfer the mixture to the prepared baking sheet.  Bake for 1 hour, stirring and turning the popcorn with a spatula every 20 minutes.

Remove from the oven and sprinkle lightly with flaky sea salt.  Place on a cooling rack for 20 minutes.  Gently break up the popcorn and serve.

Keeps in an airtight container for up to 5 days.

For a printer-friendly version of this recipe, please click here:  Maple Caramel Corn


Advertisement

Milk Chocolate and Almond Butter Cups

Milk Chocolate and Almond Butter Cups

Are you ready for the holidays?  My holiday is long gone, and I am still not ready.  Today my plan was the take the day off and catch up on some stuff – but unfortunately the weather got in the way, and with the girls only at school for 3 hours – I was not all that productive.  We woke up to snow, and in Seattle, that means either no school, or a 2-hour delay.  Ok – so instead of working on my stuff, I want to help all of you.  It is the season of giving, and whether you want to make something or buy something – I am offering up suggestions.

If you are in the market of buying – here are my top 5 all time favorite kitchen gadgets:

1)  Oxo 1/4 cup Measuring Cup

2)  Extra-large Spatula

3)  Ice-cream Scoop for Cookies

4)  Immersion Blender

5)  Silicon Pastry Brush

Now – if you are like me, and like to make treats for friends and neighbors – here are my top 5 favorite gifts from the kitchen:

1)  Mulled Cider Jelly

2) Basic Tomato Salsa

3) Chocolate Truffles

4) Vanilla Bean Caramels with Fleur de Sel

5) Rocky Rods

Now – I will be honest – I love all my jams and jellies like children – they are all special in their own way – but I choose one that I thought was just a little extra special.  Seriously though, you can’t go wrong.  And now I have one more to add to that list for next year – the Milk Chocolate and Almond Butter Cups that we made at The Pantry Holiday Gift Making class – with kids.  These are definitely an extra special treat – and for those people allergic to peanuts – have no fear – they are even better made with almond butter.

So – hang in there, just another few days to go – but you have an entire weekend to all your last minute shopping and baking.  HAVE FUN!!!

Ingredients

  • 4 ½ ounces (1/2 cup) creamy almond butter
  • ½ teaspoon vanilla extract
  • 2 tablespoons (1 ounces) butter, soft
  • ¼ teaspoon kosher salt
  • 2 ounces (1/2 cup) powdered sugar
  • 1 pound milk chocolate

Preparation

Combine the almond butter, vanilla extract, butter, salt and powdered sugar in a small bowl.  Mix well.

Melt the chocolate in a microwave (30 second intervals and stir) or a double boiler.  While the chocolate is melting, line a mini-muffin pan with 36 wrappers.  Place 1 teaspoon of the almond butter mixture on top of the melted chocolate then cover the almond butter with more melted chocolate.

Place the pan into the refrigerator to set.  Store the almond butter cups in a well-sealed container in the refrigerator for up to two weeks.

Makes 2 dozen.

For a printer-friendly version of this recipe, please click here:  Milk Chocolate and Almond Butter Cups

Milk Chocolate and Almond Butter Cups 2

Salted Pistachio Brittle

Pistachio Brittle 2

I made it – I actually dove into the pool and survived.  Yes, I have entered the 21st century, and the world has not come to an end.  I can’t believe what a breeze it was to use Windows Photo Gallery for my entire photo editing process.  I can’t believe how many hours (probably days) I have lost moving from program to program.  I am shaking my head as I am typing.  Pretty soon I will have my new wireless printer (that actually is wireless) and nothing will stop me.

That is…until September.  That is truly when the world will come to an end.  Tonight I took my older daughter to the Middle School open house.  Wow.  That is just about all I can say.  Wow. (Moms – any guesses on where that is from??  Yes, just about the greatest book ever.)  Chaos – that’s exactly what it was – in one word or less.  Before we left, she asked me if she should bring her cell phone in case we get separated.  What??  Of course we will not get separated.  Right.  There were more people in that school tonight than I ever could have imagined.  At one point I thought I was going to lose it – I hate crowds.

Then we both had a little freak-out session in the car on the way home, except that I pretended to be nice and calm, like a good mom should – and I let her freak out about how it is going to be so crowded, and so hard to find all the classes, and what if my locker sticks?  Then I told her about our dear friend and neighbor down the street – who couldn’t get into his locker for the first week of school, and had to carry all of his books around the entire week – including his lunch – and then one night told his mom he wasn’t going back to school.  That made her feel better – good job mom.

So – what is just about the only thing that can make anyone feel better after that?  Salted Pistachio Brittle.  This stuff is like crack, not that I have ever tried that – but it is ridiculously addicting, and amazingly delicious.  You can’t just have one bite, oh no sir-e-sir.  Good thing I had a nice pile to come home to.  This recipe from Bon Appetit is just about the best candy I have ever made – and just about the easiest.  No rolling caramel wrappers, you just break and serve.  I feel better already.

Here we go – the world is changing so fast, and my girls are growing up – but there will always be salted pistachio brittle in my life – that I know will be true.  Please remind me of that in September – I am definitely going to need some then, as I kiss my baby good-bye that fall morning…and let her into that chaotic world.  Wow.

Ingredients

  • Nonstick vegetable oil  spray
  • 1 cup sugar
  • 1/2 cup light corn syrup
  • 1 cup unsalted, shelled raw natural pistachios, very coarsely  chopped
  • 1 tablespoon unsalted  butter
  • 1 teaspoon kosher  salt
  • 3/4 teaspoon baking  soda
  • Coarse gray sea salt (such as  fleur de sel or sel gris)

Special Equipment

  • A candy thermometer

Preparation

Line a rimmed baking sheet with parchment paper; spray with  nonstick spray and set aside. Whisk sugar, corn syrup, and  3 tablespoons water  in a medium saucepan. Stir over medium heat until sugar dissolves. Fit saucepan  with candy thermometer, bring mixture to a boil, and cook until thermometer  registers 290°, 3-4 minutes.

Using a heat-proof spatula, stir in pistachios, butter, and  kosher salt (syrup will seize initially, but will melt as it heats back up).  Continue to cook syrup, stirring often, until thermometer registers 300°  and  pistachios are golden brown, 3-4 minutes. Caramel should be pale brown  (it will  darken slightly as it cools). Sprinkle baking soda over and stir quickly to  blend caramel thoroughly (mixture  will bubble vigorously).

Immediately pour caramel onto pre-pared baking sheet and,  using a heat-proof spatula, quickly spread out as thin as possible. Sprinkle  sea salt over and let caramel cool completely. Break brittle into pieces.

DO AHEAD: Brittle can be made 1 week ahead. Store airtight  between sheets of parchment paper (to prevent sticking) at room temperature. 

Pistachio Brittle

For a printer-friendly version of this recipe, please click here:  Salted Pistachio Brittle

Cocoa Nib Pecan Shortbread

Pecan Shortbread

We made it – the kids are done with school, the gifts have been delivered, and now we can sit back and relax.  It’s amazing how this year I really thought I was doing everything ahead of time with all the jam sessions, but I was still scrambling up until the last week.  So – I am hear to write about one more delicious gift from the kitchen – knowing that some of you out there may be looking for just one more thing.
I have never been a huge nut person when it comes to baking – I love eating nuts as snacks, but I like my baked goods pure.  I omit the nuts in my banana bread, as well my chocolate chip cookies.  Even when I bake with peanut butter, I always use creamy.  Heck – I prefer creamy peanut butter just about always.  So – when I saw we were making these Pecan Cocoa Nib Shortbread at The Pantry’s Holiday Gift Making class, I was a little hesitant.
Well – this recipe was different – it really needed those nuts – and the secret?  Chopping those nuts up into really small pieces. It made all the difference.  Basically the nuts were not only used for flavor, but just a hint of texture.  Oh, and the cocoa nibs?  Out of this world.  If you don’t have cocoa nibs though, just chop some high quality chocolate up into small bits.
Now – if you have kids – I highly suggest these – although this recipe is also extremely easy.  You will just have to help with the chopping.  Now go get moving, and hopefully you can carve out some downtime as well this holiday.

Ingredients

  • 3 ½ ounces pecans
  • 8 ounces all-purpose flour
  • 2 ounces whole wheat flour
  • ½ teaspoon kosher salt
  • 8 ounces butter, soft
  • 5 ounces sugar
  • 1/3 cup cocoa nibs

Preparation

Toast the pecans in a 325 degree oven (300 convection) for about 8 minutes.  Remove from the oven and cool until cook enough to handle.  Chop into small pieces.

Whisk together the flours and the salt.  Set aside.

In a stand mixer with the paddle attachment, mix the butter and sugar on low speed until smooth.  Add the chopped pecans and cocoa nibs and mix until just incorporated.  Add the flour mixture and mix on low until just incorporated.

Roll the dough into logs and chill for several hours.  Slice into cookies and chill until ready to bake.

Bake at 350 degrees (325 convection) until browned, about 16-18 minutes.

Makes about 30 shortbread cookies.

For a printer-friendly version of this recipe, please click here: Pecan Cocoa Nib Shortbread

Espresso Marshmallows with Dark Chocolate

Espresso Marshmallows

I have to say, I have been putting off this post for a few days now.  Friday’s news really hit a little too close to home for me.  On Friday, it was bad enough learning about what happened – in the state where I went to elementary school.  But Saturday, when I learned that it was two first grade classrooms, it was a little too much to swallow.  My younger daughter is in first grade, and I just can’t imagine what a nightmare those poor families are living right now.  I tried to stay away from the computer all weekend – and we didn’t have the television on except for football on Sunday – but today I couldn’t avoid it any longer.  It was hard enough leaving the house knowing my kids would be at school today.  I got to my office and just cried.  I wanted to call the schools, and make sure they were going to start locking the doors during the day – but I decided they would get many hysterical calls today, and I wouldn’t add to the chaos.  This is just part of the world we live in, and it makes me sick.  We have to enjoy every minute we have – especially with our little ones.  My heart goes out to all the people suffering from this horrendous tragedy.  I hope we can look back at this as the event that changed things in this country.  We can always hope.

——————————————————————————————————————————

Last week I took a Holiday Gift Making class at my favorite community kitchen – The Pantry.  It was awesome, although I really didn’t need any more edible gifts.  I have about 80 jars of jam I made this summer and fall…  It was really fun, and I came home with 12 more nicely wrapped gifts from the kitchen.  As if that wasn’t enough – my older daughter asked when we were going to make our annual holiday pretzels.  Seriously?  Did we need more treats – of course we did, how could a holiday season go by without making those?  So – on Sunday afternoon, we got out the supplies, and the girls and I hammered out another 7 bags of gifts.  I swear we could go into business at this point.  Does anyone need any?

These marshmallows were one of the treats we made at the class last week – and what an incredible treat they were.  I was snacking on them the entire time.  There were not the easiest of the holiday treats, but they were definitely worth the trouble.  Be careful if you make these with kids – they need to watch you pour the syrup into the egg whites.  They will have great fun decorating though!

Ingredients

  • 1 tablespoon vegetable oil
  • 1/4 cup powdered sugar
  • 1/4 cup cornstarch
  • 1 tablespoon sugar
  • 1 vanilla bean
  • 1/4 cup instant espresso
  • 1/2 cup water
  • 1 ounce powdered gelatin
  • 14 ounces sugar
  • 1 tablespoon corn syrup
  • 3/4 cup water
  • 2 1/2 ounces egg whites, room temperature
  • 1/4 teaspoon kosher salt
  • good quality dark chocolate for decorating

Preparation

Mix the cornstarch and powdered sugar together.  Prepare a 9×13″ pan by greasing it lightly with the vegetable oil.  Dust it with half of the powdered sugar mixture and lightly shake off any excess.

Mix together the vanilla bean seeds and sugar.  Rub with your fingers until the seeds are incorporated into the sugar.  Mix the water and vanilla sugar in a small saucepan and bring to a boil.  Stir in the instant espresso until it is completely dissolved.  Transfer to a bowl and place in the fridge until thoroughly chilled.

When the coffee is chilled, slowly sprinkle the gelatin on top, stirring it in to keep it from clumping.  Place this over a pot of hot water to melt the gelatin, stirring occasionally.

Combine the sugar, corn syrup and 3/4 cup of water in a pot over low heat.  Stir until the sugar is dissolved.  Stop stirring and bring to a boil.  You want the syrup to eventually reach 260 degrees.  When the syrup reaches 240 degrees, begin beating the egg whites until they begin to look like meringue.  The goal is to get the egg whites to whip up at the same time the sugar syrup reaches 260 degrees, adjusting the speed of the mixer as needed.  Once they are stiff and syrup is at 260 degrees, begin slowly pouring in the syrup while continuing to beat the whites on medium high-speed.

If needed, re-warm the gelatin mixture and then pour it into the meringue.  Continue whipping until the marshmallow mixture is glossy, tripled in volume and doesn’t visibly have steam rising from it.  Immediately pour into the prepared pan and quickly smooth the top flat.  Let the marshmallow sit, uncovered, for at least 3 hours at room temperature.

Dust a work surface with the rest of the sugar cornstarch mixture.  Run a knife along the edges to loosen the marshmallow and turn out onto the surface.  Cover with a layer of powdered sugar and rub in with your fingers.  Cut the marshmallow up into squares and toss the squares in the powdered sugar mixture.  Decorate the marshmallows with the melted chocolate.  Store in an airtight container for up to a week.

For a printer-friendly version of this recipe, please click here: Espresso Marshmallows with Dark Chocolate

Candy Cane Brittle

I am late…I am very late, and I am sorry.  This has been quite a week, one I wasn’t really expecting, but these weeks happen, and you have to prioritize.  Unfortunately my post just didn’t make it to the top.  But here I am, better late than never.  This week really ended on a high note, so even though I am emotionally drained, there is a happiness as I am typing away…one that I have been waiting for, and it is finally here.

I decided on bark (or I guess Brittle) as one of the treats I made for people this year.  I am by no means an expert at this – although after the Holiday Treats class I took on Thursday night – I am a lot closer.  When I made these, I didn’t take the time to do them right – but it was fine, they still tasted great – not just great, pretty awesome.  I avoided the whole tempering thing…which after learning more about it – I can’t wait to try it out.  It doesn’t really impact the taste, just how it looks.  You get that really nice dark shiny look to your bark, that is just beautiful.

I found this recipe hidden in Bon Appetit this month, and when I said hiding, I meant that it was not the showcase of the recipe.  The Pots de Creme were, but this is what caught my eye.  The chocolate wafer cookies definitely make these amazing.  So – my gift to you this weekend?  Here is a perfect gift you can make for people…now I am going to go relax.

Ingredients

  • 1 pound high-quality bittersweet chocolate,  chopped
  • 1 cup chopped candy canes, divided
  • 1/2 cup chocolate wafer cookies (such as  Nabisco Famous Chocolate Wafers), lightly crushed
  • 1 ounce high-quality white chocolate,  melted

Preparation

Line a large baking sheet with foil. Stir bittersweet chocolate in a medium  metal bowl set over a saucepan of simmering water until melted. Stir in 3/4 cup  chopped candy and crushed cookies; spread over foil. Sprinkle 1/4 cup candy  over. Drizzle with melted white chocolate. Chill until set, about 30 minutes.  Break into shards.

For a printer-friendly version of this recipe, please click here:  Candy Cane Brittle

Add to FacebookAdd to DiggAdd to Del.icio.usAdd to StumbleuponAdd to RedditAdd to BlinklistAdd to TwitterAdd to TechnoratiAdd to Yahoo BuzzAdd to Newsvine

Trio of Chocolate Truffles

The last dessert I chose for my Tower of Treats were truffles. Who doesn’t like truffles? The day before the auction I made the truffles and the caramels. I figured that trying to make everything in one day would be a little crazy. So the night that I made the truffles and caramels, I was exhausted…if that was all I had to do during that day, it would have been easy – but with two kids, it is never like that. Nevertheless, I had to rally, we had a pre-adoption party to go to.

I didn’t know a lot of people at the party besides the host and hostess – although my husband knew quite a few. At one point he was talking to a guy he hadn’t seen in a while – and I walked up to them to ask Rich how late he wanted to stay, when the guy gave me a hard time about leaving so early. I told him that I was exhausted – I had made truffles and caramels and the next day I had brownies and peanut butter cupcakes to create (ok, yes, I sounded like a whiner at this point…). He mentioned that he made a huge batch of truffles for the holidays for all his family – and yes, it was not easy. The egg whites make the
chocolate really lumpy, and he felt like he wasted hundreds of dollars’ worth of good chocolate. Egg whites? Those were nowhere near my truffles – and I laughed at him, and told him that truffles don’t have egg whites – just cream and chocolate. He looked me straight in the eye and said, “You obviously have no idea what you are talking about.” Wow. Ok – I didn’t go to culinary school, and definitely have a lot to learn when it comes to cooking and baking – but come on. That was quite a statement. It was a good thing I was so tired – otherwise I would have ripped this guy a new one. But, I just turned around a got a drink – and relished in the fact that I had made some damn good truffles that day – and his were a bomb.

These truffles were like the ones I spend tons of money on at Fran’s Chocolates – I swear. Ok, maybe I am going a little overboard, but these were a chocolate lover’s dream. So rich, creamy and decadent – and yes, I’m sure it has a lot to do with the fact that I used high quality chocolate. They were also particularly easy as far as truffles go – my daughter helped me roll them. Most people liked the ones rolled in cocoa the most – because of the texture – but I preferred the coconut – I just love that coconut flavor. Go ahead – try them out – but leave out the egg whites – they ruin the consistency, I am pretty sure of that.

Ingredients

  • 2/3 cup whipping cream
  • 1 (12-ounce) package (about 2 cups) semisweet chocolate chips
  • 2 teaspoons vanilla extract
  • 1/4 cup unsweetened cocoa powder
  • 3/4 cup (about 2 1/2 ounces) sweetened shredded coconut, toasted
  • 1/2 cup (about 2 ounces) finely chopped unsalted almonds

Preparation

Bring cream to boil in heavy medium saucepan. Remove from heat. Add chocolate; whisk until melted and smooth. Whisk in vanilla. Pour into medium bowl. Cover; chill until firm, about 3 hours.

Line baking sheet with waxed paper. Drop mixture by rounded teaspoonfuls onto prepared baking sheet. Freeze until firm, about 45 minutes.

Place cocoa, coconut and nuts in separate bowls. Roll truffles between hands into rounds. Roll 1/3 of truffles in cocoa, 1/3 in coconut and 1/3 in nuts. Cover with plastic; chill until ready to serve. (Can be
made 2 weeks ahead. Keep chilled.)

For a printer-friendly version of this recipe, please click here:  Trio of Chocolate Truffles

Add to FacebookAdd to DiggAdd to Del.icio.usAdd to StumbleuponAdd to RedditAdd to BlinklistAdd to TwitterAdd to TechnoratiAdd to Yahoo BuzzAdd to Newsvine

Vanilla Bean Caramels with Fleur de Sel

I tend to over-extend myself.  Whether it is at work, or at home – I always think I can do more.  I fill my weekends with activities (ok, my kids fill me with activities), and I try to fit in baking and cooking whenever I can.  I can never say no to baking for auctions, or various events at my kids schools…I actually look for those opportunities – as much as I end up cursing later on.

I signed up to bake for the “Dessert Dash” at an auction we are involved in last weekend.  I didn’t want to just bake a cake, I wanted to do something different.  I wanted to give people some choices, and some variety to choose from – knowing that 10 people bid on dessert – and they are stuck sharing one item.  So – I decided to make a Dessert Tower – or what I called – The Tower of Treats.  I bought a three-tiered cardboard cupcake stand, and filled it with various desserts (all of which I will be posting).  Here is the first one – which I sprinkled in between the other goodies.

I found these delicious caramels at Annie’s Eats – I have always been afraid of the candy thermometer, but I faced my fears, and made these – and I am SO GLAD I DID.  They were amazing – in fact, I am still enjoying them because the recipe made so many.  They are buttery and rich, and the subtle salt flavor is just amazing with that deep caramel.  I couldn’t believe they were so easy…I am making these every holiday to wrap my pretzels before dipping them in chocolate.  Wow, I have really been missing out – don’t waste another day…MAKE THESE NOW!!!

Ingredients

  • 1 cup heavy cream
  • 5 tbsp. unsalted butter
  • ½ tsp. vanilla extract
  • 1 vanilla bean pod, split lengthwise and scraped
  • 1¼ tsp. fleur de sel, plus more for sprinkling
  • 1½ cups sugar
  • ¼ cup light corn syrup
  • ¼ cup water

Preparation

Line the bottom and sides of an 8-inch square baking dish with parchment paper.  Lightly butter the parchment.  In a small saucepan, combine the cream, butter, vanilla extract, vanilla bean seeds, pods, and fleur de sel.  Heat over medium-high heat and bring to a boil.  Remove from the heat and set aside.
In a medium saucepan, combine the sugar, corn syrup, and water.  Heat over medium-high heat, stirring occasionally until the sugar is dissolved.  Boil, without stirring but gently swirling the pan occasionally, until the mixture is a light golden caramel color.

Remove the vanilla bean pods from the cream mixture and carefully stir the cream mixture into the caramel – the mixture will bubble up, so pour slowly and stir constantly.  Continue simmering the mixture until it registers 248˚ F on a candy thermometer.  Immediately remove from the heat and pour into the prepared pan.  Let cool for 30 minutes, then sprinkle lightly with additional fleur de sel.  Continue to let sit until completely set and cooled.  Cut into 1-inch pieces (a buttered pizza cutter works well).  Wrap the individual caramels in small pieces of wax paper, about 4-inch squares.

Makes approximately 64 caramels

For a printer-friendly version of this recipe, please click here:  Vanilla Bean Caramels with Fleur de Sel

Add to FacebookAdd to DiggAdd to Del.icio.usAdd to StumbleuponAdd to RedditAdd to BlinklistAdd to TwitterAdd to TechnoratiAdd to Yahoo BuzzAdd to Newsvine

Chocolate Covered Marshmallows

GO STORM!!!  Storm fever, the latest sickness to hit our household.  In case you are not a WNBA fan – I am talking about the Seattle Storm.  They clinched the second round of the play-offs today, in an unbelievable game – they scored a 3 pointer in the last few seconds of the game to come from behind and beat the Phoenix Mercury.

When our second daughter was born, the dream that my husband had about watching professional sports with his children was pretty much done.  I have to say, that watching the Storm game with my girls – both completely interested in what is going on – is amazing.  I love it.  My husband is even starting to get into it.  Most of all, I love that it is women that we are watching on television, and screaming about in the stands.

It is not just little girls that love the games though, my older daughter’s good friend is quite the fan.  He comes to the games in his storm jersey with his face painted – and at the playoff game on Thursday night – I was looking at the little kids on the court who got to hi-five the players as they were introduced – wondering how they got to be so lucky – when there he was – with a brand new basketball in hand, given to him by Lauren Jackson!  Just at that moment – his mom texted me, and yes, it was him!!  What an experience that he will never forget.

Well Seattle Storm – these treats are for you.  Keep up the amazing work – and we will be cheering for you all the way!!

Ingredients

  • 30 marshmallows
  • 1/2 pound of milk or dark chocolate
  • assorted sprinkles or chopped nuts
  • 10 wooden skewers

Preparation

Line some parchment paper on a cookie sheet. Put 3 marshmallows close together at the sharp end of the skewer.  Using a strong pair of scissors, cut off the sharp point.  Place the chocolate in a shallow microwave safe bowl.  Heat the chocolate in 30 second intervals, stirring well between each time, until the chocolate is melted and smooth.  Dip the marshmallows in the chocolate and twist them around to make sure all the marshmallows are completely covered with chocolate.  Place them on the cookie sheet lined with parchment, and decorate with sprinkles.  Let them harden either at room temperature, or by placing them in the refrigerator.

Makes 10 skewers.

For a printer-friendly version of this recipe, please click here:  Chocolate Covered Marshmallows

Add to FacebookAdd to DiggAdd to Del.icio.usAdd to StumbleuponAdd to RedditAdd to BlinklistAdd to TwitterAdd to TechnoratiAdd to Yahoo BuzzAdd to Newsvine