Grapefruit-Poppy Seed Loaf Cake with Yogurt Glaze

There is a lot of talk these days about diversity – as there should be – it is critical for so many reasons.  Fortunately, there is even more talk these days about inclusion and belonging.  Without it, you will never be able to sustain a diverse population.  Now I am not just talking about the color of your skin, or the gender that you identify with – I am also talking about the diversity of thought.  If you do not feel like you belong, and you can’t be your real self – there is no point.

I have two daughters – one teenager, and one pre-teen, and the focus on females and how they look is very disturbing to me.  I want my daughters to grow up feeling good about the way they look – however that is.  Of course I want them to be healthy, but to treat themselves when they want and not have to worry.  Fortunately exercise and eating healthy foods is part of our lifestyle, but another part of our lifestyle is enjoying really delicious food – even when they may not be the best for us.  And that is ok!  Particularly when they are homemade…so you know exactly what is going into those delectable goodies.

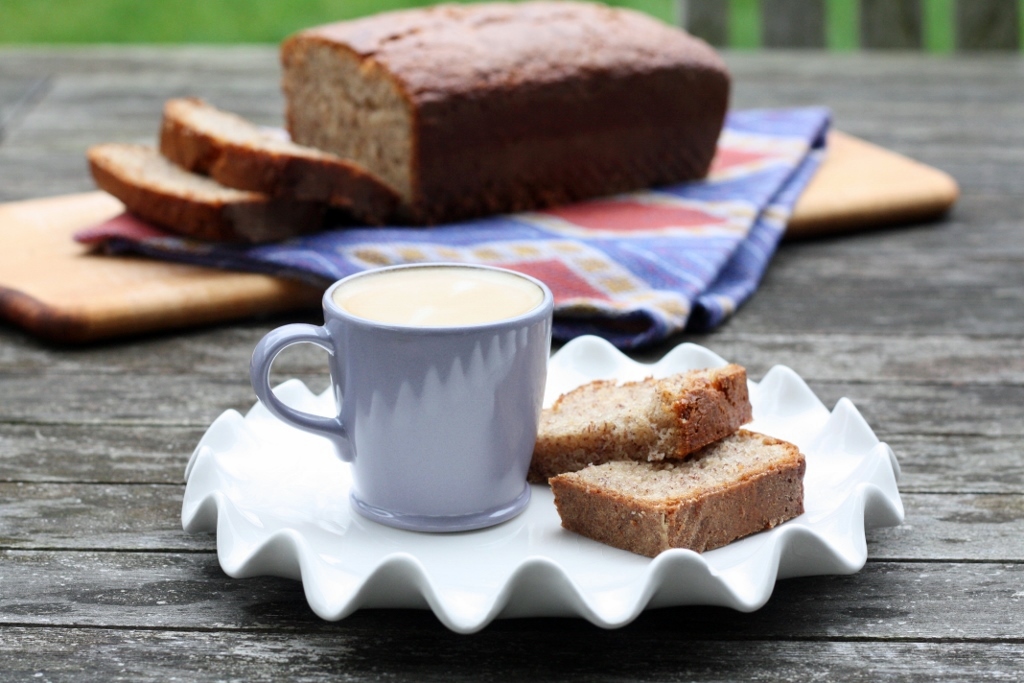
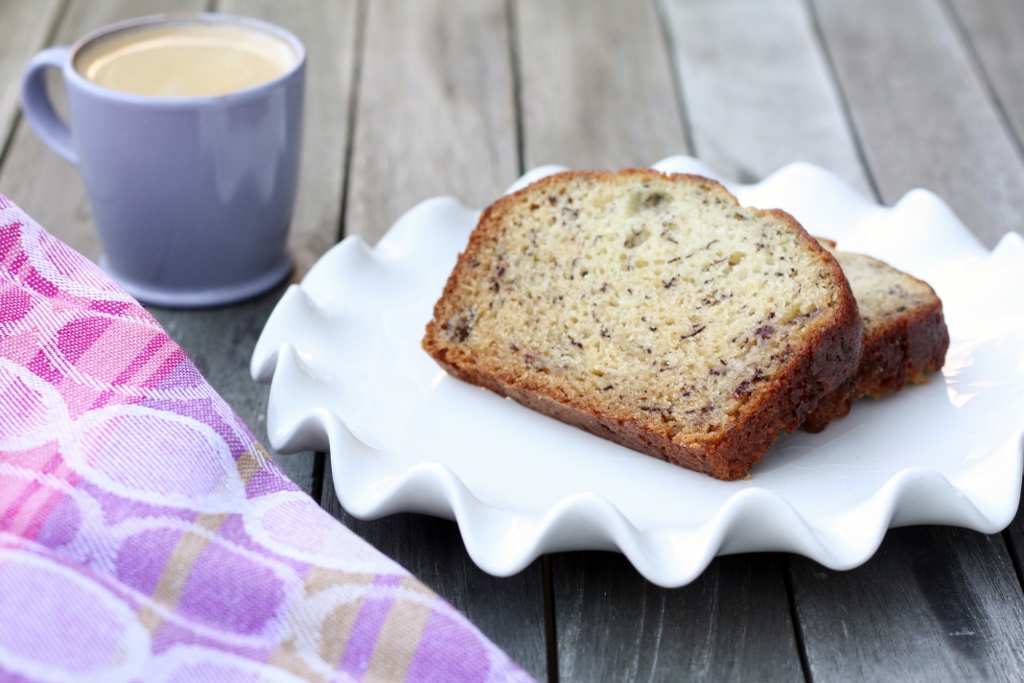
Two brands that really focus on making sure you can be yourself are PrAna and Stonyfield Farms – and they both inspired me to get into my kitchen today and bake.  After all – that is the real me.  I made this grapefruit-poppy seed loaf cake with a yogurt glaze that I found in Bon Appetit– made with Stonyfield Farm’s whole milk greek yogurt…and boy was it amazing.  Maybe it is because I haven’t been able to bake much lately, or maybe because I made it with lots of love – this cake was moist and flavorful.  And I can’t wait for the sun to shine a little brighter so I can start wearing my new PrAna dress sitting next to the bread.  And what’s more exciting, is you too can get yourself some beautiful clothing at 15% discount!  Just use this code when checking out in May:  WHOLES17FLC

Ingredients

  • Nonstick vegetable oil spray
  • 1½ cups all-purpose flour
  • 2 teaspoons baking powder
  • ¾ teaspoon kosher salt, plus more
  • 1 tablespoon finely grated grapefruit zest
  • 1 cup granulated sugar
  • 2 large eggs, room temperature
  • ⅓ cup vegetable oil
  • 1 teaspoon vanilla extract
  • ¾ cup plus 1 tablespoon plain Greek yogurt (Stonyfield Farm’s Whole Milk Greek Yogurt)
  • 8 tablespoons fresh grapefruit juice, divided
  • 1 tablespoon poppy seeds, plus more for sprinkling
  • ½ cup powdered sugar

Preparation

Preheat oven to 350°. Line an 8½x4½” loaf pan, preferably metal, with parchment paper, leaving overhang on the long sides, and lightly coat with nonstick spray. Whisk flour, baking powder, and ¾ tsp. salt in a medium bowl.

Using your fingers, work grapefruit zest into granulated sugar in a large bowl until sugar starts to clump and mixture is very fragrant, about 1 minute. Add eggs, oil, and vanilla and beat with an electric mixer on high speed until light and thick, about 4 minutes. Reduce speed to low and mix in half of dry ingredients, then mix in ¾ cup yogurt. Mix in remaining dry ingredients followed by 5 Tbsp. grapefruit juice and 1 Tbsp. poppy seeds. Scrape batter into prepared pan and smooth top.

Bake cake until top is golden brown and a tester inserted into the center comes out clean, 50–60 minutes. Transfer pan to a wire rack. Poke holes in top of cake and brush remaining 3 Tbsp. grapefruit juice over top. Let sit 15 minutes, then run a knife around sides to loosen and use parchment paper to lift cake out of pan and onto rack. Remove parchment and let cool completely.

Whisk powdered sugar, remaining 1 Tbsp. yogurt, 1 tsp. water, and a pinch of salt in a medium bowl until smooth and drizzle over cake. Sprinkle with poppy seeds and let sit until glaze is set, about 30 minutes.

Do Ahead: Loaf can be baked and glazed 3 days ahead. Store airtight at room temperature.

For a printer-friendly version of this recipe, please click here:Grapefruit-Poppy Seed Loaf Cake with Yogurt Glaze

Please note: As a Team Stonyfield ambassador, I am being compensated. All opinions about Stonyfield Farm and PrAna’s products are always my own.


Almond Butter Banana Bread

almond-butter-banana-bread

My mother’s banana bread is pretty perfect just the way it is.  It is just about the only recipe that I never mess with – I have tried other banana bread recipes, but none compare.  The only experimenting I have done over the years is to create a non-dairy version that my husband can enjoy.  Coconut milk makes a wonderful substitution from the buttermilk that normally I use.

This month I received some delicious products from Woodstock Foods to try – and for some reason when I dipped my spoon into the delicious almond butter – it was the banana bread that I couldn’t stop thinking about.  What if I added almond butter to the mix…would magic happen?  Well, I think it was the combination of Stonyfield Farm’s Grass Fed Yogurt with the Almond Butter that really sparked something.  This was one of the best batches I have ever made.  But seriously, with this recipe, have I ever made a bad batch?  These loaves came out a little more tender, and the almond butter just gave it a little richer flavor.  Success all around – particularly for my kids who now have a special treat for breakfast all week.

Ingredients

Preparation

Pre-heat oven to 350.  Mash bananas with a fork and set aside.  Mix oil, sugar, yogurt, vanilla, almond butter and eggs well.  Add mashed bananas.  Mix dry ingredients in a small bowl, and add to banana mixture until just combined well.  Pour into 2 greased and floured 9 x 5″ loaf pans.  Bake for 45-50 minutes, or until a toothpick inserted in the middle comes out clean.  Remove from pans while still warm and wrap with plastic.

For a printer-friendly version of this recipe, please click here: almond-butter-banana-bread

Please note: As a Team Stonyfield ambassador, I am being compensated. All opinions about Stonyfield Farm’s products and Woodstock Foods are always my own.

Apple Streusel Muffins with Maple Drizzle

Apple Streusel Muffins

Breakfast is my favorite meal of the day, next to dinner, lunch, and all the snacks in between.  I definitely like to eat all day, it keeps me going.  My most favorite days are when I can start off with a couple of hard boiled eggs, and then a couple hours later, I eat a muffin.  That only happens when there are muffins in the house, and they didn’t all get claimed by the kids – which is not that often.

Last night I was exhausted – and I knew I had to get up super early in the morning – not my regular early time, but a couple of hours earlier than that.  Unfortunately for me, I was up most of the night worried that I would sleep through my alarm.  Boy do I hate when that happens.  Instead, I very lightly slept (if at all), and turned off my alarm before it even went off.  I was so tired I wasn’t even hungry.

When I finally was hungry enough to think about food, these muffins were what came to mind.  Right out of the oven, with a nice cup of tea.  These muffins have been long gone though, but I still think about them.  I know what you are thinking – what is so special about these?  Well, it was the maple drizzle.  It was almost like I was eating an apple pancake shaped into a muffin with some syrup on top.  Yes, they were that good.  The perfect breakfast to get you out of bed – and from Cooking Light, what could be better?  Sleeping in and then eating these muffins…

Ingredients

Streusel:

  • 2 tablespoons old-fashioned rolled oats
  • 2 tablespoons spelt flour (if you don’t have spelt flour you can use all-purpose)
  • 1 tablespoon brown sugar
  • 1 tablespoon butter, melted
  • 1/2 teaspoon ground cinnamon

Muffins:

  • 5 ounces spelt flour (about 1 cup) (if you don’t have spelt flour you can use all-purpose)
  • 2.5 ounces whole-wheat pastry flour (about 1/2 cup)
  • 2 teaspoons ground cinnamon
  • 1 1/2 teaspoons baking powder
  • 1/2 teaspoon baking soda
  • 1/4 teaspoon kosher salt
  • 3/4 cup low-fat buttermilk
  • 1/2 cup brown sugar
  • 2 tablespoons canola oil
  • 1 tablespoon butter, melted
  • 1 large egg, lightly beaten
  • 1 Granny Smith apple, diced (about 1 1/4 cups)
  • 1/2 cup powdered sugar
  • 2 tablespoons maple syrup
  • 1/2 teaspoon water

Preparation

Preheat oven to 400°.

To prepare streusel, combine first 5 ingredients in a bowl; set aside.

To prepare muffins, weigh or spoon 5 ounces spelt flour and whole-wheat pastry flour into dry measuring cups; level with a knife. Combine flours, cinnamon, baking powder, baking soda, and salt in a medium bowl.

Combine buttermilk, 1/2 cup sugar, oil, 1 tablespoon melted butter, and egg in a bowl. Add buttermilk mixture to flour mixture, stirring just until combined. Fold in apple. Divide batter among 12 paper-lined muffin cups; top evenly with streusel. Bake at 400° for 16 minutes or until a wooden pick inserted in the center comes out with moist crumbs clinging. Cool in pan 5 minutes. Remove from pan; cool completely.

Combine powdered sugar, syrup, and 1/2 teaspoon water in a bowl; stir until smooth. Drizzle evenly over muffins.

For a printer friendly version of this recipe, please click here:  Apple Streusel Muffins with Maple Drizzle

Dairy Free Blueberry Muffins with Cinnamon Sugar

Bluberry Muffins 1

I cannot believe that summer is almost over, and I feel like I have hardly had time to smell the roses.  Between visitors, swim meets, and a ridiculous amount of work – it’s no wonder.  The girls on the other hand have had quite a different experience, they have had the summer of their life.  Enjoying every day of summer that they can.  So – today’s post is from my daughter – she decided to help me out…I am still smiling.

We spend most of our summer at the pool, one day when we were walking down, we saw that the pool was closed and wouldn’t be open until later in the afternoon. So we started trudging home having no idea what we were going to do. We got home and looked in the fridge and remembered that we had these giant blueberries that we got from the farmers market. We called to our mom and asked her if we could bake something and we both had the same idea of what to bake- blueberry muffins. We got this recipe from the Kitchen for Kids cookbook. The recipe called for milk but we substituted that for coconut milk that way our dad could have some. These muffins are light, airy, and almost cake like. We also added a pinch more cinnamon because who doesn’t love more cinnamon. I love these muffins because they are super easy and tasty. I hope you like these as much as I do!

So there you have it – if a 12 and 8 year old could make these all by themselves (no help AT ALL from mom, not even clean up!), there is no excuse for you.  Thanks to my wonderful daughters for helping with the blog, and providing us a lovely breakfast this morning – I got to have my cake, and eat it too (for breakfast!)

Ingredients

  • 1 1/2 cups all-purpose flour
  • 3/4 cup white sugar
  • 2 teaspoons baking powder
  • 1/4 teaspoon baking soda
  • 1/8 teaspoon salt
  • 1 1/2 teaspoons white sugar
  • 1 teaspoon cinnamon
  • 1 large egg
  • 3/4 cup coconut milk
  • 1/4 cup vegetable oil
  • 1 tablespoon lemon juice
  • 3/4 cup fresh or frozen blueberries

Preparation

Preheat oven to 375 degrees.  Grease 9 muffin tins, or use papers.

Mix the flour, 3/4 cup sugar, baking powder, baking soda and salt in a bowl.  Set aside.

In a small bowl or cup, mix the 1 1/2 teaspoons sugar and cinnamon.  Set Aside.

In another bowl, use a whisk to stir the egg, coconut milk, oil and lemon juice until smooth.  Switch to a baking spatula and scrape into the flour mixture.  Stir to form a stiff batter.  Don’t over-mix.  Stir in the blueberries.  (Be especially careful not to over-mix frozen blueberries because the juice will make the batter green.)

Green a teaspoon to scoop the stiff batter into 9 muffin tins (or use an ice cream scoop) to about half-full.  Use a clean teaspoon to sprinkle the cinnamon sugar on top.

Bake about 20 minutes, or until the muffins are puffed and golden.  Cool slightly.  Eat while warm.

For a printer-friendly version of this recipe, please click here: Dairy Free Blueberry Muffins with Cinnamon Sugar

Oatmeal Chocolate Chip Scones

Oatmeal Chocolate Chip Scones

I know it is Sunday, but I am already looking forward to Thursday.  That market basket that my husband got me for Mother’s Day is quite something.  It is like Christmas morning every Thursday night – as we unpack the beautiful wooden box with all sorts of goodies.  This week’s basket came with this wonderful box of pistachio apricot granola.  I can’t wait to put some on my yogurt in the morning.  It’s the little things that get me through this end-of-the-year chaos.

Since I was set for breakfast this week, I thought it was only fair if I made some treats for the girls.  They do love granola – but I know they love scones even more.  I have gone through many ways of saving recipes over the years.  I started by keeping every single food magazine and marking the pages where I liked a recipe.  That worked for a little while, but after I had over 20 magazines, I couldn’t remember what was in each issue.  Then I started cutting out the indexes, and had a binder of them – with the highlighted recipes that I liked.  Again, not very practical as I had to look through hundreds of pages to find what I was looking for.  The next plan was to cut out the recipe and put it in a photo album, where I had dividers of the different types of recipes.  After I filled up two binders, I was done with that method.  At that point I decided I needed to use technology, and that’s when I started my blog.  I tell you, I love being able to Bing a recipe from my blog and get to it instantly.  Technology can be quite awesome.

Instead of going to my usual stack for a scone recipe (knowing that I didn’t have any lingering around that I wanted to make), I went to one of the binders I created – and flipped to the “Breakfast” tab.  I found this recipe that I probably cut out ages ago from either Gourmet or Bon Appetit and decided to see if it had stood the test of time.  Boy did it ever – these scones were crunchy on the outside, soft and pillowy on the inside, with a touch of oat flavor, but nicely sweetened.  I could have scarfed a couple of them down, except that I reminded myself they were for the girls – I already had my treat waiting.  So, we will all be eating well this week, and we need to – if we are going to get through these last 5 weeks.  Ugh!

Ingredients

  • 1 2/3 cups all-purpose flour
  • 1/4 cup plus 2 tablespoons sugar plus additional for sprinkling
  • 1 tablespoon baking powder
  • 3/4 teaspoon baking soda
  • 1/2 teaspoon salt
  • 1 1/3 cups old-fashioned oats
  • 1 1/2 sticks (3/4 cup) cold unsalted butter, cut into tablespoon pieces
  • Finely grated zest from 1 large navel orange
  • 2/3 cup well-shaken buttermilk plus additional for brushing
  • 1/2 cup mini chocolate chips
  • Special equipment: a 2 1/4-inch round cookie cutter

Preparation

Preheat oven to 425ºF.

Sift together flour, sugar, baking powder and soda, and salt into a food processor, then add oats and pulse 15 times. Add butter and pulse until mixture resembles coarse meal with small (pea-size) lumps, then transfer to a bowl.

Stir together zest and buttermilk. Toss chocolate chips with oat mixture, then add buttermilk, stirring with a fork just until a dough forms. Turn dough out onto a lightly floured surface  and gently knead 6 times.

Pat dough into a 1-inch-thick round, dusting surface with more flour if necessary. Cut out as many scones as possible with cutter, dipping it in flour before each cut, and transfer scones to a lightly buttered large baking sheet. Gather scraps into a ball, then pat into a round and cut out more scones in same manner.

Brush tops of scones with buttermilk and sprinkle lightly with sugar. Bake in middle of oven until golden brown, 15 to 18 minutes, and transfer to a rack.

Serve warm or at room temperature.

For a printer-friendly version of this recipe, please click here: Oatmeal Chocolate Chip Scones

Cream Cheese Danish Braid

Cream Cheese Danish Bread

Happy Mother’s Day to all you mothers out there!  I hope everyone had a wonderful day, and as my mother told me to do, indulge just a little.  Speaking of indulging…in going with the theme of over the top that I started last weekend, I decided to continue that trend just a bit…particularly in honor of mother’s day.

I don’t make bread very often anymore – it was something I was fascinated in when I lived in Denver – mostly because of the high altitude.  Bread would rise much faster, and it was just exciting to watch.  For the past 18 years, I can count how many times I have attempted a yeast dough on one hand – just because I don’t want to spend a day waiting for it to rise.  A couple of years ago, I noticed that my oven had a proof setting – and all of a sudden I realized that I had my own little proofing oven right in my house.  But even that added incentive was not enough.

The other month in Cooking Light they had a section on cooking and baking like the professionals.  Basically they tried to tell you that you didn’t have to be an expert to make different things.  I know better than that, and didn’t fall for it for a minute.  But here I was cutting out this delicious cream cheese Danish braid and sticking it in my recipe pile.  Note to self – if you don’t want to make something, do not put it in that pile.  Of course placing anything in that pile means that it is visible for my daughters to see – and when my older one saw that it was an option, that’s all she talked about.

So – I attempted the Danish braid.  I was not expecting much, but that dough was heavenly.  Figuring out exactly how to make the braid just by reading the instructions was a little tricky – but it turned out beautifully.  I was a hero.  My daughter was completely amazed.  The filling was a little sweet for us – but the bread was out of this world.  Just amazing, and I can’t wait to try the dough on cinnamon buns.

Here’s to all you heroes out there – but especially the moms today – even the little things you do go a long way…it is your day to celebrate.

Ingredients

Sponge:

  • 6 tablespoons very warm 1% low-fat milk (120° to 130°)
  • 1 teaspoon sugar
  • 1 package quick-rise yeast (about 2 1/4 teaspoons)
  • 2 tablespoons unbleached all-purpose flour

Dough:

  • 7.9 ounces unbleached all-purpose flour, divided (about 1 3/4 cups)
  • 2.25 ounces whole-wheat pastry flour (about 1/2 cup)
  • 1/4 cup sugar
  • 1/4 cup light sour cream
  • 3 tablespoons butter, softened
  • 3/4 teaspoon salt
  • 1 teaspoon vanilla extract
  • 1 large egg
  • Cooking spray

Filling:

  • 4 ounces 1/3-less-fat cream cheese
  • 1/3 cup part-skim ricotta cheese
  • 2 tablespoons honey
  • 2 teaspoons fresh lemon juice
  • Dash of salt

Remaining ingredients:

  • 1 teaspoon water
  • 1 large egg
  • 1/3 cup powdered sugar
  • 2 teaspoons 1% low-fat milk
  • 2 tablespoons sliced almonds, toasted

Preparation

To prepare sponge, combine first 4 ingredients in a medium bowl, stirring well with a whisk. Cover loosely with plastic wrap; let stand 15 minutes.

To prepare dough, weigh or lightly spoon 6.75 ounces (about 1 1/2 cups) all-purpose flour and pastry flour into dry measuring cups; level with a knife. Combine 1/4 cup sugar, sour cream, butter, salt, vanilla, 1 egg, and sponge in a large bowl; beat with a mixer at medium speed 1 minute or until well combined. Add flours; beat at low speed 3 minutes or until a soft dough forms. Turn dough out onto a lightly floured surface. Knead until smooth and elastic (about 4 minutes), adding remaining 1.15 ounces all-purpose flour, 1 tablespoon at a time, to prevent dough from sticking. Place dough in a large bowl coated with cooking spray. Cover and let rise in a warm place (85°), free from drafts, 1 hour and 15 minutes or until doubled in size. (Gently press two fingers into dough. If indention remains, dough has risen enough.)

To prepare filling, combine cream cheese and the next 4 ingredients (through dash of salt) in a medium bowl; beat with a mixer at medium speed until smooth.

Punch dough down; roll dough into a 12 x 15-inch rectangle on lightly floured parchment paper. Spread cream cheese mixture down center of dough, leaving about a 5-inch border on each side and a 1-inch border at top and bottom of rectangle. Make 5-inch cuts about 1 inch apart on both sides of dough to meet filling using a sharp knife or kitchen shears. Remove 4 outer corner strips of dough from rectangle; discard. Fold top and bottom 1-inch portions of dough over filling. Fold strips over filling, alternating strips diagonally over filling. Press ends to seal. Transfer braid and parchment paper to a baking sheet. Cover and let rise 45 minutes.

Preheat oven to 375°. Combine 1 teaspoon water and 1 egg; stir with a whisk. Brush braid with egg mixture. Bake at 375° for 20 minutes or until golden. Cool on wire rack 10 minutes.

Combine powdered sugar and 2 teaspoons milk in a bowl, stirring until smooth. Drizzle glaze over braid; sprinkle with nuts.

For a printer-friendly version of this recipe, please click here:  Cream Cheese Danish Braid

Johnnycake Bread

Johnnycake Bread

What exactly is an “acquired taste?”  I use the phrase when I am describing something that I didn’t like at first, and then it grew on me.  I wouldn’t say I can put my finger on too many things like that, although artichokes definitely come to mind.  I remember sort of liking them the first time I tried one, and then over the years they completely grew on me to the point that I now consider them almost a delicacy.  My daughters were exactly the same way – the first time they weren’t crazy about them, but now they beg me to buy them in the market at this time of the year.

My daughter is still on this breakfast treat kick that she has been on for quite a while.  She just thinks that it is much easier to enjoy a slice of banana bread or a muffin in the morning, than to take the time to make toast, or even eat a bowl of cereal.  When your bus comes at 7:10 in the morning, I think there is always a little bit of a panic…what if I don’t have time to eat breakfast at home, what could I throw in my backpack and eat on the way?

I found this recipe in Bon Appetit ages ago, and it has been sitting patiently in the pantry waiting for its chance.  I didn’t think it looked overly sweet, but for some reason I was intrigued.  When my daughter asked what I was going to make for breakfast for her – I showed her the recipe.  She didn’t say no, which I thought was a good sign.

I absolutely LOVED this bread.  It was the cross between a brown bread and a cornbread.  Now, there was a certain way to eat this though after the first day and it was hot out of the oven.  I actually toasted this with some butter – and it sung in my mouth.  The best part, you can enjoy this bread at any meal.  The more I ate it, the more I loved it.  My daughter on the other hand took one bite, and that was enough.  This was not her type of breakfast treat.  Cereal for her.  Oh well, I guess my acquired taste was not contagious in this case.  Hey, more Johnnycake Bread for me…!!

Ingredients

  • ¼  cup vegetable oil, plus more for pans
  • 1¼ cups all-purpose flour
  • ¾ cup cornmeal
  • ¼ cup granulated sugar
  • 1½ teaspoons baking powder
  • ¾ teaspoon kosher salt
  • 2 large eggs
  • 1 cup whole milk
  • ¼ cup mild-flavored (light) molasses
  • 1 tablespoon maple sugar or raw sugar

Preparation

Heat oven to 325°. Lightly oil two 5×2½” loaf pans (or one 8½x4½” loaf pan). Whisk flour, cornmeal, granulated sugar, baking powder, and salt in a large bowl. Make a well in the center, add eggs, milk, molasses, and ¼ cup oil, and whisk in dry ingredients. Divide between pans. Sprinkle with maple sugar.
Bake breads until golden and a tester inserted in the center comes out clean, 40–45 minutes for small loaves (50–55 minutes for large loaf). Transfer pans to a wire rack and let cool 10 minutes before turning out.

Do Ahead:  Breads can be made 1 day ahead. Store wrapped tightly at room temperature.

For a printer-friendly version of this recipe, please click here:  Johnnycake Bread

Chocolate Chip Ricotta Scones

Chocolate Chip Ricotta Scones

Here we are back to breakfast.  My daughter got sick of the banana bread that I made every week for the past month.  The good news is that I finally used up the huge bag of frozen bananas we had in the freezer.  So of course I got the question on Sunday morning, “What am I going to eat for breakfast this week?”  I guess cereal was not the answer she was looking for.  Why is it that they can listen to the same song over and over again, but they get sick of my wonderful banana bread after a month?

To digress just for a moment, for some reason as I was looking at these beautiful scones typing away, the song Waltzing Matilda came into my head.  Why?  I have no idea how my mind works sometimes.  But nevertheless, it did.  I started singing the song, and asked my husband if he remembered it – of course he did.  We only listened to it about 100,000 times – it was on a Dan Zanes album that the girls absolutely loved when they were little.  And if you have small kids, you know that when they enjoy a song in the car – you keep playing it.  When I Binged it – the first YouTube video that was listed was by Slim Dusty.  Wow.  What a blast from the past.  My husband and I were in the office singing at the top of our lungs – of course intriguing my older daughter who was trying to finish up her homework, and all of a sudden the three of us were in the office having a little sing-a-long.  Gotta love that song…

Back to the scones – so needless to say, cereal was not going to cut it – fortunately Cooking Light came to the rescue – with some very interesting looking scones.  I adapted them to fit my daughter’s tastes – which of course has to include some chocolate.  These scones were soft and flakey and absolutely delicious.  She actually rationed them out so they lasted the entire week.  Just 30 seconds in the microwave was all they needed in the morning, and they were as fresh as can be.  Let’s see how many weeks in a row she can eat these – surely not as long as Waltzing Matilda – but maybe longer than banana bread?

Ingredients

  • 1 cup part-skim ricotta cheese (such as Calabro)
  • 1/4 cup packed brown sugar, divided
  • 1 teaspoon vanilla extract
  • 1/3 cup plus 1 tablespoon fat-free buttermilk, divided
  • 2 tablespoons canola oil
  • 4.5 ounces whole-grain pastry flour (about 1 cup)
  • 3.4 ounces unbleached all-purpose flour (about 3/4 cup)
  • 1 tablespoon baking powder
  • 1/2 teaspoon salt
  • 4 tablespoons cold unsalted butter, diced
  • 1/2 cup chocolate chips
  • 1 large egg, lightly beaten
  • 1 tablespoon turbinado sugar

Preparation

Preheat oven to 425°.

Combine ricotta cheese, 1 tablespoon sugar, and vanilla in a medium bowl. Reserve 1/2 cup of the ricotta mixture. Add 1/3 cup buttermilk and canola oil to remaining ricotta mixture, stirring until smooth.

Weigh or lightly spoon flours into dry measuring cups; level with a knife. Combine flours, remaining 3 tablespoons sugar, baking powder, and salt in a large bowl; cut in butter with a pastry blender or 2 knives until mixture resembles coarse meal. Add chocolate chips; toss. Add buttermilk mixture; stir just until combined.

Turn dough onto a counter lighted dusted with flour.  Pat into a 1 inch thick circle, and then cut into eight wedges shaped pieces. Combine egg and remaining 1 tablespoon buttermilk, stirring with a whisk. Gently brush top and sides of dough with egg mixture. Sprinkle with turbinado sugar.

Bake at 425° for 15 to 16 minutes or until golden. Remove from pan; cool slightly on a wire rack. Beat the reserved ricotta mixture at medium speed 3 minutes or until fluffy. Serve with warm scones if you would like.

For a printer-friendly version of this recipe, please click here:  Chocolate Chip Ricotta Scones

Indian Parantha

Indian Parantha

What a week…and I can’t believe it is only Wednesday.  I am only posting this tonight because I need a break from the madness.  Yes, there has been some serious madness going on this week.  I have probably two of the most important meetings I will have all year – tomorrow.  Isn’t that always the way things go?

And just when I didn’t think I could take anymore – tonight my daughter went to her new middle school she was redistricted to next year.  We have all been trying to look on the bright side of this move, but seriously, I see very little positives at all.  The worst part of all is that the majority of her friends will not be joining her.  Tonight they invited current 6th and 7th graders to come and talk about their new school, and what electives they would like to see.  This will be the first of a series of meetings with the kids – because at this point, they still have nothing but a Principal and a couple of teachers.  When she got in the car, she started telling me about how depressing it was.  The school is horribly old and run down, the science classrooms are from the dark ages (unlike her current school that was renovated a few years ago, and is beautiful) – and there won’t be an orchestra room (we are still crossing our fingers for an orchestra – there are 5 in her current school).  She said at one point the principal asked them to write down what they like about their current school – and one of her friends wrote this:

MY FRIENDS

Thanks for taking them away from me

I almost burst into tears.  I guess the principal saw this, and told the girl that they were supposed to be focusing on the positives, and to please turn that piece of paper over.  ARE YOU KIDDING ME???  My daughter said they are just looking for a way to get out their feelings – and I completely agree with her.  They need to be a little sensitive about this change…geez.

So – as you can see, I am in fine form right now, and trying to get out of this funk in preparation for tomorrow.  So now it is time to switch gears and talk about something that puts a smile on my face.  Indian Parantha.  The other week I took a class at my favorite Community Kitchen – all about making Indian breads.  One of my very good friends is from India and when I was pregnant she would bring me to her house so she could cook for me.  This was one of the things she would make – and she make them so easily – and beautifully.  I have to admit – they were not that difficult to make, and boy did they taste delicious – particularly with some ghee brushed on top.  Maybe if I can get through tomorrow, this will be my treat afterwards.  Personally, I think I will need something a little stronger, but this will be a nice accompaniment…

Ingredients

  • 2 cups white whole wheat flour (Chapatti Atta in the indian grocery stores)
  • 3/4 cup cool water

Preparation

Using your hands, bring this together in a large mixing bowl to form a ball.  Knead it in the bowl for a minute until the dough comes off your hands.  Let the dough rest at room temperature for 5 minutes.

Preheat a cast iron griddle on medium low.  You will have to adjust the heat after the first roti depending on how fast or slow it is cooking, every stove is different.

Divide the dough into 10 equal portions.  Place one portion of dough in the palm of your hand and knead it with your other hand 10 times, roll it into a ball and flatten it slightly.  Pinch it into a flat disk about 3″ in diameter, lightly dust it in dry flour. On a lightly floured wooden cutting board or smooth countertop roll out to a 6″ diameter circle. If it starts to stick, pick it up and dust with more flour. Place the roti between the palm of your hands and shake off any extra flour. Place the roti on the grill for approximately one minute.  When the color of the roti has changed to a slightly deep tan flip the roti. There should be no brown spots on the other side. If there is, lower the heat until light brown spots appear all over the other side. Cook for another minute gently pressing down on the roti with a folded tea towel until light brown spots appear all over the other side.  Flip roti one more
time and cook for another minute gently pressing down with a tea towel slightly turning the roti. The roti should fill with hot air. Continue pressing gently, remove from heat and serve immediately with a dab of butter.

For a printer-friendly version of this recipe, please click here:  Indian Parantha

Dairy-Free Banana Bread

Dairy-Free Banana Bread 2

Sometimes you just need a little comfort.  This could be in many different forms – although comforting food seems to be what people gravitate towards when that need exists.  No wonder we have such an obesity problem in the United States – comfort food restaurants are everywhere, and unless you choose wisely when to indulge (and maybe balance it out with some exercise), it can be dangerous.

I definitely love my comfort good – but all in moderation.  Friday night we went to our absolute favorite restaurant/bar in Seattle, and ordinarily I would never order something like this – but it was calling for me.  It was a wonderful bowl of carbonara – with a perfectly poached egg on top.  I am telling you – this dish of homemade angel hair pasta with the smoky ham – it was decadent, and I enjoyed every single bite.  If that wasn’t enough, I had a piece of peanut butter pie for dessert with a small scoop of banana ice-cream.  I went all out.  The next morning, I couldn’t get to the gym fast enough.  Thank goodness for Tabata.  But everyone deserves an indulgent night now and then.

Most of the time what comforts me the most are the simple pleasures – like banana bread.  My mother’s banana bread recipe is just as perfect as it could be.  Although this time I decided to see if could survive the dairy-free challenge.  I substituted coconut milk for buttermilk – and you would have never known.  My husband and I couldn’t believe it – this was something he used to be nuts about, and when he gave up dairy, he had to give this up as well.  Not anymore though – this is now back in our lives, and better than ever.  Thank goodness for the small comforts in life…because seriously, sometimes that’s all you need.

Ingredients

  • 3 very ripe bananas, mashed
  • 2/3 cup vegetable oil
  • 1 2/3 cup sugar
  • 2/3 cup coconut milk
  • 1 teaspoon vanilla
  • 2 eggs
  • 2 1/2 cups all-purpose flour
  • 1 1/4 teaspoon baking powder
  • 1 1/4 teaspoon baking soda
  • 1/2 teaspoon salt
  • 2/3 cups chopped nuts (optional)

Preparation

Pre-heat oven to 350.  Mash bananas with a fork and set aside.  Mix oil, sugar, coconut milk, vanilla and eggs well.  Add mashed bananas.  Mix dry ingredients in a small bowl, and add to banana mixture with nuts (optional) until just combined well.  Pour into 2 greased and floured 9 x 5″ loaf pans.  Bake for 40-45 minutes, or until a toothpick inserted in the middle comes out clean.  Remove from pans while still warm and wrap with plastic.

For a printer-friendly version of this recipe, please click here:  Dairy-Free Banana Bread

Dairy-Free Banana Bread