Pumpkin-Caramel Tart

Pumpkin Caramel Tart

All too often we forget about the “assist.” I won’t even go into how this applies at work – that would be a white paper, not a one page blog post.  But I am talking about at home – particularly around the holidays.  Last year stress was at an all-time high.  We had two major events we were planning, one of them taking us away for almost 3 months – and work was its normal state of chaos.  The holidays were just a blur – and I remember vowing that I would never try to cram everything in ever again.  I remember having to explain to my daughters why we would not have time to make the holiday treats – they were crushed.  There was just too much going on, and it wasn’t until I was on an airplane flying far, far away, that I was able to take a breath.

This year my older daughter decided to take matters into her own hands.  A few weeks ago she sat me down to talk about our “holiday strategy” this year.  I loved it.  She wanted to help plan out everything we wanted to do, so we would have time to get that holiday baking in, and we would not be stressed.  We decided on a plan of attack, and the execution has been flawless.  We are already so far ahead of where we were last year – it is amazing.  All it took was a little planning, and some help.  It’s amazing what you can accomplish when you work together.

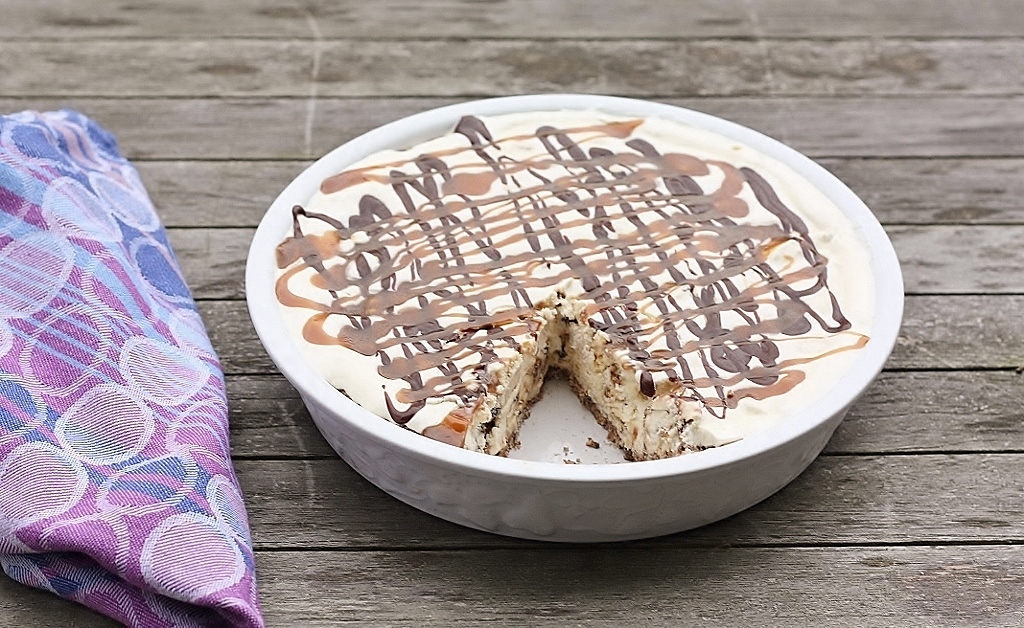
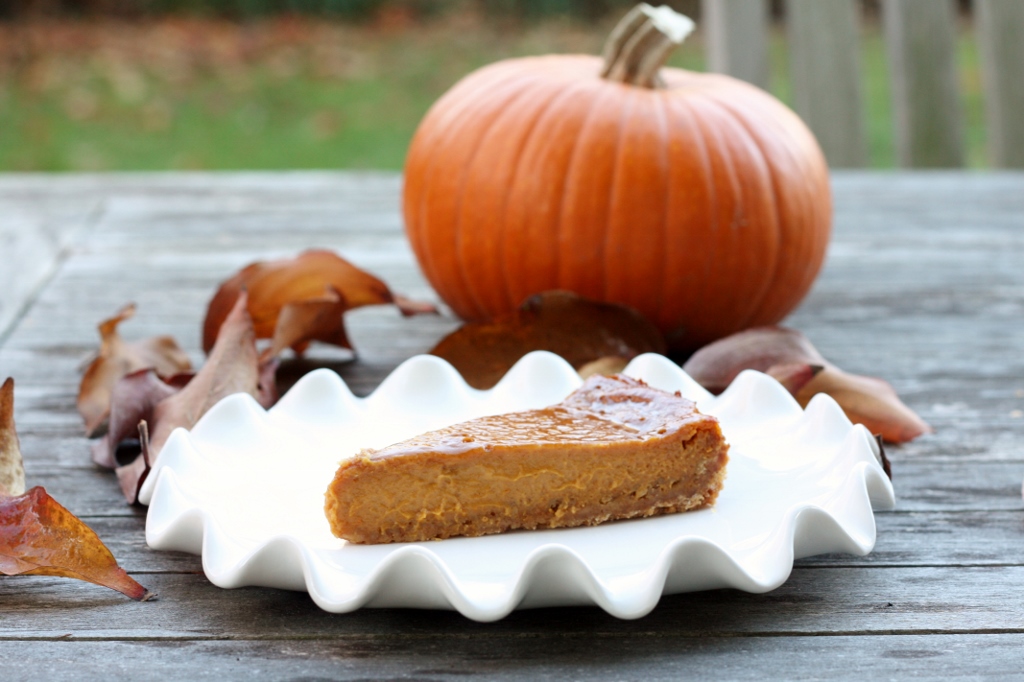
Thanksgiving was a quiet day for us – this was the first year ever that it was just the 4 of us. We decided that for dessert we would get together with our friends from the street – fortunately there were enough of us that we got to do a lot of baking, which meant experimenting in the kitchen.  Every once in a while a recipe comes along that really knocks my socks off.  This is one of those recipes.  It wasn’t until after I took a bite of this tart that I decided it MUST go into the blog – for nothing else than to document the fact that this was a home run winning recipe.  After all, that’s what this blog was intended to be – a way to document recipes for years to come.  I definitely adapted this one, but Bon Appetit deserves the credit here – thanks for yet another assist – I couldn’t have done it without you!

Ingredients

Crust

  • cups graham cracker crumbs
  • 1/4 cup sugar
  • 1/3 cup melted butter

Filling and Assembly

  • Pinch of cream of tartar
  • cups granulated sugar, divided
  • 1 cup heavy cream
  • 1 cup canned pumpkin purée
  • 2 tablespoons light brown sugar
  • 1 tablespoon all-purpose flour
  • teaspoons finely grated peeled ginger
  • ¾ teaspoon ground cinnamon
  • ¾ teaspoon kosher salt
  • 3 large eggs
  • Whipped cream (for serving)

Special Equipment

  • A 9-inch springform pan

Preparation

In a small bowl, combine the crumbs and sugar; add butter and blend well. Press onto the bottom and up the sides of an ungreased 9-inch springform pan. Bake at 375° for 8-10 minutes or until crust is lightly browned. Cool on a wire rack before filling.

Bring cream of tartar, 1 cup granulated sugar, and 2 Tbsp. water to a boil in a medium saucepan over medium heat, stirring until sugar dissolves. Increase heat to medium-high and cook, swirling pan occasionally (do not stir), until caramel is a deep amber color, 8–10 minutes. Remove from heat. Whisking constantly, carefully add cream (mixture will be extremely hot and will bubble vigorously); whisk until smooth. Let caramel cool slightly in pot.

Whisk pumpkin purée, brown sugar, flour, ginger, cinnamon, and salt in a large bowl. Gradually add caramel and eggs, whisking until well blended. Scrape filling into prepared crust.

Bake tart, rotating halfway through, until filling is set around edges and center barely jiggles, 30–35 minutes. Transfer to a wire rack and let cool in pan.

Serve with whipped cream.

For a printer-friendly version of this recipe, please click here:  Pumpkin-Caramel Tart

Advertisement

Samoas Ice Cream Pie

Somoas Ice-Cream Pie

Yes, it is that time again – not just Super Bowl time, but GIRL SCOUT COOKIE TIME!!!  How can you resist those beautiful colored boxes filled with deliciousness, and sold by girls who are learning to be leaders. Last year I decided to skip the Girl Scout Cookie Recipe Contest, I was just too busy, and I couldn’t fit it in.  This year I am even busier, but when I saw the email that they were going to be celebrating the 40th Birthday of the Samoas Cookie, I just had to make time.  That combination of chocolate, caramel, coconut and shortbread is a winner…and just happens to be my favorite cookie.

The Girl Scouts are an amazing organization.  Their mission is building girls of courage, confidence, and character, who make the world a better place, by helping them discover their inner strength, passions, and talents. Working at a company that is predominantly male has really taught me how important it is for women to be heard – and without that confidence and courage, it can be difficult.  Fortunately this organization is teaching girls at a young age how important it is, so when they grow up and are in the workplace, they won’t even have to think about it.  They will hold their head high, proud of what they are able to accomplish.

As in the past, if I win the grand prize, I would like to donate the money to a charity – and I am going to ask you – my readers – to choose the charity.  That’s right – so stayed tuned for more on that – no sense in giving more details if I am not a finalist.  This competition is stiff – I know from experience – so let’s hope that I can at least make it as a finalist this year.

So why did I choose this pie?  Well, I had a lot of different ideas, but ice-cream just kept coming back to me.  I think it’s because I have secretly always wanted to make Samoas ice-cream.  And oh boy is it amazing.  Although the crust on this pie really was the kicker – once I took those cookies and put them into the food processor – I knew they would make an unbelievable crust – and I was right.  So not only do you have a cookie bottom, you have cookies in the ice-cream as well, and then with some of my grandmother’s chocolate sauce, and a caramel sauce that was easy as pie to make – you have an ice-cream pie that is absolutely over the top.  If you don’t have an ice-cream maker, you can definitely just buy some vanilla ice-cream, and fold in the coarsely chopped cookies, before adding it to the pie.  Darigold was nice enough to put in some coupons with the cookies, so I decided to go home-made.  YUM.

If after reading this post, you are ready to go get yourself some cookies – don’t fret – you can find the cookies here!  Unfortunately you will have to wait a little bit, as the cookie sales happen from February 27 – March 15 – but it will be here before you know it.  Happy Birthday Samoas!!

Ingredients

crust

  • 1 1/2 boxes Samoas Cookies
  • 2 tablespoons melted butter

ice-cream

  • 2 eggs
  • 3/4 cup sugar
  • 2 cups heavy cream
  • 1 cup whole milk
  • 2 teaspoons vanilla
  • 1/2 box Samoas Cookies, coarsely chopped

fudge sauce

  • 1/4 pound butter
  • 2 oz. unsweetened chocolate
  • 1/2 cup cocoa powder, sifted
  • 1 1/2 cups sugar
  • 1 cup evaporated milk
  • 1 teaspoon vanilla extract

caramel sauce

  • 1 cup Brown Sugar
  • 1/2 stick Butter (4 Tablespoons)
  • 1/2 cup Half-and-half Or Cream (cream Will Make It Thicker)
  • 1 Tablespoon Vanilla
  • Pinch Of Salt

Preparation

Make the crust.  Pre-heat the oven to 350 degrees.  Put the Samoas into the food processor and pulse until the cookies are finely ground.  Add to a bowl.  Melt the butter and pour over the cookie crumbs.  Mix well, so that the butter is evenly distributed.  Press the cookie mixture into a 9″ pie pan, and press up the sides of the pan evenly.  Bake for 8 minutes, and then cool completely.

Make the ice-cream.  Whisk the eggs in a mixing bowl until light and fluffy, 1 to 2 minutes. Whisk in the sugar, a little at a time, then continue whisking until completely blended, about 1 minute more. Pour in the cream, milk, and vanilla and whisk to blend.  Transfer the mixture to an ice cream maker and freeze following the manufacturer’s instructions.  When the ice-cream is done, add the coarsely chopped Samoas and fold into the ice-cream.  Put into the freezer for at least 1 hour.

Make the fudge sauce.  Melt butter over medium heat.  Add unsweetened chocolate & melt, stirring. Add cocoa, sugar, and milk and stir well to combine. Boil a few minutes, stirring. Turn off the heat then add vanilla and salt. Stir to combine.  Heat GENTLY in microwave to soften & serve.

Make the caramel sauce. Mix all ingredients in a medium saucepan over medium-low to medium heat. Cook while whisking gently for 5 to 7 minutes, until thicker. Turn off heat. If sauce is thin, just continue cooking for a few more minutes.

Put the pie together.  Add the ice-cream to the pie pan with the cooled crust – spreading evenly on top.  Soften the fudge sauce and caramel in the microwave, and drizzle on top of the pie.  Put back in the freezer until you are ready to serve.  Let the pie sit on the counter for about 10 minutes before serving so it is easier to cut.

For a printer-friendly version of this recipe, please click here:  Samoas Ice-Cream Pie

Samoas Ice-Cream Pie

Nan’s Fudge Sauce

Ice Cream Pie with Chocolate Sauce

Nothing says Happy New Year quite like a good cocktail, or a nice piece of ice cream cake.  At least that’s what we decided this year.  After a week off from work, and we still had New Year’s to look forward to, things were looking good.  We had ample time to really think hard about the dessert we would prepare.  Normally I put that kind of thought into the cocktails that I make, but this year things were a little different.  I really put together the cocktail list in a matter of minutes, but we spent hours going back and forth on the dessert.

The dessert was really created around a centerpiece, and that was my grandmother’s chocolate sauce.  My mother had made some when she was visiting, and we still had a lot left over.  This is not your ordinary chocolate sauce either – I seriously could eat it with a spoon, it is so perfectly balanced.  So, it was not crazy at all that we had to create a dessert in order to incorporate her sauce.  Ice cream was of course the first thing we thought of – but it was New Year’s Eve – a special celebration – it had to be outrageous.  I am not sure whose idea it was to create a brownie bottom, but we debated the brownie bottom vs. the chocolate chip cookie bottom for quite some time – at one point we even had both in the dessert – but we ended up settling for the brownie.  Then it was time to choose the ice cream.  Mint chocolate chip was the clear winner for a while, but I just couldn’t get past the fact that some people don’t like mint.  Also – I thought that the richness of the brownie needed some type of vanilla in the ice cream.

It wasn’t until we were at the store – after spending 15 minutes with multiple selections in our cart, that we ended up with chocolate chip cookie dough.  We added a little whipped cream on top, and then poured the chocolate sauce all over.  Wow. That is just about all I can say.  Here’s to a New Year filled with health, happiness, delicious food and creative cocktails.  What more could you want?

Ingredients

Brownie

  • 3 19/50 ounces all-purpose flour (about 3/4 cup)
  • 1 cup granulated sugar
  • 3/4 cup unsweetened cocoa
  • 1/2 cup packed brown sugar
  • 1/2 teaspoon baking powder
  • 1/4 teaspoon salt
  • 1 cup bittersweet chocolate chunks, divided
  • 1/3 cup fat-free milk
  • 6 tablespoons butter, melted
  • 1 teaspoon vanilla extract
  • 2 large eggs, lightly beaten
  • Cooking spray

Chocolate Sauce

  • 1/4 pound butter
  • 2 oz. unsweetened chocolate
  • 1/2 cup cocoa powder, sifted
  • 1 1/2 cups sugar
  • 1 cup evaporated milk
  • 1 teaspoon vanilla extract


  • half-gallon chocolate chip cookie dough ice cream
  • whipped cream

Preparation

Preheat oven to 350°.

Weigh or lightly spoon flour into dry measuring cups; level with a knife. Combine flour and next 5 ingredients (through salt) in a large bowl. Combine 1/2 cup chocolate and milk in a microwave-safe bowl; microwave at HIGH 1 minute, stirring after 30 seconds. Stir in butter, vanilla, and eggs. Add milk mixture and 1/2 cup chocolate; stir to combine.

Pour the batter into a 9-inch square metal baking pan with a piece of parchment paper that over hangs on two of the sides – then butter the parchment. Bake at 350° for 19 minutes or until a wooden pick inserted in center comes out with moist crumbs clinging. Cool in the pan on a rack.

When brownies are completely cool, let the ice cream sit on the counter until it is slightly softened (so it is spreadable).  Spread the ice cream on top of the brownie in the pan.  Cover with plastic wrap, and put back in the freezer until frozen solid.

To make the fudge sauce, melt butter over medium heat.  Add unsweetened chocolate & melt, stirring. Add cocoa, sugar, and milk and stir well to combine. Boil a few minutes, stirring. Turn off the heat then add vanilla and salt. Stir to combine.  Keeps in refrigerator for a few weeks. Heat GENTLY in microwave to soften & serve.

When you are ready to serve, you can lift on the parchment paper and place the entire cake on a cutting board and cut into 16 squares.  Put some whipped cream on each piece, and top with warm chocolate sauce.  Enjoy!

For a printer-friendly version of this recipe, please click here: Nan’s Fudge Sauce

Dahlia Triple Coconut Cream Pie

Dahlia Lounge Coconut Cream Pie

I am definitely known for going a little too far – in pretty much every aspect of my life.  My husband has had to get used to it over the years, and now he just thinks it is funny.  His father and I have that in common – his motto in life is “If it is worth doing, it is worth over doing.”  I love it.

When we moved here, almost 18 years ago – I remember going downtown for a special dinner one night.  Tom Douglas was a Seattle icon, even back then, although he only had a couple of restaurants.  It is remarkable to me that I can still remember that dinner – particularly the dessert.  I remember seeing that Triple Coconut Cream Pie on the menu, and I had to get it.  I love coconut, and I have always had a little thing for cream pies.  This pie was over the top.  I wasn’t exactly sure why it was a triple coconut pie, but it didn’t matter – every bite had an overwhelmingly delicious coconut flavor.  That pie is now a Seattle icon – everyone knows about this famous pie, and for good reason.

Last year for my birthday, one of my very close friends surprised me with a very special gift – the Dahlia Bakery Cookbook – and of course the first recipe I turned to was this Triple Coconut Cream Pie.  I knew that I would make it eventually, but I had to wait for the right occasion.  A month of so ago another good friend asked if I would make a dessert for her daughter’s school auction.  It is our neighborhood school – that my kids also attended – so I quickly snatched up the opportunity.  She was the one that suggested this pie, and even though I looked to see if there was anything else I thought could be more special – I couldn’t come up with anything.  How could anything top this?

Well – unfortunately I didn’t get to eat it in it’s entirety – but I did take tastes along the way – just to make sure it was edible for the auction…  And yes, it was definitely edible – and again, over the top.  It is sweet as all can be, so be prepared, but it is completely worth it.  Sometimes you just have to go too far – and when it is allowed, there is no holding back.  I hope that whoever ends up with this pie enjoys it as much as I did making it!

Ingredients

Coconut pastry crust:
  • 1 cup plus 2 tablespoons flour
  • ½ cup shredded sweetened coconut
  • 2 teaspoons sugar
  • ¼ teaspoon kosher salt
  • ½ cup (1 stick) unsalted butter, sliced thin and chilled
  • 1/3 cup ice water
Coconut pastry cream:
  • 1 cup milk
  • 1 cup canned unsweetened coconut milk (I used full-fat)
  • 2 cups shredded sweetened coconut
  • 1 vanilla bean, split and seeds scraped
  • 2 large eggs
  • ½ cup plus 2 tablespoons sugar
  • 3 tablespoons flour
  • 4 tablespoons (½ stick) unsalted butter, room temperature
Whipped cream topping:
  • 2 ½ cups heavy whipping cream, chilled
  • 1/3 cup sugar
  • 1 teaspoon pure vanilla extract
Garnish:
  • 1 ½ cups unsweetened large-flake coconut or 2/3 cup sweetened shredded coconut
  • Chunk of good white chocolate to make 2 ounces of white chocolate curls

Preparation

Coconut pastry crust

In a food processor, combine flour, coconut, sugar and salt. Pulse a few times to combine. Add butter and pulse until butter and flour are combined and mixture resembles small peas.Slowly pour in ice water through the feed tube. Stop when dough is beginning to come together. Dough should hold together when you squeeze it, but should not be sticky. You may not need to use all of the water. Shape dough into a disk and chill at least 1 hour. When you’re ready to roll, roll out dough on a well-floured surface into a 12- to 13-inch circle. Transfer to a 9-inch pie pan, being careful not to stretch the dough. Trim overhang to 1 inch, then fold onto rim and flute with fingers and thumb. Chill unbaked pie shell at least 1 hour.

Preheat oven to 400 degrees. Line shell with parchment paper and pie weights (beans or coins.)  Bake in preheated oven 20 to 25 minutes until rim is golden. Remove shell from oven. Remove parchment and weights, and bake an additional 10 to 12 minutes until bottom is golden-brown in spots.

Coconut pastry cream

In a heavy bottomed pot, combine milk, coconut milk, coconut shreds and vanilla bean seeds. In a separate mixing bowl, whisk together eggs, sugar and flour until smooth and combined. Bring milk to a boil over medium heat. Reduce heat and whisk 1/3 cup of the mixture into the mixing bowl with the eggs to temper them. Pour egg mixture slowly into milk, whisking constantly. Return to a bubble and let simmer 5 minutes until very thick. Remove from heat and stir in butter. Put plastic wrap directly on surface of pastry cream and chill.

Whipped cream topping

Whip cream, sugar and vanilla until firm enough that peaks hold their shape.

Garnish

Preheat oven to 350 degrees and gently toast coconut until edges are golden brown, 7 to 8 minutes. Watch carefully and stir a few times. Use a vegetable peeler to make chocolate curls. When crust is cooled, fill with coconut pastry cream and smooth the top. Either pipe or decoratively spoon whipped cream topping on top, then garnish with toasted coconut flakes and white chocolate curls.

For a printer-friendly version of this recipe, please click here:  Dahlia Triple Coconut Cream Pie

Banana Cream Pie

Banana Cream Pie 2

My younger daughter is a super-smeller, like me.  We have a ridiculous sense of smell.  Now I am not sure I am a super-taster, but I swear she is probably the closest thing to a super-taster that I know.  This comes in handy when things spoil – particularly milk.  My older daughter is pretty good too, but not as good as her little sister.  Years ago we were visiting some friends – both of my kids love milk – but for some reason they just weren’t drinking their milk.  After the second day, I asked what was going on – and they quietly told me that the milk tasted funny.  They thought it was because we were not at home, and maybe our friends bought a different type of milk.  I tasted it – and there it was – the milk had gone sour.  Oops.

Yesterday was a nice day – it was a holiday, and I was fasting – but what do I do when I fast?  I bake.  My excuse was that we were having some friends come over for dessert after break-the-fast.  Truthfully, I have a much easier time fasting when I am in the kitchen.  Don’t ask me why – and since I do consider my kitchen to be my place of worship – I thought it was only fitting.  I had a great day reflecting, as I slowly made this Banana Cream Pie – a recipe that I found in Bon Appetit.  The only problem with baking while fasting, is I am not able to try things along the way.  At one point I asked my older daughter (who is not old enough yet to fast) to try the filling – just to make sure we were on the right track – and boy did she love it.

It was right before dinner when I decided to make the whipped cream topping for the pie.  I whipped up the cream, and spread it on the pie.  It looked amazing.  It looked so good that I decided to take pictures before the sun came down.  I got a few good shots and then stuck it back in the refrigerator to keep cool.  At this point I was knee-deep into preparing dinner, and I just left the bowl on the counter with a few streaks of whipped cream waiting for someone to take a lick.  I finished making dinner when my husband declared fasting was over. I went right over to that bowl with the whipped cream and scooped up a little of the leftover cream – wow, that was not good.  I tried it again, boy that tasted horrible – I ran over the refrigerator and grabbed the leftover cream in the carton and took a whiff…oh my goodness, the cream I had purchased that day (with an expiration date of October 20th) was completely rancid.  I couldn’t believe it.

I sat there for a second not knowing what to do.  I certainly couldn’t let this pie go to waste – but we couldn’t eat the cream either.  So, after dinner – my husband ran out to the store to get me another carton of cream (I instructed him to open it in the store to make sure it was good), and I scraped the cream off the top of the pie into the sink.  Banana Cream Pie – take 2.  Fortunately the next batch of whipped cream was delicious – and I spread it on top of the pie.  Amazingly it was all completed before our friends arrived.  The pie was delicious – particularly with that sweet cream on top.  The filling though was perfect – nice and creamy with chunks of banana.  Oh, and everyone loved the thin layer of chocolate between the crust and the filling.

There are lots of things I plan on doing differently this year, as always – but there was one thing I added later in the day.  From now on, I am always going to smell what is in that carton before doing anything more with it – whether it is fresh off the shelf or has been sitting in the refrigerator for weeks.  I definitely learned my lesson there.

Ingredients

  • 2 ounces bittersweet chocolate
  • 2 teaspoons vegetable oil
  • Prebaked 9″ pie crust
  • 3 large egg yolks
  • 1/2 cup sugar
  • 3 tablespoons cornstarch
  • Pinch of salt
  • 2 cups whole milk
  • 2 tablespoons unsalted butter
  • 2 teaspoons vanilla extract
  • 3 sliced bananas
  • 1 cup chilled heavy cream
  • 2 tablespoons sugar
  • 1/4 teaspoons vanilla  extract

Preparation

Melt 2 ounces bittersweet  chocolate with 2 teaspoons vegetable oil and brush over a prebaked 9″ pie crust;  chill until set. Meanwhile, whisk 3 large egg yolks, 1/2 cup sugar, 3  tablespoons cornstarch, and a pinch of salt in a medium saucepan, off heat,  until smooth. Gradually whisk in 2 cups whole milk. Whisking constantly, bring  to a full boil over medium heat and boil until thickened, about 1 minute. Remove  from heat and whisk in 2 tablespoons unsalted butter and 2 teaspoons vanilla  extract. Fold in 3 sliced bananas and let cool slightly. Pour filling into  prepared pie crust, cover with plastic wrap, and chill until firm, at least 3  hours and up to 1 day. Beat 1 cup chilled heavy cream with 2 tablespoons sugar  and 1/4 teaspoons vanilla extract until firm peaks form; spoon over pie and  swirl decoratively.

For a printer-friendly version of this recipe, please click here: Banana Cream Pie

Mile-High Chocolate Pie

I basically broke all of the rules today.  There were so many, I am not sure where to start.  I am going to let you in on a few secrets…and I hope you don’t think poorly of me.  First of all, it was the end of Thanksgiving weekend – and tonight my daughter had her book club.  I really procrastinated badly with this month’s book – I started it last night at 8:30pm.  Good thing it was a quick read – and a really good book – so luckily I finished it easily.  I signed up to bring dessert – not really remembering that it was Thanksgiving weekend, but I knew I could rally.

This morning, I took out some recipes, and gave my daughter 4 options which to choose from.  She narrowed it down to two, then I chose the winner – a Mile-High Chocolate Pie.  The picture in Bon Appetit said it all – it looked amazing.  I read through the recipe, and realized it had to chill for 4 hours, so I could not do my usual and procrastinate baking – I had to get to work.  I decided to make my life just a little simpler – and buy a prepared pie crust (rule #1).  The last time I did that I swore I would never do it again.  And after that amazing pie crust on made on Thanksgiving – I was really surprised by this decision – but it was a desperate situation.  It was 11am, and we still hadn’t gone to the supermarket for the ingredients.  I decided to buy a different prepared crust at Whole Foods – and when I went to check out – I saw the checker looking strangely at the crust.  I told her that usually I make my own, but we were in a bit of a time crunch today, so I went with a prepared crust.  She was awesome – she told me she wouldn’t charge me for it – just in case it didn’t work out.  Wow.

We started baking at about 1:30pm – not too bad, but yes, cutting it very close.  In order to cut corners again, I decided to go with semi-sweet chocolate chips, instead of using good chocolate and chopping it up (rule #2).  Bad decision.  The melted chocolate was a mess, and it never actually melted, it just got gritty  – I had to throw it away and go with the good chocolate.  Much better – so please, use good chocolate if you make this – it makes all the difference.  Also – the egg white mixture never really tripled in size – but that made no difference what-so-ever.  There was so much filling, this would have been called a Fourteener Chocolate Pie, had I not decided to stop mounding (rule #3), and fill some ramekins with the extra chocolate mixture.

The pie came out perfect – it looked beautiful, it had just enough time to chill – and it tasted amazing.  In fact – it was so good – that I couldn’t wait to post it (rule #4).  Normally I cannot get my act together to bake, photograph, write and post – all in the same day.  In fact – the Spinach Puffs post was the first time I had done that in months – maybe even years – and it was because I took the day off from work.  For those of you that actually think I can come home from working 10 hours in the office, cook a delicious meal for my family – take pictures and then write something about what I made – all in the same day – that is crazy talk.  I really would be superwoman.  But today – I did it – I had to, I couldn’t wait to share this pie – good thing it was a Sunday after having 4 other days off.  So yes, I broke a lot of rules today – but I think these types of rules are meant to be broken.  Now excuse me while I run to the kitchen and have another bite of pie – yes, I can do that when I post the same day I bake…

Ingredients

  • 1  pie crust, home made or store-bought
  • 4  large egg whites
  • 3/4 cup plus 3 Tbsp. sugar
  • 10 ounces semisweet or bittersweet chocolate (do not exceed 71% cacao), chopped, plus more shaved with a vegetable peeler for garnish
  • 3 tablespoons unsalted butter
  • 4 cups heavy cream, divided
  • 1 cup coarsely crushed chocolate wafer cookies (such as Nabisco Famous Chocolate Wafers), divided
  • 1/2 cup crème fraîche
  • 1/8 teaspoon kosher salt

Preparation

Preheat oven to 350°. Line pie dish with crust; crimp edges  decoratively. Fully bake pie crust according to instructions in recipe or on  box. Let cool completely.

Whisk egg whites and sugar in a medium heatproof bowl set over  a medium saucepan of simmering water until sugar dissolves and egg whites are  warm but not hot, 3–4 minutes. Remove from heat. Using an electric mixer, beat  on medium-high speed until cool, tripled in volume, and stiff peaks form (the  tips of the peaks won’t fall over when beaters are lifted from bowl and turned  upright), about 6 minutes.

Stir chopped chocolate and butter in a large bowl set over  same saucepan of simmering water until melted and smooth, 4–5 minutes; set  aside.

Beat 2 cups cream in another medium bowl until medium peaks  form (cream should be soft and pillowy), 5-6 minutes.

Gently fold egg whites into warm chocolate mixture until fully  incorporated (work quickly to prevent chocolate from turning gritty). Gently  fold in whipped cream just until no white streaks remain; do not overmix or  mixture will deflate. Spoon ½ cup chocolate mousse into bottom of prepared pie  crust; spread evenly over bottom of crust. Sprinkle 3/4 cup plus  2 Tbsp.  crushed chocolate wafers over mousse. Top with remaining mousse, mounding in the  center to create a dome. (The point is to add height, not to spread out evenly  to edges.) Chill pie.

Beat remaining 2 cups cream, crème fraîche, and salt until  medium-stiff peaks form (when the beaters are lifted from the cream, the peaks  will hold their shape but the tips will fall over). Top chocolate mousse with  whipped-cream mixture, following the same rounded dome shape. Chill pie for at  least 4 hours or, covered, for up to 3 days. (It will slice best if chilled  overnight, allowing mousse to set properly.)

Garnish pie with 2 Tbsp. chocolate wafers and chocolate  shavings. Slice pie using a clean, dry knife; wipe between slices to ensure  clean, elegant pieces.

For a printer-friendly version of this recipe, please click here:  Mile-High Chocolate Pie

Peanut Butter Honeycomb Pie

Where did this week go?  All of a sudden it was Saturday, and I realized I never posted anything this week.  Sorry about that.  I was talking to one of my very close friends today, who by the way, I never have time to talk to anymore…and we were venting about the end of the school year.  She calls it the “100 days of May” – I think that’s it anyway, and has to do the fact that there are a million things to do before school is over.  We are cut from the same cloth – there is no resting – and she has three kids.  The only difference is that I work full-time, and she works part-time – but that doesn’t mean she has free time.  She fills it up just like I would with school activities, volunteering, and anything else she can get her hands on.  We used to joke that we would buy houses next door to each other and she would take care of my kids.  She knew I would never stop working, and she is Super Mom.  Too bad that never came true – we are at least in the same time zone, but an airplane ride away.  Well – her kids get out of school in just a couple of weeks, I told her she was in the home stretch…and I am just a week after that.  Soon summer will be here, and we will be dealing with a whole different set of chaos!

So, I am sure you are all wondering what I did with that delicious honeycomb I made.  The wait is over!  Now, unfortunately I never got to eat the entire pie put together – because this was a dessert I made for my younger daughter’s school auction…but I am telling you, that I sampled every bit of the way, and this is a winning recipe.  The peanut butter center was so creamy and amazing, I swear I liked the bowl clean.  I changed the recipe slightly from the Bon Appetit version, because I really thought it needed a chocolate cookie crust.  I think it really cut the sweetness of the filling.  Some friends of mine ended up with the pie that night, and they were pretty pleased.  One of them asked my husband how he stays so thin…the secret is in the stress.  Did you know that stress actually melts the pounds away?  Well I wouldn’t recommend it for a diet, but it seems to work in our house.

So – on this beautiful Memorial Day weekend (yes, it is sunny and 75 degrees here!!), sit back and relax – after you make this pie that is…I am heading to the kitchen now and toast to my friend Marti.  I am ready for summer!

Ingredients

Crust

  • 1 box of chocolate wafer cookies
  • 6 tablespoons (3/4 stick) butter, melted

Filling

  • 8 large egg yolks
  • 12 tablespoons sugar, divided
  • 1 1/2 cups whole milk
  • 1 vanilla bean, split lengthwise
  • 3/4 cup (1 1/2 sticks) unsalted butter, room temperature
  • 1 cup creamy peanut butter
  • 2 tablespoons powdered sugar
  • 1/2 teaspoon kosher salt

Topping

  • 2 ounces bittersweet chocolate (do not exceed 61% cacao), chopped
  • 2 1/2 tablespoons unsalted butter
  • Honeycomb
  • 1/4 cup roasted, salted peanuts

Preparation

Crust

Preheat oven to 325°. Finely grind cookies in a food processor.Transfer crumb mixture to a medium bowl. Add butter and stir to blend. Use bottom and sides of a measuring cup to pack crumbs onto bottom and up sides of 9″ glass or metal pie or tart pan. Bake until golden brown, about 15 minutes. Let cool.

Filling

Mix yolks and 6 Tbsp. sugar in the bowl of a stand mixers fitted with a whisk attachment. Beat at high-speed until ribbons form, stopping once to scrape down sides of bowl, about 2 minutes.

Combine milk and remaining 6 Tbsp. sugar in a large saucepan; scrape in seeds from vanilla bean and add bean. Bring to a boil, stirring to dissolve sugar. Remove bean. With mixer running, gradually add hot milk mixture to yolk mixture. Scrape mixture back into pan. Clean bowl. Whisking constantly, bring to a boil over medium heat. Remove pan from heat; whisk vigorously for 1 minute. Return custard to mixing bowl, beat on high-speed until cool, about 4 minutes. Mix in butter on Tbsp. at a time. Add peanut butter, powdered sugar, and salt; beat to blend. Scrape filling into cooled crust; smooth top. Chill until set, 2-3 hours.

Topping

Stir chocolate and butter in a medium bowl set over a saucepan of simmering water until melted and smooth.

Drizzle some of the chocolate glaze over the peanut butter filling, making a circle in the middle of the pie and leaving a 1″-2″ plain border. Pile pieces of honeycomb and salted peanuts on top, then drizzle remaining chocolate glaze over.

For a printer-friendly version of this recipe, please click here: Peanut Butter Honeycomb Pie

Add to FacebookAdd to DiggAdd to Del.icio.usAdd to StumbleuponAdd to RedditAdd to BlinklistAdd to TwitterAdd to TechnoratiAdd to Yahoo BuzzAdd to Newsvine

Crack Pie

A few years ago, the Momofuku Milk Bar craze began.  It wasn’t until I actually visited it myself in New York City did I really understand why.  This place was too much.  The desserts in the case were incredible, the cookies outrageous, and the cereal milk ice-cream…let’s just say, I am hooked for life.  It was really quite a experience, and that was before I tried the Crack Pie.  So, what kind of pie is called Crack Pie?  A pie that is so irresistibly delicious, you just can’t stop.  The name captures it perfectly.

A good friend of mine in Seattle is a huge fan as well – in fact, she lived in NYC and frequented the Milk Bar often before moving out west.  She is a huge Momofuku fan.  We had been talking about having a Momofuku dinner for a while – she would make the main dishes, I would make the dessert.  Since Crack Pie was printed in Bon Appetit a couple of years ago, I was all set.  We finally put a date on the calendar to have our special meal, and since the pie had to chill overnight, I put a note for myself on the counter on Friday night to remind myself to make it on Saturday (our dinner was Sunday).  We had some friends over on Friday night for cocktails – unfortunately I still had a ton of work to do – so after everyone left  – I went to the computer to tackle my emails.  A couple of hours later – I went back to the kitchen to look at my list for the next day – and mind you, I could barely keep my eyes open I was so tired.  I saw the pie, then brownies and cookies.  I thought I only had to make a pie?  Why do I have to make Pot Brownies and Cocaine Cookies?  I burst out laughing.  Obviously my friends were as well – as I figured out exactly what happened.  When I spoke to them the next day, we all had a good laugh about it.  No, their friend had not turned into a dug addict…just a pie addict.

Ingredients

Oat Cookie Crust

  • Nonstick vegetable oil  spray
  • 9 tablespoons (1 stick plus 1  tablespoon) unsalted butter, room temperature, divided
  • 5 1/2 tablespoons (packed)  golden brown sugar, divided
  • 2 tablespoons  sugar
  • 1 large egg
  • 3/4 cup plus 2 tablespoons  old-fashioned oats
  • 1/2 cup all-purpose  flour
  • 1/8 teaspoon baking  powder
  • 1/8 teaspoon baking  soda
  • 1/4 teaspoon (generous)  salt

Filling

  • 3/4 cup sugar
  • 1/2 cup (packed) golden brown  sugar
  • 1 tablespoon nonfat dry milk  powder
  • 1/4 teaspoon  salt
  • 1/2 cup (1 stick) unsalted  butter, melted, cooled slightly
  • 6 1/2 tablespoons heavy whipping  cream
  • 4 large egg  yolks
  • 1 teaspoon vanilla  extract
  • Powdered sugar (for  dusting)

Preparation

Oat Cookie Crust

Preheat oven to 350°F. Line 13x9x2-inch metal baking pan with  parchment paper; coat with nonstick spray. Combine 6 tablespoons butter, 4  tablespoons brown sugar, and 2 tablespoons sugar in medium bowl. Using electric  mixer, beat mixture until light and fluffy, occasionally scraping down sides of  bowl, about 2 minutes. Add egg; beat until pale and fluffy. Add oats, flour,  baking powder, baking soda, and salt and beat until well blended, about 1  minute. Turn oat mixture out onto prepared baking pan; press out evenly to edges  of pan. Bake until light golden on top, 17 to 18 minutes. Transfer baking pan to  rack and cool cookie completely.

Using hands, crumble oat cookie into large bowl; add 3  tablespoons butter and 1 1/2 tablespoons brown sugar. Rub in with fingertips  until mixture is moist enough to stick together. Transfer cookie crust mixture  to 9-inch-diameter glass pie dish. Using fingers, press mixture evenly onto  bottom and up sides of pie dish. Place pie dish with crust on rimmed baking  sheet.

Filling

Position rack in center of oven and preheat to 350°F. Whisk  both sugars, milk powder, and salt in medium bowl to blend. Add melted butter  and whisk until blended. Add cream, then egg yolks and vanilla and whisk until  well blended. Pour filling into crust. Bake pie 30 minutes (filling may begin to  bubble). Reduce oven temperature to 325°F. Continue to bake pie until filling is  brown in spots and set around edges but center still moves slightly when pie  dish is gently shaken, about 20 minutes longer. Cool pie 2 hours in pie dish on  rack. Chill uncovered overnight.

DO AHEAD Can be made 2  days ahead. Cover; keep chilled.

Sift powdered sugar lightly over top of pie. Cut pie into  wedges and serve cold.

For a printer-friendly version of this recipe, please click here:  Crack Pie

Add to FacebookAdd to DiggAdd to Del.icio.usAdd to StumbleuponAdd to RedditAdd to BlinklistAdd to TwitterAdd to TechnoratiAdd to Yahoo BuzzAdd to Newsvine

Frozen Peanut Butter Pie

About a month ago, I was really excited to tell you that I had taken a food photography class.  The woman who taught the class was amazing.  As I mentioned before, not only is she an incredible photographer, she makes everything from scratch, I mean everything – and she has three kids.  Unbelievable.  When I found out who was going to be teaching the class, I spent some time looking at her phenomenal blog, and there was one post that really struck me – it was a Peanut Butter Pie

A few weeks earlier when we were back east in New York City, I remember looking at two of my favorite food blogger sites – foodgawker and tastespotting – and there were a ridiculous number of Peanut Butter Pies posted.  Now, that is not completely unusual, because when there is a Daring Baker challenge, I often see many of the same dishes posted – but this was different, and it went on for days.  When I saw the Peanut Butter Pie posted on Not Without Salt, I decided to read the post to see what was going on.  A well-known blogger from NYC lost her husband.  It was a sudden tragedy, just like what happened to a good friend of mine that I wrote about here.  It brought me back to that place, that helpless place of not being able to do anything to help.  Peanut Butter Pie was his favorite dessert – and not even days after he passed away, she made a Peanut Butter Pie in his memory.  I had to do the same.

This recipe comes from my Aunt Marilyn, who is no longer with us.  She was a very good cook, and my grandmother often used her recipes – such as this one.  What I love about this recipe, is you can use all light ingredients, and you would never know – it is amazing.  The added bonus is that it makes two.  So, you can enjoy one right away, and freeze the other for a different occasion.  I was happy to solve the Peanut Butter Pie mystery, until I figured out what actually happened – my heart goes out to her and her children.

Ingredients

  • 1 box of chocolate teddy grahams
  • 4 tablespoons butter
  • 2-1/2 C creamy peanut butter (not natural)
  • 8 oz. light cream cheese, softened
  • 1-1/2 teaspoons vanilla extract
  • 2-3/4 cups powdered sugar, sifted
  • 1-1/2 cups low-fat milk
  • 20 oz. light frozen non-dairy whipped topping, thawed
  • Hot fudge sauce or Nutella

Preparation

To make the crust, grind the teddy grahams in a food processor until fine.  Transfer to a bowl and mix in melted butter.  Press crust into 2 – 9″ glass pie plates, pressing up the sides.  Bake at 350 degrees for 6-8 minutes.  Let the crust cool completely.

In a bowl, combine peanut butter, cream cheese & vanilla; beat until smooth.  In a separate bowl, whisk milk & sugar until smooth, then gradually add to peanut butter mixture, & blend until smooth.  Fold in whipped topping.

Pour a layer or fudge on topped of cooled crust, then spoon peanut butter filling into crust, mounding as necessary.  Freeze. Serve frozen or thaw 10 minutes ONLY.  Pie is better when it is VERY cold.

Makes 2 – 9″ pies, with some leftovers to put in ramekins.

For a printer-friendly version of the recipe, please click here:  Frozen Peanut Butter Pie

Add to FacebookAdd to DiggAdd to Del.icio.usAdd to StumbleuponAdd to RedditAdd to BlinklistAdd to TwitterAdd to TechnoratiAdd to Yahoo BuzzAdd to Newsvine

Blueberry Crumble Pie

I have been longing to make a homemade crust lately.  The last time I used a prepared crust, I just wasn’t happy with how it turned out – yes, it significantly cut down on the amount of time to make the pie, but it just wasn’t that good.  Also – I found a new gadget that I just love, and it makes rolling out pie crust so easy, you almost want to make one from scratch, just so you can use this thing.  I found it at Whole Foods one day, and decided that for $6, I have nothing to lose.  A prepared pie crust can cost up to that, so I figured I would be getting my money’s worth.

I tried it out for the first time during Thanksgiving – and it was awesome.  It made the most consistent homemade pie crust I have ever made, and it was so easy to get it into the pan.  No more worrying about folding it over, or rolling it, – I just unzipped the thing, and flipped it over on top of the plate.  This was my second or third time using it, and it worked like a charm.  When I saw this recipe in Bon Appetit, I decided it was time to make another crust.  Then I remembered my new gadget, and I was all over it.  This pie was excellent – not too sweet, not too tart, just perfect – and the crumble on the top was such a nice change from another pie crust.  So – no need to be afraid of pie crusts any longer – just get yourself a pie crust bag, and you will be making perfect pie crusts in an instant!  And no, I swear they are not paying me to say this…

Ingredients

Crust

  • 1 1/4 cups unbleached all-purpose flour plus more for  surface
  • 1/2 cup (1 stick) chilled unsalted butter, cut  into 1/2″ cubes
  • 1/2 teaspoon kosher  salt

Filling and Topping

  • 2/3 cup plus 3 tablespoons  sugar
  • 2 1/2 tablespoons cornstarch
  • 1 teaspoon finely grated lemon zest plus 2  tablespoons fresh lemon juice
  • 5 cups (1 pound 10 ounces) fresh  blueberries
  • 3/4 cup unbleached all-purpose  flour
  • 3 tablespoons (packed) light brown  sugar
  • 1/2 teaspoon cinnamon
  • 1/4 teaspoon salt
  • 5 tablespoons unsalted butter, melted,  cooled slightly

Special Equipment: Use a 9″-9 1/2″-diameter glass or metal pie dish. You will  need pie weights or dried beans to bake the crust.

Preparation

Crust

Pulse 1 1/4 cups flour, butter, and salt in a food processor  until mixture resembles coarse meal with some pea-size pieces remaining. Drizzle  3 tablespoons ice water over mixture. Pulse until moist clumps form, adding more  water by teaspoonfuls if mixture is dry. Transfer dough to a lightly floured  work surface. Divide into 4 equal pieces. Working with 1 piece at a time, use  the heel of your hand to smear each portion of dough twice in a forward motion  to distribute butter. Gather all 4 dough pieces into a ball. Flatten into a  disk, wrap in plastic, and chill dough until firm, at least 1 hour. DO  AHEAD Dough can be made up to 2 days ahead. Keep chilled.

Roll out dough on a lightly floured surface to a 13″ round.  Transfer to pie dish, gently pressing dough onto bottom and up sides of dish.  Fold overhang under and crimp edges decoratively. Pierce bottom of crust in  several places with a fork, then chill until firm, about 30 minutes.

Line a large baking sheet with foil and place on a rack in  middle of oven; preheat to 375°. Line crust with parchment paper or foil and  fill with pie weights. Bake until crust is set, about 20 minutes. Carefully  remove parchment and pie weights. Bake until crust is pale golden, about 12  minutes longer. Transfer crust to a wire rack; let cool.

Filling and Topping

Whisk 2/3 cup sugar, cornstarch, and lemon zest in a large  bowl. Add blueberries and lemon juice; toss gently to coat and evenly  distribute. Let filling stand, tossing occasionally, until berries release their  juices, 20-30 minutes.

Whisk flour, remaining 3 tablespoons sugar,  light brown  sugar, cinnamon, and salt in  a medium bowl. Add melted butter; mix topping with  fingertips to blend.

Assembly

Preheat oven to 375°. Spoon blueberry filling into crust, then  sprinkle topping over. Bake pie until filling is bubbling and topping is golden,  about 1 hour 15 minutes. Cover with foil after 30 minutes if browning too fast.

Let pie cool on a wire rack.

DO AHEAD Can be made 8  hours ahead. Let stand at room  temperature.

For a printer-friendly version of this recipe, please click here:  Blueberry Crumble Pie

Add to FacebookAdd to DiggAdd to Del.icio.usAdd to StumbleuponAdd to RedditAdd to BlinklistAdd to TwitterAdd to TechnoratiAdd to Yahoo BuzzAdd to Newsvine