Peach-Drop Biscuit Cobbler

Peach-Drop Biscuit Cobbler

I can’t believe that in only two weeks, I will be attending my very first food bloggers conference.  It is not just any conference, it is the International Food Bloggers Conference (IFBC), and it just happens to be in Seattle this year.  I have a little confession to make…I think I might be allergic to conferences.  Actually, I am allergic to crowds of people where you are supposed to mingle and talk to one another.  I am an introvert – not with my friends, but with pretty much anyone I have never met before.  I have trained myself very well at work to smile and make conversation with new people, but it does not come naturally to me.  When it comes to parties, conferences, or any large gatherings of people whom I do not know – I would rather be at the dentist.

The strange thing is, I have no problem speaking in front of large crowds of people – in fact, it almost gives me a rush – and I would rather speak in front of people I didn’t know to people I know in a heart-beat.  I teach a few classes a year, and I love it – it is almost like I am on stage acting, and for some reason I can play the part very well.  If only I could somehow figure out how to do that when I am just speaking to a few people – or if I could just get past the “Hi, I am….”

I have been to a couple of food blogger events in Seattle, and I always have to talk myself into actually entering the room.  The last one I went to, I talked to one person, then made a beeline out the door.  I couldn’t get out of there fast enough, and it was really a shame.  The food looked incredible, but I was too anxious to enjoy myself.  I am already nervous about this Food Blogger conference, but I keep looking at the website, and at the agenda, and it looks just amazing, so I am not backing out.  Not this time.

Not to change the subject, but it always makes me feel better to focus on food….

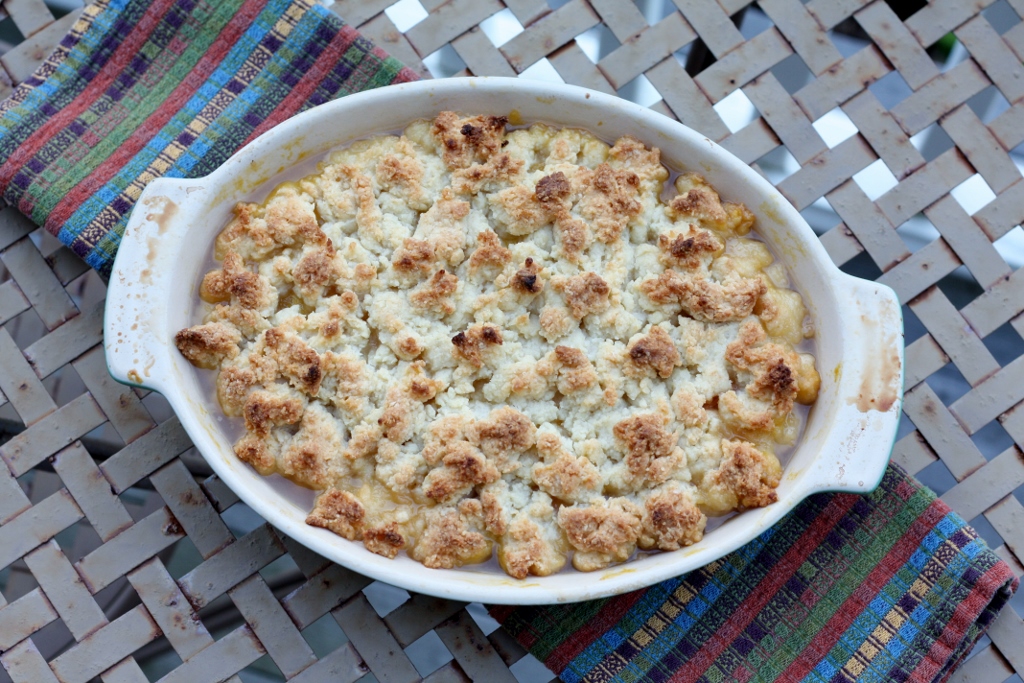
I couldn’t let peach season come to an end without at least one type of peach cobbler.  Something happened to me a few years ago, and I can no longer eat peaches unless they are cooked.  My entire mouth swells up – particularly my lips.  At first I thought it had something to do with the fact that the peaches were not organic, but next time I bought organic ones, and the same thing happened.  Peaches used to be my favorite fruit, and I really miss eating them – but fortunately I can cook them and I don’t get any of those strange side effects. This cobbler was terrific, of course the topping was just as good as those sweet and juicy peaches.  It was not a sweet topping, and it really didn’t need to be.  The recipe in Bon Appetit that I adapted for this recipe was really meant for blueberries, but I think peaches were just perfect.

So – I was able to figure out a way to overcome my peach allergy – I am hopeful that maybe I can get over my allergy of conferences as well.  I just have to keep my eye on the prize, and if you are reading this – and happen to be going to this conference – please look for me.  I always do much better when someone comes up to me – particularly if food is involved.

Ingredients

  • 1 1/2 cups plus 3 Tbsp. all-purpose flour
  • 3 tablespoons plus 3/4 cup sugar
  • 1 1/2 teaspoons baking powder
  • 1/2 teaspoon kosher salt
  • 6 tablespoons (3/4 stick) chilled unsalted butter, cut into 1/2′ pieces
  • 1/2 cup plus 1 Tbsp. crème fraîche or sour cream
  • 2 pounds fresh peaches, peeled and cut into wedges
  • 2 tablespoons fresh lemon juice
  • 1 tablespoon finely grated lemon zest

Preparation

Preheat oven to 375°. Whisk 1 1/2 cups flour, 3 Tbsp. sugar, baking powder, and salt in a large bowl. Add butter; using your fingertips, incorporate until only pea-size lumps remain. Gently mix in crème fraîche. Knead in bowl until a biscuit-like dough forms, 5–7 turns (overmixing will make dough tough).

Combine remaining 3/4 cups sugar, remaining 3 Tbsp. flour, peaches, juice, and zest in a large bowl. Toss to coat. Pour into an 8x8x2′ glass baking dish or divide among six 6-oz. ramekins. Tear biscuit topping into quarter-size crumbles; scatter over berries.

Bake cobbler until juices are thick and bubbling and topping is cooked through and deep golden brown, 20–25 minutes for ramekins or 45–50 minutes for baking dish. Let cool for at least 1 hour.

For a printer-friendly version of this recipe, please click here:  Peach-Drop Biscuit Cobbler

Peach-Drop Biscuit Cobbler 2

Cherry-Grapefruit Basil Sorbet

Cherry-Grapefruit Basil Sorbet

Cherry season is in full swing here in Seattle, the farmer’s markets are packet with all different varieties.  We even have cherry trees in our back yard, although it is always a race to get them before the crows do.  Unfortunately they don’t mind eating them when they are not so ripe – and we are always waiting until they are perfect to pick.  Every year we lose – don’t you think that after a while we would learn?  This year I decided to support the local farmers instead.

Where do I start with cherries – there is just so much to talk about.  When I was younger, cherry was my absolutely favorite flavor for just about everything – we are talking about that fake cherry flavor.  I hated real cherries – in fact, I am not sure I even had a real cherry until I was well into my 30s.  The cherries they use in Shirley Temples do not count – and I hated those – because they were close to real cherries.  I still am not a huge real cherry fan, but love the flavor – and the color.  The other weekend I ordered a drink that came with a real cherry on the bottom – no, I didn’t order a Shirley Temple at a restaurant, as much as I love them.  This was called the Corpse Revival #2, and was actually pretty decent.  I almost ate the cherry, but them remembered that there was probably a pit – which scared me off.  My husband popped it in his mouth – and would you believe there was no pit?  I have no idea how they managed to take the pit out without any type of hole – could there be such a thing as a pitless cherry that is fresh from a tree?  Of course not.

So in walks the cherry pitter.  The invention that can really change lives.  The other week at Book Club, one of the moms brought a bowl of pitted cherries – all the other moms were in awe.  They couldn’t believe there was such thing as a cherry pitter that was so easy to use and actually worked.  One of them said it was life changing.  So – even though I would never think about eating a real cherry, do you believe that I actually got one of these as a wedding present?  Yes, it is amazing – and pits cherries in a matter of seconds without hurting your hand one bit.  My younger daughter can pop them in her mouth though as fast as I can pit them.

I saw this recipe in Cooking Light – and with all the hot weather we are having, I knew I had to give it a try.  Plus, it gave me an excuse to use that life changing tool.  I found some beautiful cherries at the farmer’s market, and secretly pitted a bunch without my daughter seeing me.  She thanked me later – because this sorbet was the bees knees.  I am telling you – there is nothing better than a bowl of icy cold sorbet that is naturally flavored with wonderful cherries and grapefruit – and did I mention that undertone of basil?  Wow.

Cherry lover or not – do not waste your time on anything else this weekend.  Oh, and did I mention that when I looked up the recipe online it only got 1 star (exactly why I never look at ratings before I make anything) – that person is obviously on a different planet – one in which all fruit is fake.  These cherries were real and they were spectacular.

Ingredients

  • 1 cup water
  • 1/2 cup sugar
  • Dash of kosher salt
  • 1/2 cup basil leaves
  • 3 cups pitted cherries
  • 1/2 cup fresh ruby-red grapefruit juice (about 1 grapefruit)
  • 1 1/2 teaspoons fresh lime juice

Preparation

Combine first 3 ingredients in a small saucepan; bring to a boil, stirring until sugar dissolves. Stir in basil; remove from heat. Cover and let stand 30 minutes.

Place cherries in a food processor; process until smooth. Add sugar mixture, grapefruit juice, and lime juice; process until well blended. Strain cherry mixture through a fine sieve over a bowl; discard solids. Pour cherry mixture into the freezer can of an ice-cream freezer; freeze according to manufacturer’s instructions. Spoon sorbet into a freezer-safe container; cover and freeze 1 hour or until firm.

For a printer-friendly version of this recipe, please click here:  Cherry-Grapefruit Basil Sorbet

Cherry-Grapefruit Basil Sorbet 2

Little Apricot Cakes

Apricot Cakes

Another beautiful weekend in Seattle – boy have we been spoiled this summer.  And you should just see the markets.  I seriously haven’t seen such amazing looking produce at the farmer’s markets in years.  I walk around in awe at just about everything.  This Saturday was no exception.  The market was more crowded than usual – because word is getting out about how beautiful everything is – I just know it.  There was so much to buy, my daughter finally had to tell me to stop, and walk around the entire market before I put anything else in my bag.  I have taught her well.

I remember leaving work on Friday and telling my coworkers that I was not going to work this weekend.  One of them even had the audacity to suggest that I turn off my email on my phone – like that would ever happen.  I told her that the anxiety I would get when I started syncing my mail again would be enough to throw me over the edge – and that I would do better just monitoring things, but reminding myself that it was time for a break.  Then they asked me if  I was going to cook this weekend – as I emphatically said “YES!”  I explained that I had absolutely no idea what I would be making – and that it would all depend on what I found at the farmer’s market in the morning.  Well, I found the mother-load.  I had big plans based on what I brought back to the house – and I am pleased to report that I made everything that I wanted (ok, not exactly – I made everything I thought I could make, but believe me, that was not everything I wanted – that would take me another couple of weeks)…and everything turned out exceptionally well.  What did I make?  Well, I started with a couple jars of these, I made a big batch of this, and some new stuff that I can’t wait to show you.  Everything was made from locally sourced produce, which makes me even happier.

One of my favorites stands at the University District farmer’s market is this woman who sells her amazingly perfect apricots.  They are just stunning.  I get them in my hands, and I don’t want to put them down.  I saw this recipe in Bon Appetit, and I immediately thought of this nice woman.  Her apricot’s would make these little cakes glow.  These little babies were delicious – just the perfect size, and just the right amount of golden apricot flavor.  They were super easy to make – and with or without whipped cream, they were a wonderful summertime treat.  I can hardly wait to see what the market will bring next week – all I know is that I am starting the week refreshed and ready to go, with my eye on the prize – next week’s market that is.

Ingredients

  • Nonstick vegetable oil spray
  • 1 cup all-purpose flour
  • 1 1/2 teaspoons baking powder
  • 1/4 teaspoon kosher  salt
  • 6 tablespoons (3/4 stick) unsalted butter, room temperature
  • 1/3 cup sugar
  • 1 large egg
  • 1 teaspoon finely grated lemon zest
  • 1 teaspoon vanilla extract
  • 1/3 cup whole milk
  • 2 apricots, halved, pitted, cut into 1/4-inch wedges
  • 2 tablespoons raw sugar

Preparation

Preheat oven to 350°. Coat muffin cups with nonstick spray.  Whisk flour, baking powder, and salt in a medium bowl.  Using an electric mixer, beat butter and sugar in another  medium bowl, occasionally scraping down sides of bowl, until light and fluffy,  about 2 minutes. Add egg, lemon zest, and vanilla and beat until combined.  With mixer on low speed, add dry ingredients in 3 additions  alternately with milk in 2 additions, beginning and ending with dry ingredients.  Divide batter among muffin cups (cups will be only 1/3 full) and smooth tops.  Top with apricot slices and sprinkle with raw sugar.

Bake until cakes are golden and a tester inserted into the  centers comes out clean, 20–25 minutes. Transfer pan to a wire rack; let pan  cool 5 minutes. Transfer cakes to rack and let cool completely.

DO AHEAD: Cakes can be made 1 day ahead.  Store airtight at room temperature.

For a printer-friendly version of this recipe, please click here:  Little Apricot Cakes

Strawberry Jam Biscuits

Strawberry Jam Biscuits

It’s jam time…that’s right, one of my very favorite times of the year.  The time of year when those empty shelves in my pantry start getting filled with all sorts of delicious cooked fruit.  My daughters love that I make jam, in fact my younger daughter refuses to eat any other jam except my homemade.  You could say I have spoiled them, or maybe just taught them what good food is.

I have already started stock piling for the holidays – but I always save some for the girls.  Usually I just put the leftovers in a ramekin, or in a jar that is not labeled, that I place on a special shelf in the pantry – “our jam section” – as opposed to the jam for gifts.  Last week I came over after a long day, and saw that there was a new jar of strawberry vanilla jam in the refrigerator.  I just about lost it.  Ok, so it wasn’t my proudest moment – but when I asked why they didn’t use the other two already opened jars of jam (one which I might add was the exact same variety, and another was the leftover jam I used for these delicious treats) – they told me that the jam with the pretty labels tastes even better.  Seriously???  I was so angry, but part of me was laughing inside (although that laughing started much later) – but I was fuming that they had just wasted one of my holiday jams.  I brought them into the pantry and showed them where I keep “our jam section” as opposed to the “holiday jam section”.  Of course the “holiday jam section” has about 30 jars already – where as ours only has about 5.  The girls didn’t understand why they didn’t get both.  Wow – that would be a lot of jam.  So – no Mom of the year award for me…

Back to this recipe…I found this in Bon Appetit, and I felt like it was time to actually bake with some jam.  These were so perfect for strawberry season – just the right amount of sweetness with the biscuit – the girls ate them every morning before swim team, and they were gone in no time.  Fortunately there is still some of that great leftover jam in the refrigerator…I just need to get a label for the jar, and it will disappear magically, so I am told.

Ingredients

Strawberry Jam

  • 12  ounces fresh strawberries, hulled, halved or quartered if large (about 3  cups)
  • 1/4  cup sugar
  • 1  tablespoon finely grated lime zest
  • 2 tablespoons fresh  lime juice

Biscuits

  • 3/4 cup sugar
  • 2  teaspoons  baking  powder
  • 3/4 teaspoon kosher  salt
  • 2 1/4 cups  all-purpose  flour plus more
  • 1/2 cup (1 stick) chilled unsalted butter, cut into 1/2-inch pieces
  • 1 teaspoon finely  grated lime zest
  • 3/4 cup buttermilk
  • 1 large egg, beaten to blend
  • 1 tablespoon raw  sugar
  • Vanilla ice cream (for  serving)

Preparation

Strawberry Jam

Cook strawberries and sugar in a medium saucepan over  medium-high heat, stirring occasionally, until jamlike in consistency, 12–15  minutes. Remove from heat; stir in lime zest and juice. Pour into a shallow bowl  and let cool.

Biscuits

Preheat oven to 400°. Whisk sugar, baking powder, salt, and 2  1/4 cups flour in a large bowl. Add butter and lime zest and blend with your  fingertips until coarse crumbs form. Add buttermilk and, using a fork, mix until  just combined. Transfer to a lightly floured surface. Gently knead just until a  shaggy, moist dough forms, about 4 times.

Roll out dough about 1/2-inch thick. Using a 2 1/2-inch  biscuit cutter or inverted glass, cut out rounds. Gather scraps and repeat  rolling and cutting until all dough is used.  Place biscuits on a parchment-lined baking sheet. Using your  thumb, make a large divot in the center of each biscuit; brush with egg and  sprinkle liberally with raw sugar. Spoon a scant 1 teaspoon strawberry jam into  each divot.

Bake biscuits until golden brown, 18–22 minutes. Serve warm  with vanilla ice cream, if using, and remaining jam.

DO AHEAD: Jam can be made 3 days ahead.  Cover and chill.

For a printer-friendly version of this recipe, please click here:  Strawberry Jam Biscuits

Strawberry Jam Biscuits 2

Easy Strawberry Shortcakes with Whipped Cream

Easy Strawberry Shortcake

I made it though another year – I don’t really know how, but I did.  It was quite a last week of school, with exciting events for both girls every day.  Things were so crazy, I almost forgot they would bring their report cards home on Friday.  Normally that is not something I think about, but after the last report card – my younger daughter was spending a little too much time socializing, and not enough time actually focusing on her work.  She is not the driver my older one is, and has no real desire to do more than she needs to (unless it has to do with art), and the teachers were starting to catch on.  She is extremely capable, and they were pushing her to do more – but that wasn’t happening.  Fortunately the talks we had with her worked, and her last report card really lit a little fire under her – because boy did she turn things around.  Even I was floored – the first word her Math teacher wrote in the comments section was:  “Wow!”  I was so proud of her, and you should have seen her face when I told her how well she had done, she was beaming.  The summer was starting out on a really good note.

So what do you make for a special last day of school dessert?  Well – I have been waiting and waiting for the strawberry stand to open at my bus stop.  I always thought it opened in the beginning of June – but the beginning of June came and went – and not only was the stand not open, the stand wasn’t even there.  Every day when the bus dropped me off, I would hope and pray that the stand would show up – but no.  I was starting to think they decided to put the stand somewhere else.  I was really getting depressed.  It is like my own secret stash of fresh strawberries that only my neighborhood knows about – ok, so that is a lot of people – but still.  Finally last week the stand showed up, just as I was ready to give up on them, and start driving around looking for another one.  I was so happy – all I could think about was Friday – after my older daughter’s promotion ceremony.  We would stop on the way home and buy a whole flat.  Also – I completely forgot that a whole flat – is really like buying 2 flats.  $21 bought me more strawberries than I could ever know what to do with – I even cranked out 10 jars of my favorite strawberry vanilla jam – and I still have pounds of them left.

Back to dessert on Friday night.  I really wanted to make a strawberry crisp – but they both had such amazing report cards – they got to choose – and they found this picture on Tastespotting  from a beautiful blog called Just a Taste.  When I looked at the name of the recipe, and the first word was “easy” – how could I turn them down?  These shortcakes were delicious, in fact – I actually think I have made them before – but it was the whipped cream that really made this dessert special.  The sour cream gave the cream some weight, and some tang – it was exactly what these shortcakes and strawberries needed.  Ok, seriously – these strawberries needed nothing – they were sweet and delicious, but pairing them with these shortcakes and whipped cream just put them over the edge.

It was a really nice start to the weekend, that ended with a wonderful Father’s Day, and another delicious dessert.  The girls made me promise they could eat the rest of the strawberries this week after swim team (with a little cake on the side).  I think this is going to be a great summer…for all of us.

Ingredients

For the shortcakes:

  • 4 cups sliced strawberries
  • 2 Tablespoons sugar
  • 2 cups all-purpose flour
  • 3 teaspoons baking powder
  • 1/2 teaspoon salt
  • 1 1/3 cups heavy cream, plus additional for brushing on shortcakes
  • 2 teaspoons decorative sanding sugar (optional)

For the whipped cream:

  • 1 cup chilled heavy cream
  • 1/4 cup sour cream
  • 3 Tablespoons sugar
  • 1 teaspoon vanilla extract

Equipment: 3-inch circular cookie cutter (optional)

Preparation

Make the shortcakes:

Preheat the oven to 425ºF with a rack in the middle. Lightly butter a baking sheet.  In a small bowl, stir together the sliced strawberries with the sugar. Set aside.

In a large bowl, whisk together the flour, baking powder and salt. Stir in the heavy cream just until a dough forms. Gather the dough into a ball and knead it on a lightly floured surface one to two times. (Don’t over-knead the dough or your biscuits will be tough.)  Roll out the dough until it’s 1/2-inch thick. Using the cookie cutter, cut out 8 shortcakes and transfer them to the baking sheet. (Alternately, you can trim the sides of the dough into a square and then, using a sharp knife, cut the dough into 8 square shortcakes.)  Brush the tops of the shortcakes with additional heavy cream and then sprinkle them with the sanding sugar (optional). Bake the shortcakes until golden, 15 to 20 minutes, and then transfer them to a rack to cool.

Make the whipped cream:

In the bowl of a stand mixer fitted with the whisk attachment, whisk the heavy cream, sour cream, sugar and vanilla extract on high-speed until soft peaks form.

Assemble the shortcakes:

Slice the shortcakes in half and then sandwich the strawberries and whipped cream inside them.

For a printer-friendly version of this recipe, please click here:  Easy Strawberry Shortcakes with Whipped Cream

Apple-Molasses Upside-Down Cake

Apple Mollases Upside Down Cake

Cast Iron pans are a secret weapon.  Yes, they are heavy enough that they could actually be used as a weapon, but that’s not what I am talking about.  I love my cast iron pan, but I hardly ever use it!  The problem is, because I don’t use it very much, whenever I go to use it – I usually have to re-season it.  It is not that hard, but kind of a pain.  It is always completely worth it though – particularly for baking.  The one thing I have not done yet is use my cast iron pan to bake something on the Big Green Egg…now we’re talking.

The other week I signed up to bring dessert for book club.  I decided that I would make two desserts – one for the kids, and one for the adults.  What did I make for the kids?  Of course these…but I wanted to do something completely different for the adults.  Something that was easy, not too heavy, but that looked appetizing enough for everyone to try it.  I was so happy when I found this recipe in Bon Appetit, and it called for a cast iron pan.  It had been a while since I baked on my cast iron pan, and it was time.

It was a little risky to make this when we were trying to think spring, but I think I pulled it off.  The apples really made this dish – the cake had such an intense flavor that the apples offset it nicely.  Most of the Moms had a taste, and many of the kids did too.  Now, all I have to do is make this on the Egg to give it a nice smoky flavor…now that would be something else.

Ingredients

  • 5 tablespoons unsalted  butter
  • 1 3/4 cups all-purpose  flour
  • 1 1/2 teaspoons kosher  salt
  • 1 teaspoon ground  cinnamon
  • 3/4 teaspoon baking  soda
  • 1/2 teaspoon baking  powder
  • 3/4 cup mild-flavored (light) molasses
  • 1 large egg
  • 2 teaspoons grated  peeled ginger
  • 1/2 cup sugar, divided
  • 1/3 cup sour cream
  • 1/4 cup whole milk
  • 3-4 Honeycrisp or Pink Lady apples,  (about 2 pounds), peeled

Preparation

Place a rack in middle of oven; preheat to 350°. Melt butter  in a 10-inch (as measured across the bottom) cast-iron or other ovenproof  skillet; set aside. Whisk flour, salt, cinnamon, baking soda, and baking powder  in a medium bowl.

Whisk molasses, egg, ginger, and 1/4 cup sugar in a large  bowl. Whisk in sour cream, then milk. Gradually whisk in dry ingredients, then 3  tablespoons melted butter from skillet. Set aside.

Place 1 apple on a work surface  stem up. Cut a large piece of  apple from 1 side, leaving core behind. Rotate apple and repeat twice for a  total of 3 large pieces (a triangular core will remain). Repeat with remaining  apples.

Add remaining 1/4 cup sugar to butter in skillet. Cook over  medium-high heat until sugar begins to caramelize, 2-3 minutes. Add apples; stir  to coat. Cook apples rounded sides down for  3 minutes, then turn over and cook  flat sides down until beginning to soften, about 5 minutes longer. Space apples  evenly in skillet flat side down and pour cake batter over.

Transfer skillet to oven. Bake until a cake tester inserted  into the center comes out with a few moist crumbs attached, 30-40 minutes.

Let cake cool in skillet for 10 minutes, then carefully invert  onto a plate. Serve cake warm or at room temperature.

For a printer-friendly version of this recipe, please click here:  Apple Mollases Upside Down Cake

Apple Trefoils Crisp

Apple Trefoil Crisp

It is that time again – just when the holiday blues start wearing off, when you see those brightly colored boxes of delicious cookies.  Yes, it is Girl Scout Cookie time!  And like last year, the Girl Scouts of Western Washington are having another recipe contest.  Since I came in 2nd place last year, I figured I had to try again. And again, like last year – if I can win some money out of this contest, I would like to do something really special – I would like to donate the money to a charity – and I am going to ask you – my readers – to choose the charity.  That’s right – so stayed tuned for more on that – no sense in giving more details if I am not a finalist.

Unlike last year, where the sky was the limit when it came to making up a recipe – I really had to control myself this year.  After all, I am still on this simplicity kick – and not only that, I wanted to make something a little healthier.  I thought about fruit, and what I could do with Girl Scout Cookies and fruit, and then I remembered where I live – in Washington State…so how could I not make something with Washington Apples??  It is extremely important to support your local economy – especially in the midst of a contest.  So – there it was, staring me in the face – an apple crisp, and what could be better than making a topping using the tried and true Trefoils Shortbread Cookie.

I was pretty impressed with how good this came out.  I made it in a skillet and then put that skillet in the oven – how’s that for simplicity?  The crisp was delicious, especially the topping – but combined with those caramelized apples, boy was it a treat – and the best part of all, I let my kids have seconds.  I actually felt good about serving it for dessert.

Just a few reminders – Girl Scout Cookies are on sale from March 1-17! There is an awesome cookie locator, as well as an app, that tells you exactly where girls are selling cookies in your neighborhood! They won’t be updated until closer to the sale, but are very good to keep handy.  Then you too can buy some cookies and make this awesome and simple crisp, that supports our local farms!

Ingredients

Topping

  • 1 1/2 sleeves of Trefoils Girl Scout Cookies
  • 3/4 cup old-fashioned rolled outs
  • 1/4 cup packed light brown sugar
  • 1/2 teaspoon ground cinnamon
  • 1/2 teaspoon table salt
  • 4 tablespoons (1/2 stick) unsalted butter, melted

Filling

  • 3 pounds Golden Delicious apples, peeled, cored, halved, and cut into 1/2-inch-thick wedges
  • 1/4 cup granulated sugar
  • 1/2 teaspoon ground cinnamon
  • 1 cup apple cider
  • 2 teaspoons juice from 1 lemon
  • 2 tablespoons unsalted butter

Preparation

Make the topping:  Adjust the oven rack to the middle position and heat oven to 450 degrees.  Put the Girl Scout cookies in a food processor and crush until fine.  Combine the cookies, oats, brown sugar, cinnamon, and salt in a medium bowl.  Stir in butter until mixture is thoroughly moistened and crumbly.  Set aside while preparing the fruit filling.

Make the filling:  Toss the apples, granulated sugar, and cinnamon (if using) together in a large bowl;  set aside.  Bring cider to a simmer in a 12-inch oven-safe skillet over medium heat; cook until reduced to 1/2 cup, about 5 minutes.  Transfer reduced cider to a bowl or liquid measuring cup; stir in lemon juice and set aside.

Heat butter in a now empty skillet over medium heat.  When foaming subsides, add apple mixture and cook, stirring frequently, until apples begin to soften and become translucent, 12 to 14 minutes.  (Do not fully cook apples.)  Remove pan from heat and gently stir in cider mixture until apples are coated.

Sprinkle topping evenly over fruit, breaking up any large chunks.  Place skillet on baking sheet and bake until fruit is tender and topping is deep golden brown, 15 to 20 minutes.  Cool on a wire rack until warm, at least 15 minutes, and serve.

Serve the apple crisp warm or at room temperature with vanilla ice cream, whipped cream – or just by itself.

Serves 6-8

For a printer-friendly version of this recipe, please click here:  Apple Trefoils Crisp

Honey-Lemon Custard with Fruit

I am back from my quick trip to China – and what an amazing experience it was.  I really had no expectations – it was a work trip, and I was focussed on the content I was there to present.  I loved getting to know the employees in our Beijing offices, I loved the food, the silk market – and I loved getting a Chinese foot massage (that is really like a body massage) where they kick the crap out of you, and it actually feels amazing – if you can control yourself from laughing.

So when I go to new cities, there is one place I always want to see – the super market.  I know it sounds crazy, but that is how I really embrace the culture.  I was a little afraid to tell the people I was travelling with about my quest – so I decided to keep it quietly to myself.  I was pretty sure I wouldn’t find one, since I had very little time to explore – so I told myself not to be disappointed.  After the first few meals, I was so impressed, I almost stopped thinking about trying to find one.  The dumplings kept me happy enough – oh, and the breakfast at the hotel – it was a global breakfast dream.  They had everything and anything you can think of – the highlights were the pork dumplings, honey yogurt and the watermelon smoothies.  Believe me when I say, you could get ANYTHING.

The weather in Beijing could not have been any better – it was blue sky, high 60s and clear as can be.  I could see the mountains, and again, I had no idea how beautiful it was going to be.  I finished my meetings at 3:00 in the afternoon, and decided to take a little walk around the office building.  I heard there was a shopping mall not too far down the road, and I needed a little adventure.  On my way there, I saw a sign – for Carre Four – I found it!!!!  That is a French super market that I love going to in Paris – I couldn’t believe it!  I had to go down a big escalator, and then walk quite a bit through these subway tunnels – but I finally found it.  They had a big dollar section right when I walked in – but in China, it was like the penny section – I bought some noodles for pennies.  I loved walking around and seeing all the packaged and fresh foods – the flat chickens were really the most unusual.  They were hanging with the salami – and they looked like they had been flattened and then dried.  Wow.

I could go on and on about the food – like the night we went for Peking Duck, and after they carved the meat off the bones, they crushed the bones, and deep-fried them.  The man sitting next to me just went to town – crunching away.  Or, the night we went to a 4.5 star dumpling place that looked like a fast food joint.  The food was pretty good (although the first dumpling place we went to was better), but they brought this mango custard that was amazing.  We weren’t really sure what it was, but I had to try it – and I was so glad I did – it was my favorite part of that meal.

I found this recipe in Bon Appetit, and had made it before I left for China.  It was not as sweet as what I ate there, but this was also amazing.  Let it sit for a day or so before eating, so the flavors really have a chance to develop.  I put mango on the top, but really any fruit would be excellent.  If you like a lemon custard, this is your dessert – and you don’t have to travel thousands of miles to try some!

Ingredients

  • 2 cups heavy cream
  • 4 tablespoons honey, divided
  • 3 tablespoons sugar
  • 1/2 vanilla bean, split lengthwise
  • 3 2-inch strips lemon peel
  • 6 tablespoons fresh lemon juice, divided
  • 1/4 cup light rum
  • 1 cup berries or sliced mango

Preparation

Place ramekins on a rimmed baking sheet. Heat cream, 2 tablespoons honey, and sugar in a small saucepan over medium heat until just beginning to simmer. Scrape in seeds from vanilla bean; add bean. Add lemon peel; remove from heat. Let steep for 5 minutes (cream should register about 160°F on an instant-read thermometer). Remove vanilla bean and peel. Gently stir in 5 tablespoons lemon juice.

Divide custard among ramekins and chill to let set for at least 1 hour or, covered, up to 1 day.

Whisk remaining 2 tablespoons honey and 1 tablespoon lemon juice with rum in a small bowl. Stir in fruit; let sit until juicy, about 1 hour. Serve with custard.

For a printer-friendly version of this recipe, please click here:  Honey-Lemon Custard with Fruit

Stawberry-Lemon Shortcakes

I just love shortcake season – which also just happens to be the same time of year as cobbler and crisp season as well.  They are all so delicious, it is hard to decide which one to make.  Usually I have to make a few of each kind during the summer, just to try out some new recipes.

Over the years though, I have really started favoring shortcakes, for a few reasons:

  • I never cook the fruit, therefore, if you have some wonderful sweet and ripe berries, you get to eat them in their glory – I tend to make crisp and cobblers with fruit that is not as ripe.
  • You get to eat the leftover shortcakes the next day – warmed in the toaster or microwave, with a little butter and jam on them, just like a scone.
  • I love individualized desserts that you get to build yourself…ok, is this just me?

So, when I saw this recipe in Cooking Light, I couldn’t wait to give it a try.  I loved how these were made – basically putting the dough in a cake pan, and letting the shortcakes all bake together – although there was still a slight separation so it was easy to break them apart when they were done.  These were perfect shortcakes, nice and tender, but not too sweet – letting the strawberries do their job to add the sweetness.  I bet you can guess what my favorite part was though…that’s right, eating them the next day for breakfast – and believe me, I will be making these more and more, giving me just another excuse to make more of this.  Like I needed another excuse?

Ingredients

  • 9 ounces all-purpose flour (about 2 cups)
  • 1/4 cup granulated sugar
  • 1 tablespoon baking powder
  • 1/2 teaspoon baking soda
  • 1/4 teaspoon salt
  • 6 tablespoons chilled butter, cut into small pieces
  • 1 1/4 cups low-fat buttermilk
  • 1 tablespoon grated lemon rind
  • Cooking spray
  • 1/2 cup all-purpose flour
  • 1 tablespoon butter, melted
  • 1 tablespoon turbinado sugar
  • 4 cups sliced strawberries
  • 1/4 cup granulated sugar
  • 1 tablespoon fresh lemon juice
  • 1 1/4 cups frozen fat-free whipped topping, thawed (or real whipped cream, which is what I used)

Preparation

Preheat oven to 425°.

Weigh or lightly spoon 9 ounces (about 2 cups) flour into dry measuring cups, and level with a knife. Combine 9 ounces flour, 1/4 cup granulated sugar, baking powder, baking soda, and 1/4 teaspoon salt in a large bowl. Cut in chilled butter with a pastry blender until the mixture resembles coarse meal. Combine 1 1/4 cups buttermilk and grated lemon rind. Add the buttermilk mixture to flour mixture, and toss gently with a fork to combine. (Dough should be wet and about the texture of cottage cheese.)

Coat a 9-inch round metal cake pan or baking sheet with cooking spray. Place 1/2 cup flour in a shallow dish. Scoop 10 equal dough portions into dish. Gently shape each portion into a round by tossing in flour to help shape the dough. Arrange in pan. Discard excess flour. Brush dough with melted butter, and sprinkle evenly with 1 tablespoon turbinado sugar. Bake at 425° for 22 minutes or until the shortcakes are lightly browned. Cool in pan on wire rack for 10 minutes. Remove shortcakes from pan. Cool on wire rack.

Combine berries, 1/4 cup granulated sugar, and lemon juice; toss to coat. Let stand for 15 minutes. Split each shortcake in half; spoon about 1/3 cup berry mixture and 2 tablespoons whipped topping into each.

For a printer-friendly version of this recipe, please click here:  Stawberry-Lemon Shortcakes

Roasted Pineapple with Honey and Pistachios

I came into work a little later today, my husband was travelling, and I needed to get the kids off to school.  I like to be the first person at work in my area, with only the security guards wandering around – and when I am not, it usually throws off my entire day.  This morning, when I finally did get in, everyone was there, and my boss mentioned that she had donuts in her office.  It is not often that we have sweet treats like that in the morning, and I figured it would be nice to have with my tea. It turns out, one of my co-workers went to a new donut shop near her house and brought them in for all of us to try.  These were no ordinary donuts, they were basically like cupcakes in the shape of donuts.  I cut off a tiny taste of about 4 kinds, and they just about did me in for the rest of the day.  The universe was already a bit off by me coming in so late, but those donuts were just too much…talk about over the top.  I was craving fruit for the rest of the day – which if you know me, does not happen very often.

I grew up in a house that was against fruit for some reason.  My grandmother pushed fruit on my mother to the extreme, so in revolt, my mother banned it from the house.  Ok, not exactly, but I swear I can hardly ever remember seeing it when I was growing up.  On the other hand, when I would visit my grandmother, it was a course at every meal.  Don’t forget the fruit!  My husband has had to train me over the years to purchase fruit for the house – he sometimes will make a special trip to the market just so there is enough, and it always has to be fresh.  My girls love fruit – especially berries – so I am definitely the outlier of the house when it comes to this part of the food pyramid.

I saw this recipe in Bon Appetit, and I thought my family would be proud of me.  It would satisfy my need to make something, but in the end, we are talking about fresh fruit.  It was certainly a big hit – I loved the yogurt on the side – the pineapple was so sweet, it was a welcome accompaniment.  I didn’t end up pouring more syrup on the top, because it didn’t need it.  I ended up using the extra syrup on top of the extra plain yogurt – delicious.  So – if you are in the mood for something sweet, and want to feel like you are being healthy – here is the perfect dessert for you.  Then you can wake up the next morning and stop for a red velvet donut…

Ingredients

  • 1/2 cup(packed) dark brown  sugar
  • 1/2 cup orange juice
  • 3 tablespoons honey
  • 1 medium ripe pineapple, peeled, cored, cut lengthwise into 8  wedges
  • 1/4 cup crème fraîche or  yogurt
  • 1/3 cup natural unsalted pistachios, coarsely  chopped
  • 2 tablespoons torn fresh mint  leaves

Preparation

Preheat oven to 450°. Line a large rimmed baking sheet with  parchment paper. Stir first 3 ingredients in a large bowl until sugar dissolves.  Add pineapple; toss to coat.  Let marinate, tossing occasionally, for 10  minutes. Place pineapple, one flat side down, on prepared sheet; reserve  marinade.

Roast pineapple for 15 minutes. Turn, brush with marinade, and  roast until tender and caramelized, 10–15 minutes. Drizzle remaining marinade  over; let cool slightly.

Divide pineapple among plates. Spoon crème fraîche alongside.  Garnish with nuts and mint.

For a printer-friendly version of this recipe, please click here:  Roasted Pineapple with Honey and Pistachios

Add to FacebookAdd to DiggAdd to Del.icio.usAdd to StumbleuponAdd to RedditAdd to BlinklistAdd to TwitterAdd to TechnoratiAdd to Yahoo BuzzAdd to Newsvine