Bacon, Onion, and Cheddar Corn Muffins

Onion Cheddar Bacon Corn Muffins

When I was little we would go to my grandmother’s house during the summer – she lived near the ocean, where we would spend our days.  She was an excellent cook, but like all good grandmothers, she wanted her grandchildren to be happy, and always asked us what we wanted for breakfast and lunch.  Of course my sister and I would always choose the same things – and it was because we hardly got these at our house.  We asked for Jiffy Corn Muffins for breakfast, and Kraft Macaroni and Cheese for lunch.  We ate these treats every day – and never got sick of them.  In fact, even today, I often crave a good box of Jiffy Corn Muffins – it is a blast from the past for me to sink my teeth into those sweet little morsels.  Although, over the years, I have discovered that homemade corn muffins can actually taste even better.  I know, can you believe it?  It’s all about bacon…and seriously, what doesn’t taste better with bacon?

This reminds me of another story – and then I promise to get back to these corn muffins.  Years ago my husband’s parents took us to Napa Valley for the weekend, and we stayed at this beautiful B&B in Yountville – this was when Yountville barely existed, and I swear this B&B may have been the only thing in this town.  We woke up to the wonderful smell of bacon – it was incredible.  It got us right up out of the comfortable bed, all dressed – and downstairs for breakfast.  When they told us what was on the menu – we asked where the bacon was?   They laughed – that was just to get people up – they weren’t serving it.  ARE YOU FREAKING KIDDING ME????  We were besides ourselves, and the rest of the trip we were craving bacon.

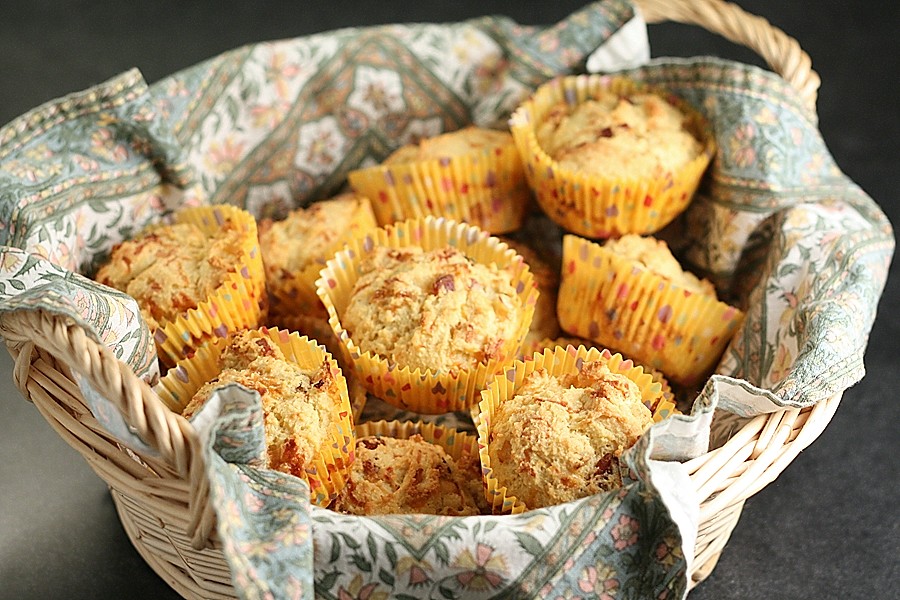
So – what does these two stories have in common?  This recipe that I found in Cooking Light.  This recipe that combines a wonderful corn muffin with the perfect taste of bacon – and add a little onion and cheddar, then you have really have yourself a party in your mouth.  These are the perfect side dish to chili, soup or just about anything you serve for dinner.  Remember, everything is better with bacon – that is if you actually get to eat it…

Ingredients

  • 2  slices bacon
  • 3/4 cup chopped onion
  • 1 1/4 cups fat-free buttermilk
  • 1/4 cup olive oil
  • 1  large egg, lightly beaten
  • 4.5 ounces all-purpose flour (about 1 cup)
  • 3/4 cup yellow cornmeal
  • 2 teaspoons baking powder
  • 1/4 teaspoon baking soda
  • 1/4 teaspoon salt
  • 1/8 teaspoon ground red pepper
  • 2 ounces shredded sharp cheddar cheese (about 1/2 cup)
  •  Cooking spray

Preparation

Cook bacon in a skillet over medium heat. Remove bacon, reserving drippings in pan. Drain bacon; crumble. Increase heat to medium-high. Add onion to drippings in pan; sauté 5 minutes.

Preheat oven to 400°.

Combine buttermilk, olive oil, and egg.

Weigh or lightly spoon flour into a dry measuring cup; level with a knife. Combine flour and next 5 ingredients (through pepper) in a bowl, stirring well with a whisk. Make a well in center of flour mixture. Add milk mixture; stir just until moist.

Stir in bacon, onion, and cheese. Spoon into 12 muffin cups coated with cooking spray.

Bake at 400° for 13 minutes or until a wooden pick inserted in center comes out with moist crumbs clinging. Remove muffins from tins; cool on a wire rack.

For a printer-friendly version of this recipe, please click here:  Bacon, Onion, and Cheddar Corn Muffins

Chive and Black Pepper Popovers

Chive and Black Pepper Popovers 2

Happy New Year!  I can’t believe it is 2013 already, where did 2012 go?  Well, upward and onward – I am looking forward to see what the new year will bring.  I have certainly enjoyed being on vacation, and can’t believe I have to head back to work tomorrow.

So – I have been thinking a lot about what I am going to do differently in 2013 – and I decided that my resolution is to simplify.  I think I have said this before – but this time I mean it.  I am still not sure how I am going to achieve this goal – but I have to try.  I feel like my life is a constant marathon – I am always exhausted, never caught up – and know that I have miles to go before I am done.  As I am writing this, I am thinking about the 10 other things I should be doing.  I don’t want to give up the things I love doing, but again, maybe I can think differently about how to get them done.  It is only the 1st, I have 364 days to make this happen – but I have to look at each day and think about one thing I can do that will make things simpler for the future.

I have posted popovers before, and I swear, I can’t figure out why I don’t make them more often.  They are so ridiculously easy to make, and you can actually prepare the batter the day before!  These were something else – I scarfed down two of them in an instant.  I found the original recipe in Bon Appetit, but adapted slightly below. The girls also loved them, and they went great with the Lentil Soup I made for dinner.  They made our New Year’s Day dinner just a little more special.  And, do you want to know a little secret?  I only made half the batch tonight – and saved the rest of the batter for tomorrow night’s dinner – wow, I am already making good on my resolution to simplify – it doesn’t get any better than that!

And for those of you really paying attention, you will notice this is a different picture from last night…that is because they looked a little different the 2nd night, and just as delicious.  These look a little more authentic, so I decided to switch the picture…

Ingredients

  • 2 cups all-purpose flour
  • 2 tablespoons finely chopped chives
  • 1 tablespoon kosher salt
  • 1 teaspoon freshly ground black pepper
  • 3 large eggs
  • 2 1/2 cups whole  milk
  • 5 tablespoons melted unsalted butter, divided

Preparation

Whisk the first 4 ingredients in  a medium bowl. Whisk eggs and milk in a large bowl until well blended. Gently whisk in flour mixture, followed by 3 tablespoons of melted butter (do not  overmix).

DO AHEAD: Batter can be made 1 day ahead. Cover and chill.

Preheat oven to 425°. With the rest of the butter, grease 12 standard muffin cups with 1/2 teaspoons melted butter each. Pour batter into prepared muffin tins, filling cups three-quarters full  and dividing equally. Bake popovers until puffed, golden brown, and crispy around edges, 30-35 minutes. Using a thin knife or an offset spatula, remove popovers from pan. Serve immediately.

For a printer-friendly version of this recipe, please click here:  Chive and Black Pepper Popovers

Crunchy Tandoori Chickpeas

Almost 3 1/2 years ago, my neighbor sent me a link to one of our favorite Passover treats.  This was my first look at a real food blog – not just a blog, but exactly what I had been thinking about doing.  I was impressed – but at the same time – I was motivated.  I knew I could do this myself – and after months of getting serious – I did it.  And that started First Look, Then Cook.  It has been a really fun ride – and don’t worry, it is not over yet.

I have written about my friend’s Cookbook Store before – Book Larder.  It is such a magical place – I could spend months in there pouring over the books.  She has some amazing events – but sometimes life gets a little too hectic and I miss a really important one.  That is exactly what happened this week.  Smitten Kitchen was coming to promote her new cookbook, and it completely flew by me.  Luckily for me, Lara needed some help – it was going to be the biggest cookbook event she has ever held at the store.  Boy was she right – the line to sign cookbooks circled around the block – Deb has quite a fan base, and it was so much fun to be a part of it all.  I was so impressed with Lara’s organization of the event though – people even thanked her afterwards and told her what a great experience it was – for people who waited in line for over an hour, that is quite a compliment.  It’s amazing what some cookies and coffee can do – and it didn’t hurt that the rain stayed away.  Deb was great last night – she signed every last book, after connecting with each and every person in line.  It was an excellent evening.

Deb explained last night that she enjoys making food that everyone can make, and with her tiny NYC kitchen, she has to control the number of bowls she uses.  This is a perfectly simple recipe, that anyone can make – and it is perfect for fall.  This recipe (which I adapted below) was published in Cooking Light – in their crunchy article.  That is exactly why I love these – I could eat these over potato chips any day of the week.  So here’s to simplicity – oh, and organization.  The combination of the two, made for a very good week.

Ingredients

  • 2  (15 1/2-ounce) cans organic chickpeas (garbanzo beans), rinsed and drained
  • 2 tablespoons canola oil
  • 1 teaspoon tandoori spice
  • 3/4 teaspoon kosher salt
  • 1/4 teaspoon ground red pepper
  • 1/8 teaspoon onion powder
  • 1  garlic clove, minced

Preparation

Preheat oven to 300°.

Wrap chickpeas in a towel; lightly roll to loosen skins. Discard skins. Combine chickpeas and remaining ingredients. Arrange on a baking sheet. Bake at 300° for 1 hour and 40 minutes, stirring every 20 minutes.

For a printer-friendly version of this recipe, please click here:  Crunchy Tandoori Chickpeas

Persian Rice

I am having one of those weeks – I call them, “I have fallen and I can’t catch up” weeks.  I come home everyday with my inbox completely full of email, the girls asking a million questions, and I can’t even think about what to make for dinner.  Oh, and throw Halloween into the mix – and things have really just been turned upside down.

I really can’t complain though, not after seeing the pictures of the devastation that occurred this week from Hurricane Sandy.  My parents live in New London, CT – and I have been going there all my life.  The seawall that I have walked on thousands of times has crumbled – and the debris on the streets was quite a sight – a toilet seat, a refrigerator?  Probably from one of the beach clubs that got washed away.  Very sad.  Thank goodness they were safe, as was their home.  It is going to be a long time though before the neighborhood gets back to normal.

Even though we didn’t have a hurricane, the rain here has been something else.  We had our 60+ days of sun, and the rain came pouring back into our lives.  This post brings me back to summer.  My family loves rice – and for the most part I buy it frozen and warm it in the microwave.  I saw this recipe in Cooking Light though, and had to indulge.  This was delicious – crispy on the outside, creamy on the inside – with a really nice tangy taste from the yogurt.  Everyone loved it, and it was the perfect side to go with our summer vegetables from the garden.  Goodbye summer, see you next year.  And to all of you on the east coast – I hope you survived the storm ok.  I hope things can go back to normal soon.

Ingredients

  • 4 cups water
  • 1 cup long-grain basmati rice
  • 1/2 cup plain 2% reduced-fat Greek yogurt
  • 1 teaspoon kosher salt
  • 1/8 teaspoon crushed saffron threads
  • 1 1/2 tablespoons unsalted butter
  • 2 teaspoons canola oil

Preparation

Place 4 cups water in a saucepan over medium-high heat; bring to a boil. Add rice; cook for 10 minutes. Drain. Rinse with cold water; drain.

Combine yogurt, salt, and saffron in a medium bowl. Add rice to yogurt mixture, stirring well.

Melt butter in a medium nonstick sauté pan over medium heat. Add oil; swirl to coat. Add rice mixture to pan, lightly packing rice down. Wrap a clean, dry dish towel around lid to pan, tying it at the handle; place prepared lid on pan. Cook rice, covered, over medium heat 20 minutes (do not stir or uncover). Reduce temperature to medium-low; cook an additional 20 minutes or until rice is tender on top and a golden crust forms on bottom.

Loosen the rice crust with a rubber spatula around the edges. Place a plate over the top of pan, and invert the rice onto plate, browned side up. Cut into 6 wedges, and serve immediately.

For a printer-friendly version of this recipe, please click here:  Persian Rice

Black Pepper Pasta Salad with Prosciutto, Asparagus, and Romano

The first day of July – you would never know it where I live.  As we hear about the record heat across the country, it didn’t even come close to 70 degrees today.  I guess I should not be complaining, but seriously – is summer ever going to come?  I know I sound like a broken record, but last year, summer never did come.  People are starting to freak out around here that we will never see summer again.  I actually worry more about finding the perfect pasta salad.  Did I just write that?

With the 4th of July right around the corner, everyone is thinking about BBQs.  Since I made this potato salad the other week, I have been hooked – I think I have made it at least 2 times since then, and plan to make it again on the 4th.  So basically, my quest for the best potato salad is done.  Now I am on to pasta salad.  I usually prefer a non-mayonaise pasta salad, but I saw this one in Cooking Light, and had to give it a try.  I love asparagus and prosciutto together, and just thought it would make a wonderful pasta salad.  I have to say, for a mayo-based salad, it was delicious.  There was a lot of flavor in every bite – the prosciutto definitely helped there.  But the combination of tomatoes and asparagus with the pasta and prosciutto was right on.  It made a darn good side dish.  I will not claim victory just yet, but it was close.  I guess this means I will still be on the search, but I have a really good standby until I find the one.

Ingredients

  • 8 ounces uncooked cavatappi pasta or elbow macaroni
  • 3 cups (1 1/2-inch) slices asparagus (about 1 pound)
  • 1 teaspoon olive oil
  • 2 ounces prosciutto, chopped
  • 1/2 cup thinly sliced shallots
  • 6 tablespoons light mayonnaise
  • 1 teaspoon grated lemon rind
  • 1 tablespoon chopped fresh tarragon
  • 2 tablespoons fresh lemon juice
  • 1 teaspoon freshly ground black pepper
  • Dash of salt
  • 1 cup diced tomato
  • 1 1/2 ounces pecorino Romano cheese, grated (about 1/3 cup packed)

Preparation

Cook pasta according to package directions, omitting salt and fat. Add asparagus during the last 2 minutes of cooking. Drain and rinse under cold water; drain.

Heat a large nonstick skillet over medium-high heat. Add olive oil to pan, and swirl to coat. Add prosciutto, and cook for 6 minutes or until crisp, stirring occasionally. Remove prosciutto from pan using a slotted spoon, leaving drippings in pan. Drain prosciutto on paper towels. Add the shallots to drippings in pan; cook over medium heat for 1 minute or until shallots are tender, stirring frequently.

Combine mayonnaise, lemon rind, tarragon, juice, pepper, and salt in a large bowl; stir well. Add pasta, asparagus, three-fourths prosciutto, shallots, tomato, and cheese; toss well to coat. Top servings evenly with remaining prosciutto.

For a printer-friendly version of this recipe, please click here:  Black Pepper Pasta Salad with Prosciutto, Asparagus, and Romano

Eggy Potato Salad with Pickles

What is a good BBQ or picnic without a good potato salad?  It is almost like April Fool’s Day without a good trick.  I swear though, making potato salad is not my idea of a fun time in the kitchen.  I have tried all types of potato salads, and I as you can see – none have ever been good enough to make it to the blog.  Aside from the fact that I never find a good recipe, it is a pain in the neck to make.  So potato salad has become one of those treats that I eat outside of the house.  I love going to a good NYC deli and getting a good side of potato salad to go with my sandwich.  How come I never seem to be able to make potato salad like that?  My favorite kind has little bits of pickles and hard-boiled eggs mixed up with the mayonnaise dressing.  I don’t like a heavily dressed potato salad, but one that is dressed just enough to make the potatoes creamy and flavorful.

Last month in Bon Appetit, there was actually a recipe for potato salad that looked pretty awesome.  The title of the article was “Will Drive for Food.”  I became very intrigued.  My husband and I will definitely drive for food.  It was something that I was kind of brought up doing, and fortunately I married someone who not only tolerates it, but finds it just as much fun as I do.  My parents would drive us to all sorts of crazy places, just to find the best “something.”  Living on the east coast made it a lot easier to do that – cities are not all that far apart.  We don’t drive for food as much as I would like – but we don’t have to – we are lucky enough to live in a city with outstanding food.

So – back to the recipe – I saw this, and knew it had to be good – but it ended up in the stack in the pantry.  This morning, I was trying to decide if I was going to make something for book club – I was kind of hosting, and everyone signed up to bring stuff – and there wasn’t really anything else we needed.  I was flipping through the recipes to menu plan for the week, when I came upon this recipe.  It didn’t actually look that hard – so I decided it would be a good addition to the menu.  As soon as I took that first taste, I almost jumped up and down.  I did it!!  I found the recipe I have been waiting for!!  I called the kids over to try it – they hate potato salad, but I told them this was the best they will ever eat – and they both loved it.  Success!!!!  There wasn’t a drop left after book club – so hopefully that meant everyone else enjoyed it as well.

Before I forget – I want to tell you about my little secret that made this recipe to easy…Trader Joes now has hard-boiled eggs…yes, can you believe it?  So – I bought a package, cut open the eggs, took the yolks out, and put the whites back in the sack.  My older daughter told me she is doing this next year for April Fool’s Day.  So not only do you get some killer potato salad, I just gave you a sweet joke for April Fool’s Day.  Come on now, what can get any better than that?

Ingredients

  • 2 3/4 pounds medium red-skinned potatoes, peeled (about 8)
  • 1 1/4 teaspoons kosher salt plus more
  • 1/2 cup mayonnaise
  • 1/4 cup sweet pickle juice from jar plus 8–10 sweet-pickle chips
  • 1 1/2 tablespoons Dijon mustard
  • 1 teaspoon sugar
  • 1/4 teaspoon freshly ground black pepper plus more
  • 5 large hard-boiled egg yolks
  • 2 tablespoons chopped red onion
  • 2 tablespoons chopped flat-leaf parsley
  • Paprika

Preparation

Place potatoes in a large pot. Add water to cover by 2″, season with salt, and bring to a boil. Reduce heat to medium and cook until potatoes are tender when pierced with a knife, 20–30 minutes. Drain. Place potatoes in a large bowl and let cool slightly.

Meanwhile, whisk mayonnaise, pickle juice, Dijon mustard, sugar,  1/4 tsp. pepper, and 1 1/4 tsp. salt in a small bowl for dressing.

Using a large wooden spoon, coarsely smash potatoes, leaving some larger pieces mixed with some well-mashed pieces.

Add dressing and egg yolks to potatoes and toss to coat, coarsely smashing egg yolks. Add onion and parsley; gently mix to incorporate. Season to taste with more salt and pepper, if desired.

DO AHEAD: Can be made 1 day ahead. Cover and chill.

Divide potato salad among small paper cups or bowls; dust with paprika. Top each serving with a pickle chip.

For a printer-friendly version of this recipe, please click here:  Eggy Potato Salad with Pickles

Roasted Carrot and Beet Salad with Feta

Why is it that the batteries for smoke alarms only decided to die in the middle of the night?  When my husband and I moved into our house 7 1/2 years ago, I remember the first night we lay down to go to sleep.  We were so happy to be done – finally living in the house that we agonized about for months.  We looked up at the cathedral ceiling in our bedroom, and saw the very high smoke detector.  It was at that moment I told him that hopefully the builder didn’t put a battery in that thing.  I remember learning that the smoke detectors were hard-wired, but they also hold a battery.  How would we ever change the battery in that thing?  We don’t even own a ladder, just a step stool?  Well, hopefully it won’t happen in the middle of the night.

Things have been hectic at home lately, and at work.  It seems that every day there is some end-of-year activity that we are attending, or preparing for – and work has been equally as crazy.  This time of year things really heat up – just like last year, my team is preparing for changes.  It is an exciting time, but that takes a lot of energy.  So, every night I hit the pillow utterly exhausted.  Except the other night, I woke up to the chirping sound of the smoke detector – the battery was dead and needed to be changed.  There was nothing we could do about it.  No sleeping for us.

So, what does this have to do with this delicious looking salad that I found in Bon Appetit?  Well, pretty much nothing – but I was looking for a quick and delicious salad to go with BBQ, and this was the winner.  It is so easy you can almost make it in your sleep – especially if you do what I did and buy the Trader Joes beets that are already cooked – what a beautiful thing.  This salad was just delightful, almost as delightful as it was to borrow our neighbor’s ladder so we could actually get some sleep.

Ingredients

  • 1 teaspoon cumin seeds
  • 2 teaspoons fresh lemon juice
  • 2 teaspoons Sherry vinegar
  • 1 teaspoon Dijon mustard
  • 1/4 cup plus 3 tsp. extra-virgin olive oil, divided
  • 1 tablespoon finely chopped fresh mint
  • Kosher salt and freshly ground black pepper
  • 1 pound baby carrots with 1/2″ of tops attached, peeled
  • 6 small (1 1/2″ diameter) red beets, scrubbed, trimmed leaving 2″ of stem attached
  • 1/2 cup crumbled feta (about 4 oz.)

Preparation

Stir cumin seeds in a small dry skillet over medium heat until fragrant, 3–4 minutes. Let cool. Finely grind in a spice mill.

Whisk cumin, lemon juice, vinegar, and Dijon mustard in a medium bowl. Gradually whisk in 1/4 cup oil, then mint. Season vinaigrette with salt and pepper.

Cook carrots in a large pot of boiling salted water for 1 minute; using a slotted spoon, transfer carrots to a bowl. Add beets to same pot of boiling water and cook until just tender, 20–25 minutes. Drain. Let stand at room temperature to cool slightly, about 15 minutes. Peel and trim beets; halve lengthwise.

DO AHEAD: Vinaigrette and vegetables can be made 1 day ahead. Cover separately; chill. Return vinaigrette to room temperature and whisk before using.

Preheat oven to 450°. Season carrots with salt and pepper. Toss with 1 1/2 tsp.  oil. Arrange on half of a large rimmed baking sheet. Place beets in same bowl; season with salt and pepper and toss with remaining 1 1/2 tsp. oil. Arrange in single layer opposite carrots on same baking sheet. Roast vegetables, turning once, until slightly charred and just tender, about 15 minutes.

Place carrots, 1/2 cup parsley leaves, and feta in a medium bowl; drizzle 1/4 cup vinaigrette over and toss to coat. Arrange carrot mixture on a small platter. Place beets in another medium bowl. Add 2 Tbsp. vinaigrette; toss to coat. Tuck beets in among carrots. Sprinkle remaining 1/4 cup parsley leaves over. Drizzle with remaining dressing.

For a printer-friendly version of this recipe, please click here:  Roasted Carrot and Beet Salad with Feta

Corn Griddle Cakes with Sausage

Breakfast for dinner is one of my favorite things.  Unfortunately I don’t get to indulge very often, as that is not one of my husband’s favorites.  My kids on the other hand, love it.  I am usually so trained to make pasta when my husband is out-of-town, I forget about making pancakes for dinner.  The next time he goes away, that is definitely on the menu…

So, when is it ok to have breakfast for dinner?  Well, I decided to test the limits just a bit.  I saw this recipe in Bon Appetit by one of my favorite chefs from this latest season of Top Chef.  I was really surprised when he was asked to leave, but then again, there were some amazing chefs this season.  Since this was one of Ed’s recipes, I knew it had to be good.  I decided to make these as a side dish to go with the smoked chicken we were having for dinner.  Little did I realize how many griddle cakes I was actually making.  Good thing they were amazing, because I had enough to feed a small village.  Fortunately my neighbors were able to benefit as well, and we still had enough for leftovers the next day.  I loved the combination of the sweet and savory with these corn cakes – the honey butter on top, I am drooling just thinking about them now.  I didn’t have any green onions in the house, so I substituted with chives instead, which worked out just fine.  The other thing I did was to brush the butter onto a non-stick pan, so I didn’t use as much.

So, if you are cooking for someone who is not keen on breakfast for dinner – I have found the secret – and you will definitely have leftovers for breakfast the next morning…

Ingredients

Orange-Honey Butter

  • 1/2cup (1 stick) unsalted butter
  • 1/2 cup honey
  • 1 1/2 tablespoons finely grated orange zest
  • Kosher salt, freshly ground pepper

Corn Cakes

  • 6 tablespoons (3/4 stick) unsalted butter
  • 3/4 cup (about 7 ounces) breakfast sausage, casings removed if necessary
  • 1 1/2 cups fresh (or frozen, thawed) corn kernels
  • 1 cup yellow cornmeal
  • 1/2 cup whole wheat flour
  • 1 tablespoon sugar
  • 1 teaspoon kosher salt
  • 1 teaspoon freshly cracked black peppercorns
  • 1/2 teaspoon baking soda
  • 1/4 teaspoon baking powder
  • Pinch of cayenne pepper
  • 1 1/4 cups buttermilk
  • 2 large eggs
  • 6 scallions or a bunch of chives, chopped

Preparation

Orange-Honey Butter

Melt butter in a small saucepan over low heat. Whisk in honey and orange zest. Season to taste with salt and pepper. Cover and keep warm.

Corn Cakes

Melt butter in a small saucepan over medium heat. Spoon milk solids from surface and discard. Pour clarified butter into a small glass measuring cup (there should be about 1/4 cup), leaving any browned bits behind; set aside. (Alternatively, use 1/4 cup grapeseed oil.)

Cook sausage in a 10″ cast-iron skillet or other large heavy nonstick skillet over medium heat, breaking up into small pieces with the back of a spoon, until browned and cooked through, about 8 minutes. Using a slotted spoon, transfer sausage to a small bowl. Add corn to same skillet and cook over medium-high heat, stirring often, until browned, 5–6 minutes. Transfer corn to bowl with sausage and let cool. Wipe skillet clean and reserve.

Whisk cornmeal and next 7 ingredients in a medium bowl. Whisk buttermilk and eggs in a large bowl; add dry ingredients and whisk until just combined. Fold in sausage, corn, and scallions.

Heat 1 Tbsp. clarified butter in reserved skillet; working in batches and adding butter as needed between batches, add batter to pan by tablespoonfuls. Cook until cakes are crisp and golden brown, 2–3 minutes. Turn cakes over and cook until browned, 1–2 minutes longer. Transfer cakes to paper towels to drain. Serve warm drizzled with orange-honey butter.

For a printer-friendly version of this recipe, please click here:  Corn Griddle Cakes with Sausage

Add to FacebookAdd to DiggAdd to Del.icio.usAdd to StumbleuponAdd to RedditAdd to BlinklistAdd to TwitterAdd to TechnoratiAdd to Yahoo BuzzAdd to Newsvine

French Potato Casserole with Bacon and Caramelized Onion

Boy do I miss Paris.  I miss the beautiful architecture, all the people on the streets, and most of all the food – what a great week we had.  Every time I go, I feel like I am closer to actually living there again.  Of course my older daughter, who loved every minute of our trip, starts getting nervous whenever I talk about moving.  I know it is not in the cards right now, but you never know what the future might bring.

So as you know, my husband is obsessed with his egg (BGE) – and every Sunday I look forward to his next project.  Lately he has been trying to do more than just the Sunday night meal – he might smoke some extra chicken breasts for tacos later in the week, some hot dogs for the kids, or the best idea – some bacon that I can use to cook with.  Bacon on the egg is something else.  Besides the way it sounds, it is just ridiculous.  The bacon cooks perfectly, with a wonderful smokey flavor – and since the fat just drips down, it is surprisingly not too greasy.  If you don’t have an egg, I’m sorry – try to find someone who does, and bring over some bacon.  You will thank me later.

So, what did I do with the last batch of bacon?  Your’e looking at it – and these potatoes were such a hit, I made this dish twice in a week.  The flavor of these potatoes were just incredible – between the bacon and the caramelized onions, these were outrageous.  I love how simple this is to make, and how healthy it is given the complex flavors.  Cooking Light definitely knew what they were doing when they posted this recipe.

So – until I am able to move to Paris, I am going to enjoy every minute of the egg.  The biggest issue with moving, is figuring out how to move the egg.  It is part of the family now, and what a nice addition it was.

Ingredients

  • 3 slices thick-but bacon, cut into 1/2-inch pieces
  • 1 large onion, halved and sliced thin
  • 1 1/4 teaspoons salt
  • 2 teaspoons chopped fresh thyme
  • 1/2 teaspoon pepper
  • 1 1/4 cups low-sodium chicken broth
  • 1 1/4 cups beef broth
  • 3 pounds Yukon Gold potatoes, peeled
  • 2 tablespoons unsalted buter, cut into 4 pieces

Preparation

Adjust the oven rack to the lower-middle position and heat the oven to 425 degrees.  Green a 13×9-inch baking dish.

Cook the bacon in a medium saucepan over medium-low heat until crisp, 10 to 13 minutes.  Using a slotted spoon, transfer the bacon to a paper towel-lined plate.  Remove and discard all but 1 tablespoon of fat from the pot.  Return the pot to medium heat and add the onion and 1/4 teaspoon of salt; cook, stirring frequently, until the onion is soft and golden brown, about 25 minutes, adjusting the heat and adding water 1 tablespoon at a time if onion or bottom of pot becomes too dark.  Transfer onion to a large bowl; add bacon, thyme, and remaining 1 teaspoon of salt, and pepper.  Add broths to now-empty saucepan and bring to a simmer over medium-high heat, scraping the bottom of the pan to loosen any browned bits.

Slides potatoes 1/8-inch thick.  Transfer to the bowl with the onion mixture and toss to combine.  Transfer to prepared baking dish.  Firmly press down on the mixture to compress into an even layer.  Carefully pour hot broth over the top of the potatoes.  Dot the surface evenly with butter.

Bake, uncovered, until potatoes are tender and golden brown on edges and most of liqued has been absorbed, 45 to 55 minutes.  Transfer to wire rack and let stand for 20 minutes to fully absorb the broth before cutting and serving.

For a printer-friendly version of this recipe, please click here:  French Potato Casserole with Bacon and Caramelized Onion

Add to FacebookAdd to DiggAdd to Del.icio.usAdd to StumbleuponAdd to RedditAdd to BlinklistAdd to TwitterAdd to TechnoratiAdd to Yahoo BuzzAdd to Newsvine

Mini Bacon and Egg Tarts

Today I was invited to lead a “book group” discussion at work for an early in career rotational program we have in my division.  I was actually surprised they asked me to do this, until I started reading the book, then it all started to make sense.  I use the other side of my brain when I am at work, which is why I love to come home and cook – it forces me to use my creative side.  Don’t get me wrong, I have to be super creative at work – but in a completely different way.  Between my family, my job and my blog, I feel very fullfilled – even too much sometimes, which explains a lot.

We spent quite a bit of time discussing the book, and they also asked me excellent questions on the work I do.  That was all great, until someone asked me a question that started, “When you are reading the news…”  I immediately pictured myself in my office reading the newspaper, like my father does each day.  Nope, I don’t do that.  Then I pictured myself sitting down every night and turning on MSNBC to catch up on the days events.  Nope, I don’t do that either.  From the time it took the person to ask me the question, to the time I answered it – I realized that the world is so different today.  I don’t spend time reading the paper or watching the news, but somehow I know what it going on in the world, the latest technologies out there, and what our competitors are doing.  I am not sure how – but it is integrated into my day here and there, and it seems to work.  If I ever sit down and actually read something, it is usually about food.  And even that doesn’t come as often as I would like.  It is amazing these days how easily you can get information – even when you don’t sit down and pick up a newspaper.

Today I read about Pinterest – and the phenomenal growth it has had recently.  Did you know that people spend more time on Pinterest these days than Facebook?  Think about how Pinterest is having an impact on the food blogging world – it is amazing.  The majority of my hits used to come from Tastespotting and Foodgawker…now Pinterest is bringing more people to my site, and I love it.  It is just incredible to think how quickly things change.

So – please enjoy these mini bacon and egg tarts that I saw in Cooking Light.  It is a whole new way to eat your bacon, eggs and toast.  Who knows, maybe it will take off through Pinterest and be a massive hit.  They were as delicious as they were adorable.  The girls couldn’t get over them…my only mistake was not making more.  My husband and I quickly ate ours, and then started eyeing the girls.  We must have asked them at least 4 times if they were going to eat theirs…and sure enough they did, they were just taking their time.  New things pop up all the time that change the way we do things….and what I love about food, is that is an understatement.  The possibilities to use your creative side are endless – I can’t wait to see the next best dish on Pinterest.

Ingredients

  • 8 (1-ounce) slices whole-wheat white sandwich bread, crusts removed
  • Cooking spray
  • 1/2 cup 2% reduced-fat milk
  • 4 large eggs, lightly beaten
  • 2 tablespoons chopped green onions (optional)
  • 2 slices smoked bacon, cooked and crumbled
  • 1/2 cup (2 ounces) shredded sharp cheddar cheese

Preparation

Preheat oven to 425°.

Lightly coat both sides of bread with cooking spray. Press each bread slice into the cup of a muffin tin. Bake at 425° for 10 minutes or until bread is lightly toasted. Cool slightly.

Reduce oven temperature to 350°.

Combine milk and eggs, stirring well with a whisk. Divide the egg mixture evenly among bread cups. Sprinkle onions, if desired, and bacon evenly over tarts; top each tart with 1 tablespoon cheese. Bake at 350° for 15 minutes or until set.

For a printer-friendly version of this recipe, please click here:  Mini Bacon and Egg Tarts

Add to FacebookAdd to DiggAdd to Del.icio.usAdd to StumbleuponAdd to RedditAdd to BlinklistAdd to TwitterAdd to TechnoratiAdd to Yahoo BuzzAdd to Newsvine