Parmesan Bread Pudding with Broccoli Rabe and Pancetta

Parmesan Bread Pudding

I have a love hate relationship with salt.  I love salt – it is a necessary ingredient for almost everything, although sometimes too much of a good thing completely backfires.  That’s exactly what happens with salt.  As soon as you cross over the edge of too much salt – your entire recipe is ruined.  Then I hate salt.   There are times when a wedge of potato can fix your mess (like in soups), but there are other times when you are just out of luck.  Boy do I hate when that happens…and it is not always my fault – which makes it even worse.

Over the years, I have gotten really good at knowing when I have salted enough.  If anything, I will err on the side of a little less salt, and put the salt on the table for people to add their own.  My in-laws for instance, do not use any salt – I have to be very careful when I cook for them that there is no hint of salt – I can use a little to bring out the flavor – but that is about it.  Eggs are just about the most difficult thing to judge though – especially when they are raw, and you are trying to salt before you cook.

I saw this recipe in Bon Appetit, and I have been excited to make it for months.  I finally had the opportunity – and when I read through the recipe, there was one thing that struck me – the amount of salt.  The recipe called for a teaspoon of salt – that is a lot – but then again, there were six eggs.  I decided to follow the recipe exactly, since Bon Appetit usually does an excellent job testing their recipes before they publish.  I should have gone with my instincts.  This dish was so salty, it was almost hard to eat.  I was super disappointed, because I could tell that it would have been awesome had the salt not overpowered the world.  I had to make it again – it was driving me nuts.  This time I put in half the salt – and it was so much better – I could actually taste the pancetta and the cheese, oh and that tender bread that was crunchy on the outside – wow.  Exactly what I had imagined the first time.

I amended the recipe below to save you from high blood pressure, swelling, drinking too much water (hey wait, that’s a good thing isn’t it) – and so you can taste all those other ingredients in this bread pudding.  Don’t worry salt – even though I may hate you at times, I will always find a way to love you again.  Isn’t that what a love hate relationship is all about?  Or is it, I hate to love you, and love to hate you?  Now that’s just plain silly.

Ingredients

  • 1 tablespoon olive oil
  • 2 garlic cloves, thinly sliced
  • 1/2 teaspoon crushed red pepper flakes
  • 1 medium bunch broccoli rabe (rapini), trimmed, cut into 1/2-inch pieces
  • 1 teaspoon kosher salt plus more
  • 1/2 teaspoon freshly ground black pepper plus more
  • 6 large eggs
  • 1 1/2 cups whole  milk
  • 1/2 pound country-style white bread, cut into 1-inch pieces (about 8 cups)
  • 1/2 cup plus 2 tablespoons finely grated Parmesan
  • 6 thin slices pancetta (Italian bacon)

Preparation

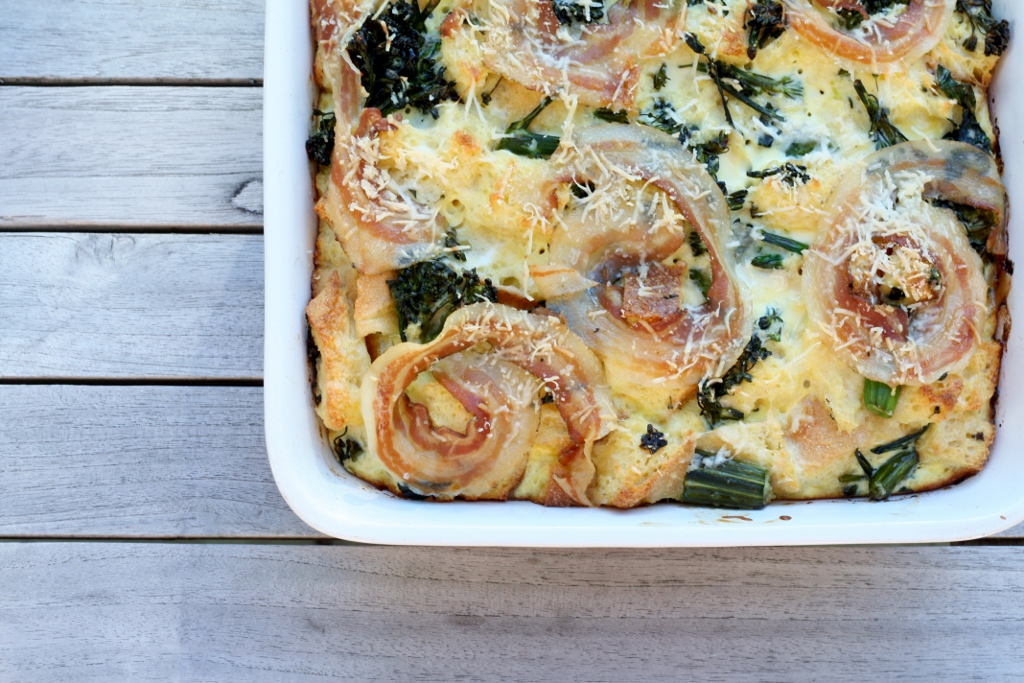
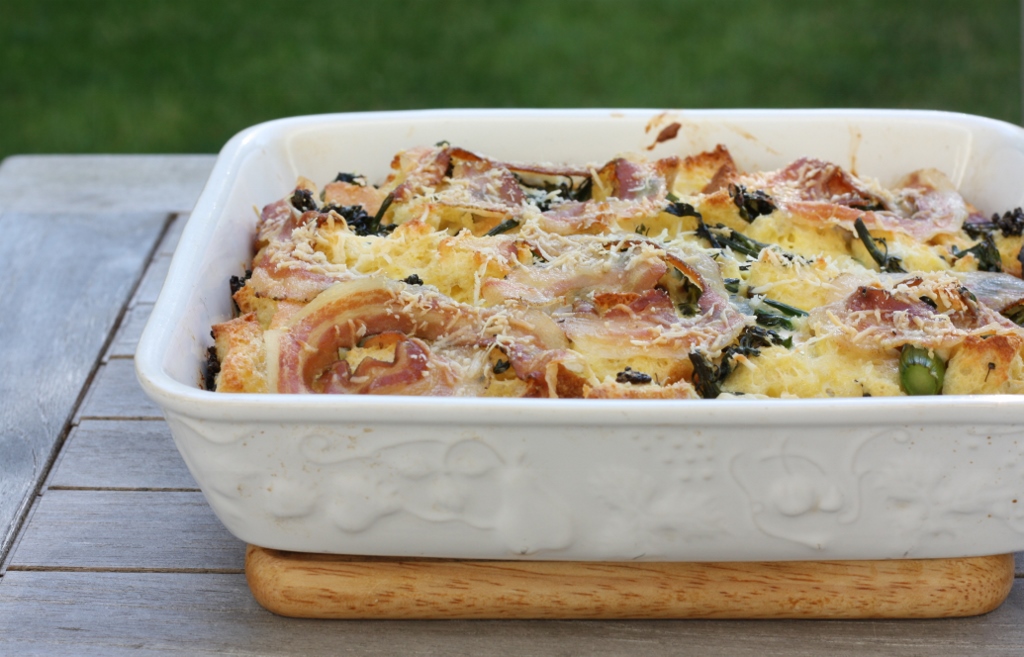
Preheat oven to 350°. Heat oil in a large skillet over medium  heat. Add garlic and red pepper flakes. Stir until garlic is softened, about 30  seconds. Add broccoli rabe; sea-son with salt and pepper. Cook, tossing, until  wilted, about 2 minutes; let cool slightly.  Meanwhile, whisk eggs, milk, 2 teaspoons salt, and 1/2  teaspoons pepper in a large bowl to blend. Add broccoli rabe mixture, bread, and  1/2 cup Parmesan; toss to combine. Transfer to a 1-1/2-qt. baking dish. Top with  pancetta and remaining 2 tablespoons Parmesan.

Bake pudding until puffed, browned in spots, and set in the  center, 45-55 minutes.

For a printer-friendly version of this recipe, please click here:  Parmesan Bread Pudding with Broccoli Rabe and Pancetta

Parmesan Bread Pudding 2

Apricot Jam

Apricot Jam 2

I finally made it back to the kitchen.  Thank goodness  – that’s just about all I can say at this point.  When we built our house many years ago, I remember working with the architect to tell him what our dream house would look (hoping we could afford something close to it), and I specifically spent a lot of time talking about the kitchen.  I told him I wanted a really big kitchen, that I plan on spending most of our time there, and I needed a big counter for all of my crazy food projects.  On the plans, it definitely looked like he centered the house around the kitchen, which was ideal.  It wasn’t really a “great room” concept, it was really just a big kitchen, with some other spaces next to it.  Although I was still worried that wouldn’t be enough.

Soon the framers came and the kitchen was framed in – that’s when it set in that I actually got what was hoping for – and maybe it was even too big.  Of course, over the years I have found use of every inch of my kitchen, and when I am stressed, there is nothing I want more than to be in my big kitchen all by myself – no music, no talking, no nothing – just me and the food.  This last week, that was a big void in my life.  In fact, with the little sleep that I got, I actually spent more time in my bedroom (awake typing on my phone), than any other room in my house – with the office being a close second.  It was a week that I have not experienced in quite a while – one of the most intense work weeks of my life.  The kind that makes you wonder if it is time to try something new.  Fortunately I got through it though – and this weekend, I went back to the kitchen.  I didn’t care if it was nice out – I needed to spend as much time possible making up for lost time.

So what did I do?  I jammed.  It was soothing, and peaceful, and wonderful.  The farmer’s market is abundant right now – and the apricots are just the most beautiful color and texture.  I used the recipe from the Food in Jars cookbook – and I don’t even like apricot jam.  But I am telling you – there nothing better than homemade.  I was scraping the side of the pot it was so amazingly delicious.  I can’t wait to get that onto my English muffin in the morning…wow.

We all have stressful weeks – but what is most important is how you recover.  I feel fortunate that I know what I need to regroup – it is actually a gift – because it gives me the ability to continue to forge ahead.  I always think back to that day when I first saw my kitchen – all framed with wood.  Little did I know that room would become so important in my life – so much has gone on in that room, but most of all, it is my space.  My space to be calm, be creative, and start fresh.  My space to forget about the past – and find the strength to think about the future.

Ingredients

  • 6 cups peeled, pitted, and diced apricots (about 3 pounds whole fruit)
  • 3 1/2 cups sugar
  • zest and juice of 1 lemon

Preparations

Prepare a small boiling water bath canner and 6 half pint jars. Place lids in a small pan of water and set to a bare simmer.

Combine the apricots and sugar in a roomy, non-reactive pot and bring to a boil. Boil for 10-15 minutes until the fruit thickens and runs slowly and thickly off the back of a spoon.  Add the lemon juice and zest and return to a boil.  Insert your candy thermometer into the jam and attach it to the side of the pot.  Let the jam boil vigorously until it reaches 220 degrees for 2 minutes.

Carefully ladle jam into four half pint jars (depending on the concentration of the sugars in the fruit, it may reduce down further and leave you with just three half pints. Prepare to be surprised). Wipe rims, apply lids and rings and process in your small boiling water canner for 10 minutes.  When time is up, remove jars from pot. Let cool. When jars are cool enough to handle, remove rings and test seals. If seals are good, store jars in a cool, dark place. If any of the jars did not seal, put those jars in the fridge and use within a month or two.

Yield: Makes 3 pints

For a printer-friendly version of this recipe, please click here: Apricot Jam

Apricot Jam

Easy Dill Cole Slaw

Easy Dill Cole Slaw

Remember a few posts ago, when I was glowing with the happiness of summer, and how the weekends were no longer filled with one event to the next?  Well, I should never write something like that without holding my breath, crossing my fingers – or knocking on a whole bunch of wood.  Even though the kids events have slowed down (I say that, and then I think about the swim meets twice a week), everything else in my life has gone completely out of control for a variety of reasons.  I am getting stressed just thinking about all the fruit I bought last week at the farmer’s market – having all intentions of making tons of jam – but that has not happened.  There is always next weekend, right?

So, what do you make when you are super busy, but having people over for dinner?  Fortunately I am not in this predicament tonight (that would really throw me over the edge), but a few weeks ago – this was my life.  It sounded like a great idea a month before when I arranged everything – but then the date finally came, and I was seriously in a bind.  My husband was all set to grill, which was awesome, but I was in charge of the sides.  I immediately thought about some slaw – but I wanted to make sure it was really easy, and tasted fresh.  Not that I had time to do this, but I looked through a few of my cookbooks, and decided I would just wing it. I had some fresh dill in the refrigerator that was looking right at me, and so I decided on a Dill Cole Slaw.  Wow was that perfect.  I just loved the Cole Slaw with that nice fresh dill flavor – and it seriously only took me 5 minutes to make.  Of course I cheated a little with already pre-chopped cabbage, but there are some shortcuts worth taking.

I hope that you are having a nice relaxing weekend – but don’t fret if you are not – here is a simple recipe to make your life just a little bit easier.  At this point, we should all take what we can get!

Ingredients

  • 5 cups shredded cabbage and carrots
  • 1/2 cup light mayonnaise
  • 2 tablespoons apple cider vinegar
  • 1 teaspoon salt
  • 1 tablespoon fresh dill, chopped

Preparation

Mix all ingredients together, and put in the refrigerator for at least 2-3 hours to allows flavors to blend. For a printer-friendly version of this recipe, please click here:  Easy Dill Cole Slaw

Easy Dill Cole Slaw 2

Strawberry Jam Biscuits

Strawberry Jam Biscuits

It’s jam time…that’s right, one of my very favorite times of the year.  The time of year when those empty shelves in my pantry start getting filled with all sorts of delicious cooked fruit.  My daughters love that I make jam, in fact my younger daughter refuses to eat any other jam except my homemade.  You could say I have spoiled them, or maybe just taught them what good food is.

I have already started stock piling for the holidays – but I always save some for the girls.  Usually I just put the leftovers in a ramekin, or in a jar that is not labeled, that I place on a special shelf in the pantry – “our jam section” – as opposed to the jam for gifts.  Last week I came over after a long day, and saw that there was a new jar of strawberry vanilla jam in the refrigerator.  I just about lost it.  Ok, so it wasn’t my proudest moment – but when I asked why they didn’t use the other two already opened jars of jam (one which I might add was the exact same variety, and another was the leftover jam I used for these delicious treats) – they told me that the jam with the pretty labels tastes even better.  Seriously???  I was so angry, but part of me was laughing inside (although that laughing started much later) – but I was fuming that they had just wasted one of my holiday jams.  I brought them into the pantry and showed them where I keep “our jam section” as opposed to the “holiday jam section”.  Of course the “holiday jam section” has about 30 jars already – where as ours only has about 5.  The girls didn’t understand why they didn’t get both.  Wow – that would be a lot of jam.  So – no Mom of the year award for me…

Back to this recipe…I found this in Bon Appetit, and I felt like it was time to actually bake with some jam.  These were so perfect for strawberry season – just the right amount of sweetness with the biscuit – the girls ate them every morning before swim team, and they were gone in no time.  Fortunately there is still some of that great leftover jam in the refrigerator…I just need to get a label for the jar, and it will disappear magically, so I am told.

Ingredients

Strawberry Jam

  • 12  ounces fresh strawberries, hulled, halved or quartered if large (about 3  cups)
  • 1/4  cup sugar
  • 1  tablespoon finely grated lime zest
  • 2 tablespoons fresh  lime juice

Biscuits

  • 3/4 cup sugar
  • 2  teaspoons  baking  powder
  • 3/4 teaspoon kosher  salt
  • 2 1/4 cups  all-purpose  flour plus more
  • 1/2 cup (1 stick) chilled unsalted butter, cut into 1/2-inch pieces
  • 1 teaspoon finely  grated lime zest
  • 3/4 cup buttermilk
  • 1 large egg, beaten to blend
  • 1 tablespoon raw  sugar
  • Vanilla ice cream (for  serving)

Preparation

Strawberry Jam

Cook strawberries and sugar in a medium saucepan over  medium-high heat, stirring occasionally, until jamlike in consistency, 12–15  minutes. Remove from heat; stir in lime zest and juice. Pour into a shallow bowl  and let cool.

Biscuits

Preheat oven to 400°. Whisk sugar, baking powder, salt, and 2  1/4 cups flour in a large bowl. Add butter and lime zest and blend with your  fingertips until coarse crumbs form. Add buttermilk and, using a fork, mix until  just combined. Transfer to a lightly floured surface. Gently knead just until a  shaggy, moist dough forms, about 4 times.

Roll out dough about 1/2-inch thick. Using a 2 1/2-inch  biscuit cutter or inverted glass, cut out rounds. Gather scraps and repeat  rolling and cutting until all dough is used.  Place biscuits on a parchment-lined baking sheet. Using your  thumb, make a large divot in the center of each biscuit; brush with egg and  sprinkle liberally with raw sugar. Spoon a scant 1 teaspoon strawberry jam into  each divot.

Bake biscuits until golden brown, 18–22 minutes. Serve warm  with vanilla ice cream, if using, and remaining jam.

DO AHEAD: Jam can be made 3 days ahead.  Cover and chill.

For a printer-friendly version of this recipe, please click here:  Strawberry Jam Biscuits

Strawberry Jam Biscuits 2

Chocolate, Cinnamon, and Coffee Ice Cream Sandwiches

Chocolate, Cinnamon and Coffee Ice Cream Sandwiches

Summer came and hit us all in the head this weekend – I must say, there wasn’t much of a Junuary this year, which is a good thing, and a bad thing.  Of course we had our share of rainy days, but nothing like our normal kick-off to summer vacation.  I am sitting here typing at almost 8pm, sweating bullets in my non-air conditioned home, where the temperature on the thermostat is reading 83 degrees (and that is on the main floor, it is hotter upstairs).  Ok, yes, I am officially a wimp.  After almost 18 years in Seattle – I have forgotten what it is like to live with hot weather.  The funny thing is each summer when we travel back-east for the summer grandparent tour – if it is not in the 90s, I am disappointed.  But I am usually on vacation at that time, and most places have AC…unlike here.

Last night my husband and I had a date night – it was the first in many weeks, and we were really looking forward to it.  We decided to try a new place – a new restaurant opened by a Chef/Restaurateur that we really love – it got a lot of local hype, and the space and menu looked amazing.  The space was even more beautiful in person, really high ceilings, more of a modern rustic feel, and extremely bright – but when we got there our table wasn’t ready so we decided to sit at the bar.  This was actually the highlight of our meal.  The bartender did a really nice job with the drinks – the bar was not extensive, which again proves, you don’t need a lot to make really good drinks.  The problem was the bar stools were too low – and the counter came up to my upper chest.  I felt like a kid.  If it wasn’t for that, we probably would have just eaten at the bar (which is definitely something we love to do), but I didn’t think I could comfortably eat my meal – so we waited for our table to be ready.  45 minutes after our reservation, they finally sat us.  If we were not paying for a babysitter, it probably would have been fine – but the one drink they took off the bill, didn’t really make it even.

The biggest disappointment was the food – although it tasted good, it was not noteworthy – I would rather eat my husband’s chicken on the egg any day of the week – and the pork he had was fine, but nothing to write home about.  Even though we had 2 appetizers and 2 main courses, we were still hungry at the end of the meal.  At that point we were both sweating – there was no air-conditioning (which is not uncommon), and the delay in getting our table and the slow service afterwards just made things a bit worse.  There was no way we were waiting for dessert – especially when the 3 choices didn’t really appeal to us.

So, what is the best dessert for a hot summer’s night – what would have actually gotten me to sit there longer and endure the heat and slow service?  Definitely these ice-cream sandwiches from Bon Appetit.  We changed the recipe slightly to appeal to our cinnamon loving tastes – and all I can say is WOW.  The cookies are on the softer side, so they are perfect for ice-cream sandwiches, and that coffee ice-cream with that chocolate and cinnamon cookie, it is exactly what this summer weather needs.  Who needs air-conditioning when you can cool off with a summer treat like these.

Ingredients

  • 8 ounces semisweet or bittersweet chocolate 60%–72% cacao), chopped
  • 3  tablespoons  unsalted  butter
  • 1 cup sliced almonds
  • 1/2 cup all-purpose flour
  • 1/2 teaspoon baking  powder
  • 1/2 teaspoon fine  sea salt
  • 1/2 teaspoon ground  cinnamon
  • 2 large eggs
  • 1 cup sugar
  • 1 teaspoon vanilla  extract
  • 1 quart coffee ice cream

Preparation

Arrange racks in upper and lower thirds  of oven; preheat to  325°. Line 2 large baking sheets with parchment paper. Combine chocolate and  butter in a medium heatproof bowl; set over a medium saucepan of simmering  water. Stir until chocolate is melted and mixture is smooth.

Combine almonds, flour, baking powder, salt, and cinnamon in a  food processor. Pulse until almonds are finely ground.  Using an electric mixer, beat eggs, sugar, and vanilla in a  medium bowl until pale and fluffy, 3–4 minutes. Add chocolate mixture in 3  additions, mixing well between additions. With motor running, gradually add dry  ingredients; mix well.  Scoop out a rounded tablespoonful  of dough. Use another spoon  to help push dough onto a prepared baking sheet. Repeat with remaining dough to  make 27 more portions, dividing between sheets and spacing dough 1-inch apart.

Bake, rotating sheets halfway through, until tops begin to  crack and cookies are set, 12–14 minutes (don’t overcook; cookies will firm up  as they cool). Transfer cookies  to wire racks and let cool completely.

DO AHEAD: Cookies can be made 3 days ahead. Store airtight  at room temperature.

Place a large scoop of ice cream on flat side of 1 cookie. Top  with another cookie, flat side down; press down lightly. Freeze on a baking  sheet while preparing remaining sandwiches. Repeat with remaining cookies and  ice cream.

DO AHEAD: Ice cream sandwiches can be made 30  minutes ahead. Keep frozen until ready to  serve.

For a printer-friendly version of this recipe, please click here:  Chocolate, Cinnamon, and Coffee Ice Cream Sandwiches

Asparagus with Lemon and Brown Butter

Asparagus with Lemon and Brown Butter 2

What a weekend, I do not remember the last time I actually had a weekend where I wasn’t running from place to place.  This was my idea of the perfect weekend.  After the week that I had at work, this was exactly what I needed.  I am not heading into the work week stressed and behind at home – I am actually well rested and caught up.  Wow.  And, it only gets better from here – the next few weekends are the same.  There is nothing on the calendar – nothing at all.  I am loving this summer already.

So – what did I do with all my time?  Most of it was spent on food, in some way or another.  Saturday morning we went to the University Farmer’s Market – and since it was warm and sunny, so did the rest of Seattle.  It was packed, but fortunately we were there early enough to still get some really good stuff.  We bought a beautiful looking brisket and pork tenderloin from our favorite folks at Skagit River Ranch, some amazing chive cheese from this local creamery (wish I could remember their name!), Japanese cucumbers that I turned in these today, and some amazingly fresh asparagus.  The girls each picked out a pastry from the Russian lady as well.  Then on the way home, we stopped at my favorite fruit stand for some more of those delicious strawberries – I just can’t get enough of those.  I was set for a Sunday in the kitchen.

If you read my blog regularly, you know that I love asparagus – it is so versatile, and beautiful at the same time.  One of my favorite Seattle restaurants just released a cookbook – Lark – Cooking Against the Grain – I actually haven’t purchased it yet, but it is on my list.  Fortunately I am on their mailing list, and as luck would have it – they sent a recipe this week for Asparagus with Lemon and Brown Butter.  It seriously took me about 10 minutes to make, and who doesn’t love brown butter on just about anything?  This dish was fantastic – and I probably didn’t even need to peel the stalks, but it definitely gives it a finished look.  The dish looked wonderful next to our smoked brisket at dinner tonight.

Here’s to a perfect summer weekend…a food filled weekend of shopping, cooking and eating!

Ingredients

  • 1 pound asparagus, peeled
  • 2 Tbsp. Butter
  • ½ tsp.  Lemon Juice

Preparation

Trim off the woody ends of the asparagus.  Peel the asparagus from about an inch below the tip to the end.  In a pot of salted boiling water, blanch the asparagus until just cooked. Shock in an ice-bath to stop them from cooking any further.    Remove the asparagus from the ice-bath to a plate to let them dry, or you can pat them dry with a paper towel.  Add the butter to a medium sauté pan and cook over a medium heat until it is golden brown and nutty.  It will be quite foamy as it browns. Add the asparagus to warm through. Add the lemon juice and season with salt and freshly ground black pepper.

Place the asparagus on a serving platter and dress with the extra brown butter from the pan.  Serve warm.

For a printer-friendly version of this weekend, please click here:  Asparagus with Lemon and Brown Butter

Salted Caramel Chocolate Shortbread Bars

Millionaire's Shortbread

I should be working right now…I have so many things to finish it isn’t even funny, but it has been a long day.  A day that started at 5:30 this morning, and after working 12 hours and almost a 2 hour commute home, I am pretty much done.  I have been on edge for a while now, and there could be many reasons to explain it, but I think I finally figured it out.  Today’s rain was definitely a sign.

When I was delivering my first baby, there was a joy that I can’t explain that came over me when the doctor told me I had a girl.  It was not that I didn’t want a boy, but for some reason I was less afraid of having a girl.  My husband was convinced that our second child was a boy, but deep down inside, I knew it was another girl.  That same joy consumed me when I heard those same words after she came out of me.  Even though my sister and I are not close, I was thrilled to have two girls – sisters – even with all the drama that comes with it.

I have always cherished the fact that I have two girls.  They love to cook and bake with me, they love to go shopping, get their nails done – and don’t get me wrong – they can fish, play softball and other fun stuff with their Dad (and boy do they love their Dad), but we have a special bond as well.  I am the Mommy, they tell me things first – and they hold nothing back.  I am sure there will be a time when that will change, but let’s hope not, and until then – I will savor every minute.

Unfortunately my story is not the way it always is for mothers and daughters.  You hear about the struggles that mothers and daughters have – sometimes you even get a glimpse of the pain.  It is not fun to watch.  I want to be involved in every happy moment that my children have – and I am pretty optimistic that I will be able to do so.  I am a very lucky Mommy.

It is only fitting that I post these delectable goodies – this was a team effort – I made the crust, and my daughter and mother made the caramel and topping.  My daughter wanted to make it all by herself, but I asked my mother to supervise – and it didn’t take long though before they both had their sleeves rolled up and were knee-deep in the caramel making.  It was really fun to watch.  These were hands down ridiculously delicious.  Crisp on the bottom, chewy in the middle, and rich on top.  Thanks Tracey’s Culinary Adventures adapted from Annie’s Eats (originally from Baked and The Golden Book of Baking) – for a great afternoon, and a perfect finished product – with my mother and my daughter.

Ingredients

Shortbread

  • 2 cups all-purpose flour
  • 2 teaspoons baking powder
  • 1/4 teaspoon salt
  • 1 cup (2 sticks) unsalted butter, at room temperature
  • 1/2 cup sugar

Caramel

  • 1/2 cup (1 stick) unsalted butter, cut into 8 pieces
  • 1/2 cup sugar
  • 2 tablespoons light corn syrup
  • 1 14-oz can sweetened condensed milk

Chocolate

  • 8 oz chocolate, finely chopped (I used bittersweet) 
  • 1 teaspoon light corn syrup
  • 1/2 cup (1 stick) unsalted butter, cut into 8 pieces
  • Fleur de sel for sprinkling (optional)

Preparation

Preheat oven to 325 F.  Line a 9×13-inch baking pan with parchment paper.

To make the shortbread layer: Whisk the flour, baking powder and salt together in a medium bowl.  In the bowl of a stand mixer fitted with the paddle attachment, beat the butter and sugar on medium speed until well combined, about 2 minutes.  With the mixer on low, gradually add the dry ingredients and beat just until combined.  Transfer the dough to the prepared pan and press into an even layer over the bottom (it’ll be a fairly thin layer).  Bake for 15-18 minutes, or until the crust is golden brown.  Transfer the pan to a wire rack and cool completely.

To make the caramel layer: Combine the butter, sugar, corn syrup and sweetened condensed milk in a medium saucepan.  Set the pan over medium heat.  Stir occasionally until the butter is melted.  Increase the heat to medium-high, and bring the mixture to a boil.  Reduce the heat to medium-low and simmer, whisking constantly, until the mixture thickens and turns a light caramel color.  This may take 10 minutes or more, so be patient.  Pour the caramel mixture over the cooled shortbread and spread in an even layer.  Allow to cool completely, then chill briefly (I stuck mine in the fridge overnight, but you just want to chill enough that it won’t melt when you add the warm chocolate in the next step).

To make the chocolate layer: Add the chocolate, corn syrup, and butter to a heatproof bowl and set over a pan of simmering water.  Heat, stirring occasionally, until everything is melted and the mixture is smooth and glossy.  Pour the chocolate over the chilled caramel and spread into an even layer with an offset spatula.  Let cool for a few minutes, then sprinkle the top with the fleur de sel (if using).  Let the chocolate set completely before slicing and serving.

For a printer-friendly version of this recipe, please click here:  Salted Caramel Chocolate Shortbread Bars

Easy Strawberry Shortcakes with Whipped Cream

Easy Strawberry Shortcake

I made it though another year – I don’t really know how, but I did.  It was quite a last week of school, with exciting events for both girls every day.  Things were so crazy, I almost forgot they would bring their report cards home on Friday.  Normally that is not something I think about, but after the last report card – my younger daughter was spending a little too much time socializing, and not enough time actually focusing on her work.  She is not the driver my older one is, and has no real desire to do more than she needs to (unless it has to do with art), and the teachers were starting to catch on.  She is extremely capable, and they were pushing her to do more – but that wasn’t happening.  Fortunately the talks we had with her worked, and her last report card really lit a little fire under her – because boy did she turn things around.  Even I was floored – the first word her Math teacher wrote in the comments section was:  “Wow!”  I was so proud of her, and you should have seen her face when I told her how well she had done, she was beaming.  The summer was starting out on a really good note.

So what do you make for a special last day of school dessert?  Well – I have been waiting and waiting for the strawberry stand to open at my bus stop.  I always thought it opened in the beginning of June – but the beginning of June came and went – and not only was the stand not open, the stand wasn’t even there.  Every day when the bus dropped me off, I would hope and pray that the stand would show up – but no.  I was starting to think they decided to put the stand somewhere else.  I was really getting depressed.  It is like my own secret stash of fresh strawberries that only my neighborhood knows about – ok, so that is a lot of people – but still.  Finally last week the stand showed up, just as I was ready to give up on them, and start driving around looking for another one.  I was so happy – all I could think about was Friday – after my older daughter’s promotion ceremony.  We would stop on the way home and buy a whole flat.  Also – I completely forgot that a whole flat – is really like buying 2 flats.  $21 bought me more strawberries than I could ever know what to do with – I even cranked out 10 jars of my favorite strawberry vanilla jam – and I still have pounds of them left.

Back to dessert on Friday night.  I really wanted to make a strawberry crisp – but they both had such amazing report cards – they got to choose – and they found this picture on Tastespotting  from a beautiful blog called Just a Taste.  When I looked at the name of the recipe, and the first word was “easy” – how could I turn them down?  These shortcakes were delicious, in fact – I actually think I have made them before – but it was the whipped cream that really made this dessert special.  The sour cream gave the cream some weight, and some tang – it was exactly what these shortcakes and strawberries needed.  Ok, seriously – these strawberries needed nothing – they were sweet and delicious, but pairing them with these shortcakes and whipped cream just put them over the edge.

It was a really nice start to the weekend, that ended with a wonderful Father’s Day, and another delicious dessert.  The girls made me promise they could eat the rest of the strawberries this week after swim team (with a little cake on the side).  I think this is going to be a great summer…for all of us.

Ingredients

For the shortcakes:

  • 4 cups sliced strawberries
  • 2 Tablespoons sugar
  • 2 cups all-purpose flour
  • 3 teaspoons baking powder
  • 1/2 teaspoon salt
  • 1 1/3 cups heavy cream, plus additional for brushing on shortcakes
  • 2 teaspoons decorative sanding sugar (optional)

For the whipped cream:

  • 1 cup chilled heavy cream
  • 1/4 cup sour cream
  • 3 Tablespoons sugar
  • 1 teaspoon vanilla extract

Equipment: 3-inch circular cookie cutter (optional)

Preparation

Make the shortcakes:

Preheat the oven to 425ºF with a rack in the middle. Lightly butter a baking sheet.  In a small bowl, stir together the sliced strawberries with the sugar. Set aside.

In a large bowl, whisk together the flour, baking powder and salt. Stir in the heavy cream just until a dough forms. Gather the dough into a ball and knead it on a lightly floured surface one to two times. (Don’t over-knead the dough or your biscuits will be tough.)  Roll out the dough until it’s 1/2-inch thick. Using the cookie cutter, cut out 8 shortcakes and transfer them to the baking sheet. (Alternately, you can trim the sides of the dough into a square and then, using a sharp knife, cut the dough into 8 square shortcakes.)  Brush the tops of the shortcakes with additional heavy cream and then sprinkle them with the sanding sugar (optional). Bake the shortcakes until golden, 15 to 20 minutes, and then transfer them to a rack to cool.

Make the whipped cream:

In the bowl of a stand mixer fitted with the whisk attachment, whisk the heavy cream, sour cream, sugar and vanilla extract on high-speed until soft peaks form.

Assemble the shortcakes:

Slice the shortcakes in half and then sandwich the strawberries and whipped cream inside them.

For a printer-friendly version of this recipe, please click here:  Easy Strawberry Shortcakes with Whipped Cream

Boston Cream Pie

Boston Cream Pie 2

Just two more days, and two more lunches to make.  I can’t believe it, could summer possible be here?  My younger daughter asked me tonight – while she was changing out of her bathing suit after swim team  – if I thought this summer it might actually get warm?  What a funny question – I guess not so funny in Seattle though.  I told her I didn’t know, but I sure hope so.  The kids here are used to going in the water when it is barely 60 degrees out – the idea of hot weather means the coaches actually go in the water too.  I will keep my fingers crossed, although there is one thing I don’t like about hot weather…no baking.

My older daughter’s birthday was Memorial Day weekend – and I asked her what kind of cake she wanted.  Before she could answer me, I asked her if she wanted a Boston Cream Pie.  She asked some questions about it – and when she found out it wasn’t a pie at all, just a moist vanilla cake with vanilla custard and a chocolate glaze – she was sold.  Finally.  I have been wanting to make a Boston Cream Pie from Cook’s Illustrated for years – yes, literally years.  I think the recipe was sitting in the pantry for over 3 years.  Each week when I would go through the stack, I would look at this longingly, wondering when I would ever find the time to make this beautiful specimen.  I knew it would come eventually – and I was finally right.

I was so excited to dive into this adventure.  I started with the cake – and that was rather easy.  The batter was pretty different looking, but I was not turning back.  When I started the pastry cream – I tried not to focus on the number of egg yolks I was using and instead focus on making sure I didn’t make scrambled eggs.  Fortunately that did not happen.  When it was time to put the cake together, I was amazed at how light it was.  It was at this point that I realized, I had never really had a real Boston Cream Pie.  I have had things like it before, but never the real thing.  I was getting more and more excited.  The glaze was slightly thicker than I imagined, and decided just to glaze the entire outside of the cake – I thought it looked prettier than gobs of chocolate trying to drizzle down the side.

We waited the required refrigeration time that the recipe suggested, and then I cut a slice.  I almost starting jumping up and down.  The slices looked beautiful – but not nearly as gorgeous as it tasted.  This was – hands down – the best cake combination I have ever had in my life.  Ok – I do love a good red velvet cake with cream cheese frosting, but even this was better.  The cake was so moist, even after being refrigerated – and the pastry cream had such body and taste – and that chocolate glaze – just the right richness to counter balance the sweetness of the cake and cream.  It was a birthday to remember.

So – even though I am excited for summer to come – I am not ready for a baking break just yet.  I need to make this recipe into cupcakes next…

Ingredients

Pastry Cream

  • 2 cups half-and-half
  • 6 large egg yolks
  • 1/2 cup (3.5 ounces) sugar
  • Pinch of table salt
  • 1/4 cup all-purpose flour
  • 4 tablespoons cold unsalted butter, cut into four pieces
  • 1 1/2 teaspoons pure vanilla extract

Cake

  • 1 1/2 cups (7.5 ounces) all-purpose flour
  • 1 1/2 teaspoons aluminum-free baking powder
  • 3/4 teaspoon table salt
  • 3/4 cup whole milk
  • 6 tablespoons (3/4 stick) unsalted butter
  • 1 1/2 teaspoons pure vanilla extract
  • 3 large eggs
  • 1 1/2 cups (10.5 ounces) sugar

Glaze

  • 1/2 cup heavy cream
  • 2 tablespoons light corn syrup
  • 4 ounces bittersweet chocolate, chopped fine

Preparation

For the pastry cream

Heat the half-and-half in a medium saucepan over medium heat until it just simmers. In another bowl, whisk the egg yolks, sugar and salt until smooth. Add the flour to the yolk mixture and whisk until incorporated. Remove the half-and-half from heat and, whisking constantly, slowly add 1/2 cup to the yolk mixture to temper. Whisking constantly, return tempered yolk mixture to half-and-half in saucepan.

Return saucepan to medium heat and cook, whisking constantly, until mixture thickens slightly, about 1 minute. Reduce heat to medium-low and continue to simmer, whisking constantly, 8 minutes.

Increase heat to medium and cook, whisking vigorously, until bubbles burst on surface, 1 to 2 minutes. Remove saucepan from heat, whisk in butter and vanilla until butter is melted and incorporated. Strain pastry cream through fine-mesh strainer set over medium bowl. Press lightly greased parchment paper directly on surface and refrigerate until set, at least 2 hours and up to 24 hours.

For the cake

Adjust oven rack to middle position and heat oven to 325 degrees. Lightly grease two 9-inch round cake pans with nonstick cooking spray and line with parchment. Whisk flour, baking powder, and salt together in medium bowl Heat milk and butter in small saucepan over low heat until butter is melted. Remove from heat, add vanilla and cover to keep warm.

In stand mixer fitted with whisk attachment, whisk eggs and sugar at high speed until light and airy, about 5 minutes. Remove mixer bowl from stand. Add hot milk mixture and whisk by hand until incorporated. Add dry ingredients and whisk until incorporated.

Working quickly, divide batter evenly between prepared pans. Bake until tops are light brown and toothpick inserted in center of cakes comes out clean, 20 to 22 minutes.

Transfer cakes to wire rack and cool completely in pan, about 2 hours.  Run a small plastic knife around edge of pans, then invert cakes onto wire rack. Carefully remove parchment, then reinvert cakes.

To assemble

Place one cake round on large plate. Whisk pastry cream briefly, then spoon onto center of cake. Using offset spatula, spread evenly to cake edge. Place second layer on pastry cream, bottom side up, making sure layers line up properly. Press lightly on top of cake to level. Refrigerate cake while preparing glaze.

For the glaze

Bring cram and corn syrup to simmer in small saucepan over medium heat. Remove fro heat and add chocolate. Whisk occasionally, until thickened slightly, about 5 minutes.Pour glaze onto center of cake. Use offset spatula to spread glaze to edge of cake, letting excess drop decoratively down sides. Chill finished cake 3 hours before slicing. Cake may be made up to 24 hours before serving.

Yield: 8 to 10 servings

For a printer-friendly version of this recipe, please click here:  Boston Cream Pie

Boston Cream Pie 3

New York Sour

New York Sour 2

What a day – let me tell you.  There were ups, and there were downs – I went from tired and cranky (on Thursday night), to completely stressed out, to elated, to livid.  I’m sorry, but I have to rant – this is my blog, and I have to get this off my chest.  I’m not even sure a drink will help at this point.

This morning, my older daughter played in the semi-finals for girls little league.  This is the furthest their team has ever gotten in the playoffs, and we (the parents) could not be more proud of them.  Unfortunately this morning my daughter was a magnet for the ball, and got hit all three times she was up at bat.  The good news is she got on base all three times, and one of those times she scored a run.  This was a tough team, with an even tougher coach, that was watching (and commenting) on every little thing – including telling the umpire that he should tell my daughter to move out-of-the-way of the pitches – like she enjoys getting hit in the side of the ribs by the ball???  The thud was painful to listen to.  They had a really tough battle, but they made it through – and came down from a 5 run deficit to win by 1 run.  It was amazing – they were so happy they were jumping up in down in a big huddle – it was one of the proudest moments I have experienced as a parent.

Later in the afternoon, we decided to head down to the neighborhood field to watch the boys championship game, as she had some friends who were playing.  As we were approaching the field, we couldn’t believe all the cars on the street.  My daughter said, “Boy, someone is having a big party!”  That someone was the boys championship game.  There were hundreds of people there – they were selling hot dogs and cotton candy, they had huge speakers to announce all the payers, and 4 umpires in the field.  It was amazing.  She looked at me and said, “Are we going to get all this stuff too?”  Well, the plan was for them to play the championship game at Husky Stadium (at University of Washington), but we learned today that due to some construction, they would not be able to play there.  The girls were so looking forward to that, but the excitement of winning took precedent.

We found out tonight that we will be playing at the field down the street from us – not a special field, just an old regular field – and the game starts at 2:30pm on Monday.  WHAT????  ARE YOU KIDDING ME???  Don’t they know that school is not out for the summer yet?  And that school doesn’t get out until 3:30pm?????  What about the parents that have to leave work in order to get to the game, and the meetings they have to reschedule???  Let alone the fact that none of their friends, neighbors, or other fans will be able to make that time work.  THIS IS CRAZY!!!  The sheer lack of disrespect for the girls is outrageous.  What are we in the dark ages?  My daughter was crushed to find out that she would need to be picked up 2 hours early from her field trip on Monday to make it to the game.  I am going to need to leave work at noon, just to drive 45 minutes to get her from the field trip, and then another 45 minutes to the field.  And if we run into traffic, forget it.

Needless to say – not even this delicious drink I found in Bon Appetit will help at this point.  But, please – go ahead and make one for yourself – and say a little toast to the Red Hot Chile Peppers.  They deserve so much better…I just hope that someday girls will be given the respect they deserve on the field – at least we can always dream.

Ingredients

  • 2 ounces rye or bourbon whiskey
  • 1 ounce fresh lemon juice
  • 1 ounce simple syrup
  • 1/2 ounce  fruity red wine (such as Shiraz or Malbec)

Preparation

Combine 2 ounces rye or bourbon whiskey, 1 ounce fresh lemon juice,  and  1 ounce simple syrup in a cocktail shaker. Fill  with ice, cover, and shake until outside of shaker is frosty, about 30 seconds.  Strain into a rocks glass filled with fresh ice. Gently pour 1/2 ounce  fruity red wine over the back of a spoon  held just above the drink’s surface so wine floats on top.

For a printer-friendly version of this recipe, please click here:  New York Sour