Caramelized Onion and Shallot Dip

Roasted Onion Dip

I hear there is a big football game this weekend – yes, the biggest game of the year.  Pretty much the only football game I actually even remotely pay attention to – and that is really just for one reason…the food that goes along with it.  Football is a very important part of my husband’s life.  Usually next week starts his mid-winter depression, not because of the weather, but because there is no more football, and baseball hasn’t started yet.

I haven’t decided what I am making for the big game yet, although I have a lot of different ideas.  Some may be repeats of the past few weeks – this whole simplicity thing is just not working for me.  One of the ways I have been trying to simplify is with my pictures for the blog.  In these long winter days, I hardly ever have a chance to get some good light.  Even on the weekends – it is ridiculously dark here when it is raining – oh, and have I talked about the fog we have had recently?  I feel like I have been stuck inside a cloud.  Just when we thought the fog was over, it came back again yesterday.  That does not help my light cause what so ever.

So – back to the original point – simplicity.  Instead of moving the food into the office where I have a nice lamp set up to give the artificial light my pictures need, I have been trying to photograph in the kitchen.  Things have not been going so well – and it is not helping that I snap about 5 pictures, and call it good.  I have never been much for taking a ton of pictures, but usually I have to take at least about 10 to get a decent shot.  Needless to say, I have been extremely disappointed with my pictures lately, and I have to turn things around.  So – you may be seeing some updated pictures on the blog – as I throw simplicity out the window – that is when it comes to photos.

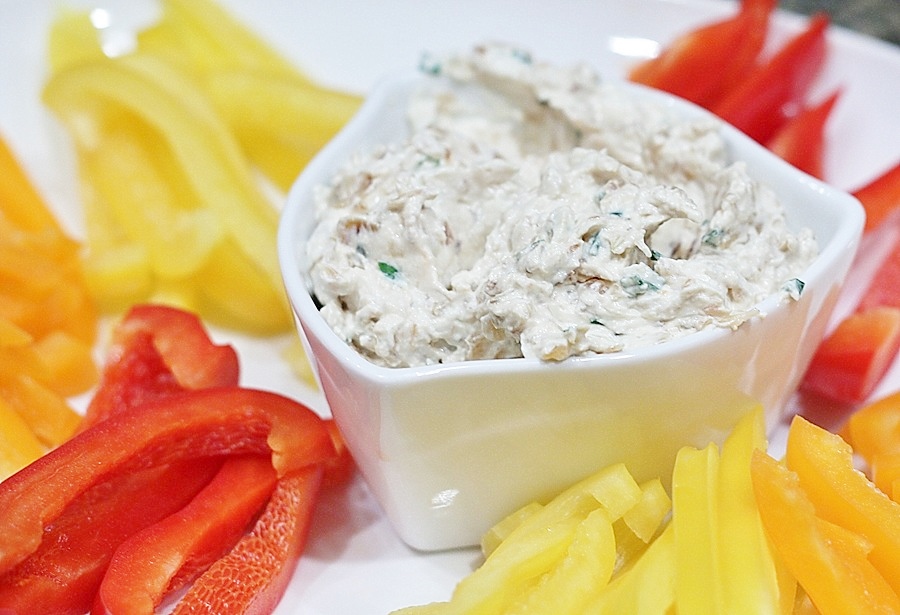
So, just in case you are looking for something to make for the big game – how about a good old fashion homemade French Onion Dip?  Remember that stuff, with the Lipton Onion Soup?  I could eat that with a spoon.  Well – here is the real deal. If you like French Onion Dip – this recipe from Bon Appetit is for you.  It is definitely different – not nearly as salty – and you can actually tasted the roasted onion and shallot flavor.  Not even a month into this resolution, and I am already backing off on simplicity – and I am making homemade French Onion Dip.  It is going to be a long year…

Ingredients

  • 2 pounds large yellow or white onions, thinly sliced
  • 2 large shallots, thinly sliced  (about 6 ounces total)
  • 4 sprigs thyme
  • 1/4 cup olive oil
  • Kosher salt and freshly ground  black pepper
  • 1 cup dry  white wine
  • 2 tablespoons Sherry  vinegar
  • 2 cups sour cream
  • 1/4 cup minced fresh chives
  • 1/4 cup plain whole-milk Greek yogurt
  • 2 teaspoons onion  powder

Preparation

Preheat oven to 425°. Mix onions, shallots, thyme sprigs, and  oil in a large roasting pan. Season with salt and pepper.

Roast onion mixture, stirring and scraping down sides of pan  every 10 minutes, until mixture starts to break down and turn golden brown,  45–55 minutes.

Discard thyme sprigs. Add wine and vinegar; stir to scrape up  any browned bits from bottom of pan. Return onion mixture to oven. Continue  roasting, stirring occasionally, until deep golden brown and completely  caramelized, about 15 minutes longer. Spread onion mixture out on a rimmed  baking sheet to cool.

Transfer onion mixture to a work surface and mince. Transfer  to a medium bowl. Stir in sour cream, chives, yogurt, and onion powder. Season  with salt and pepper.

DO AHEAD Dip can be made 3 days  ahead. Cover; chill. 

For a printer-friendly version of this recipe, please click here:  Caramelized Onion and Shallot Dip

Roasted Red Pepper Soup Shots

Red Pepper Soup Shots

It is amazing what a good somewhat relaxing weekend can do for you.  For the first time in weeks, I am actually ready for the week to come.  I got a ton done this weekend, and caught up on some much-needed sleep.  I feel like a new person – now let’s see how long it takes for that to all come undone…

So lately I have had a bit of a glass fetish.  I find myself combing Etsy for the vintage glassware – and believe me, I have stocked my bar with some keepers.  I completely turned over my somewhat modern looking glassware for all vintage stuff – ranging from the 30s  (I think) through the Mad Men era.  I am quite pleased with my collection, and love having people over so I can try them out.  Most of my more modern glasses were pretty easy to part with.  I was never really fond of them, but they were what I had – and there was no use in getting new ones.  I brought a big bag over to Goodwill and had a good time thinking about how someday maybe these glasses would become vintage…but it will be quite a while before that happens.

As I was going through my glasses, I found these tall shot glasses that I had only used once before.  That right there should have been the nudge I needed to part ways, but there was something telling me that I should hold onto them.  So, I moved them to a different cabinet – one that wouldn’t make me think of them as glasses to drink out of, but instead glasses to serve from.  It was not long afterwards that I found this recipe in Bon Appetit for these Roasted Pepper Shooters – that was it.  That was exactly what is supposed to go in these glasses.  They are appetizer glasses – or as they say in fancy restaurants – for an “Amuse Bouche.”  Something to waken your palate in anticipation of the meal.  So – when I had some friends over, I whipped this up (and literally, that’s exactly what I did – they were that easy).  My only mistake is that I did not serve them chilled.  We had the leftovers the next night – nice and chilled, and they were fantastic.  I wanted an entire bowl – which is exactly what a good Amuse Bouche does.  Now, let the week begin!

Ingredients

  • one 16-ounce jar fire-roasted red peppers with  their juices
  • 1 tablespoon Sherry vinegar
  • 1/2 teaspoon  kosher salt
  • 1/4 teaspoon black pepper
  • 1/4 cup extra-virgin olive oil

Preparation

Purée the first four ingredients in a  blender on high speed until very smooth, about 1 minute. With motor running,  gradually add the olive oil. Season to taste  with salt, pepper, and more vinegar, if  desired.

DO AHEAD Soup can be made 1 day ahead. Cover;  chill.

Divide soup among small cups or shot glasses.

For a printer-friendly version of this recipe, please click here: Roasted Red Pepper Soup Shots

Sweet and Spicy Nut and Pretzel Mix

Snack Mix

Oh…the snack mix.  That wonderful mix of salty treats that you most often eat on an airplane.  I love them.  In fact, I have actually gone to the King Nut web page just to see how much it would cost to get some of that deliciousness.  We are not talking about the ordinary Chex Mix you get in the markets – this is a special mix that only the airplanes seem to have.  I always chicken out…but don’t think I haven’t come close.  I hate thinking I have to get on an airplane to eat the snacks I love.

Lately my family has been eating a lot of Chex cereal – it is gluten and dairy free (which makes one person in the family extremely happy), crunchy with milk, and as far as cereals go – low sugar content and pretty healthy.  One day the cereal was on the counter, and my daughter spotted the recipes.  I knew it was coming eventually.  She wanted to make the snack mixes.  Well, I had already been preparing for that day – and actually surprised her with an even better recipe – one that I found from Cooking Light.  We decided to take bits and pieces of each recipe, change a couple of ingredients to match what we had in the house – and make our own.   Wow was this good.  They were salty, buttery and sweet all at the same time – and then the heat kicks in – just the right amount of heat.  Perfect for serving with cocktails or any other type of beverage.

So – who needs King Nut now?  I certainly don’t.  What I need now is some more of this snack mix.  Oh, and a nice cocktail would be fabulous…

Ingredients

  • 3 tablespoons brown sugar
  • 2 teaspoons chopped fresh thyme, divided
  • 3/4 teaspoon kosher salt
  • 1/2 teaspoon ground cinnamon
  • 1/4  teaspoon ground red pepper (optional)
  • 1/2 cup cashews
  • 1/2 cup blanched almonds
  • 1 1/2 tablespoons butter
  • 3 cups tiny unsalted pretzels
  • 1 cup crispy rice cereal squares (such as Rice Chex)
  • 2 tablespoons maple syrup

Preparation

Preheat oven to 350°.

Combine brown sugar, 1 teaspoon thyme, salt, cinnamon, and red pepper in a small bowl.

Combine cashews and almonds on a jelly-roll pan. Bake at 350° for 10 minutes or until the nuts begin to brown. Combine the pecan mixture and butter in a medium bowl, stirring until butter melts. Gently stir in pretzels, cereal, and syrup. Sprinkle the sugar mixture evenly over pretzel mixture; toss gently to coat. Spread pretzel mixture in a single layer on jelly-roll pan. Bake at 350° for 10 minutes, stirring once. Sprinkle with the remaining 1 teaspoon thyme. Cool completely.

For a printer-friendly version of this recipe, please click here:  Sweet and Spicy Nut and Pretzel Mix

Potato Chip Cookies

Potato Chip Cookies

I am officially exhausted.  I am holding up the white flag.  So much for 2013 being the year of simplification – the last two weeks have been anything but that.  I think I knew that was going to be the case, and was trying to convince myself if I just focused on simplifying, everything would be ok.  Well, I survived.  I got through the last two weekends of visitors, 20 hours of rehearsals (for my older daughter), 5 performances of Bye-Bye Birdie (which she performed and I attended), and a surprise project at work that definitely had my mind working in overdrive.  I am really looking forward to normalcy, let alone simplification.  Normal sounds about perfect right now.

So what exactly is normal anyway?  I certainly don’t operate under normal conditions in any part of my life – particularly when it comes to food.  For those of you who follow this blog, you know I love a good twist on a recipe – candy sushi and meatloaf cupcakes are just a few of my favorites.  So – when my best friend from high school sent me this recipe for Potato Chip Cookies that she got from The Chew – even among all the craziness in my life the past couple of weeks – I just couldn’t put off making them.  Of course, I cut corners when it came to taking this picture, but I had to simplify somewhere, right?  These cookies were something else – and they got better the longer they sat – they were like a salty sweet shortbread cookie that was perfectly crunchy.  You either couldn’t live with the dark chocolate side, or you couldn’t live without it – I had both reactions from people.  Either way, this recipe is definitely a keeper.

So – I am signing off now, and heading to bed.  I hope when I wake up tomorrow, I feel like a new person – without a white flag attached to the top of my head.  I am allowed to dream, right?

Ingredients

  • 1 cup butter, softened
  • 3/4 cup sugar
  • 2 cups all-purpose flour
  • 1 teaspoon vanilla
  • 1 1/4  cups coarsely crushed potato chips, divided
  • 1/4 cup confectioner’s sugar
  • 7 oz. dark chocolate, melted

Directions

Preheat oven to 350 degrees.

In a large mixing bowl cream butter and sugar until fluffy.  Reduce mixer speed to low, and add 3/4 cup of crushed potato chips and mix well.  Add vanilla, then add the flour and mix just until combined, do not over mix the dough.

Use a spoon to scoop small 1-inch balls of dough onto a lightly greased or parchment lined cookie sheets, 2 inches apart.  Dust each cookie with a bit of confectioners sugar, and press flat.  Bake 10-15 minutes, or until light brown around the edges.  Remove to wire rack to cool.

Dip each of the cookies in the melted chocolate.  While the chocolate is still soft, place the chocolate covered portion into the rest of the crushed potato chips to lightly coat.  Allow to set before serving.

Makes about 3 dozen.

For a printer-friendly version of this recipe, please click here:  Potato Chip Cookies

Rosemary Cornmeal Biscotti

Biscotti

In Seattle, the trees and flowers never seem to stop growing.  Now before I really get into this post – I want to explain something – I am not a gardener.  That is my husband’s area.  I focus on the inside of the house – he deals with the outside.  I have never really had an interest in flowers or flowering trees – the only plants I really get into growing are herbs, and that is purely because I can use them in the kitchen.  It is so nice to always have fresh herbs to cook with.  So – it annoys me at times that in Seattle, there is always something blooming.  I just looked out the kitchen window the other day, and yes, in the dead of the winter, there are flowers starting to bloom.  At least I actually noticed them – I remember when I was in college, my mother asked me to water the flowers outside while they were away.  They came home, and the flowers were dead.  She was livid – and would you believe that I didn’t even realize there were flower boxes on attached to the house that she wanted me to water?  I just thought she was talking about the big pot outside the front door.

One of the most prolific plants out here is rosemary – I have actually seen it used as a hedge – it grows that much.  Rosemary is awesome, I love having a fresh rosemary plant that I can use whenever I am roasting meat, potatoes, vegetables – the sky is the limit.  But, I don’t often bake with rosemary – that was until I made these at The Pantry.  These were such a unique cookie – they were sweet, crunchy and herbaceous – which is really not how I have ever described a cookie before.  I couldn’t stop eating them because they were so unique.  So – if you are sick of looking at that overgrown rosemary plant in your back yard, here is an idea – instead of using it for your roasted chicken, how about a batch of these?  They almost made me appreciate my garden just a little bit more – which is a good thing – I think.

Ingredients

  • 2 ¼ ounces (1/2 cup) coarsely chopped almonds
  • 1 ounce (1/4 cup) coarsely chopped hazelnuts
  • 2 ounces (4 tablespoons) unsalted butter
  • 1 ½ tablespoons finely grated orange zest
  • 1 tablespoon minced fresh rosemary
  • 4 ½ ounces (1 cup) all-purpose flour
  • 2 ½ ounces (1/2 cup) coarse yellow cornmeal
  • 3 ¾ ounces (1/2 cup) sugar
  • 1 teaspoon baking soda
  • 1 teaspoon anise seeds
  • ¼ teaspoon kosher salt
  • 2 large eggs
  • Egg wash made with 1 egg and 1 tablespoon water

Preparation

Preheat oven to 350 degrees.  Spread the nuts on a baking sheet and toast them in the oven until they are lightly golden, about 8-10 minutes.  Set aside to cool; keep oven on.

In a small saucepan, melt the butter over medium heat.  Remove from heat and add orange zest and rosemary.  Set aside to cool.

In the bowl of a mixture, mix the flour, cornmeal, sugar, and baking soda, anise seeds and salt.  Add the eggs one at a time, mixing well after each egg.  Add the cooled butter mixture and mix to combine.  Stir in the nuts, then let rest for a few minutes.

With wet hands, form the dough into a log 2 inches wide and place it on a parchment-lined baking sheet.  Brush the log with the egg wash and bake until it is a deep golden brown, about 30 minutes.  Let it cool on a wire rack.  Reduce oven to 200 degrees.

Once cooled, using a serrated knife, slide the log on the diagonal into ¼ inch slides.  Arrange the biscotti on two parchment-lined baking sheets and bake until crisp, about 1 hour.

Cool completely before storing in an airtight container.

Makes about 30 biscotti.

For a printer-friendly version of this recipe, please click here:  Rosemary Cornmeal Biscotti

Bacon, Onion, and Cheddar Corn Muffins

Onion Cheddar Bacon Corn Muffins

When I was little we would go to my grandmother’s house during the summer – she lived near the ocean, where we would spend our days.  She was an excellent cook, but like all good grandmothers, she wanted her grandchildren to be happy, and always asked us what we wanted for breakfast and lunch.  Of course my sister and I would always choose the same things – and it was because we hardly got these at our house.  We asked for Jiffy Corn Muffins for breakfast, and Kraft Macaroni and Cheese for lunch.  We ate these treats every day – and never got sick of them.  In fact, even today, I often crave a good box of Jiffy Corn Muffins – it is a blast from the past for me to sink my teeth into those sweet little morsels.  Although, over the years, I have discovered that homemade corn muffins can actually taste even better.  I know, can you believe it?  It’s all about bacon…and seriously, what doesn’t taste better with bacon?

This reminds me of another story – and then I promise to get back to these corn muffins.  Years ago my husband’s parents took us to Napa Valley for the weekend, and we stayed at this beautiful B&B in Yountville – this was when Yountville barely existed, and I swear this B&B may have been the only thing in this town.  We woke up to the wonderful smell of bacon – it was incredible.  It got us right up out of the comfortable bed, all dressed – and downstairs for breakfast.  When they told us what was on the menu – we asked where the bacon was?   They laughed – that was just to get people up – they weren’t serving it.  ARE YOU FREAKING KIDDING ME????  We were besides ourselves, and the rest of the trip we were craving bacon.

So – what does these two stories have in common?  This recipe that I found in Cooking Light.  This recipe that combines a wonderful corn muffin with the perfect taste of bacon – and add a little onion and cheddar, then you have really have yourself a party in your mouth.  These are the perfect side dish to chili, soup or just about anything you serve for dinner.  Remember, everything is better with bacon – that is if you actually get to eat it…

Ingredients

  • 2  slices bacon
  • 3/4 cup chopped onion
  • 1 1/4 cups fat-free buttermilk
  • 1/4 cup olive oil
  • 1  large egg, lightly beaten
  • 4.5 ounces all-purpose flour (about 1 cup)
  • 3/4 cup yellow cornmeal
  • 2 teaspoons baking powder
  • 1/4 teaspoon baking soda
  • 1/4 teaspoon salt
  • 1/8 teaspoon ground red pepper
  • 2 ounces shredded sharp cheddar cheese (about 1/2 cup)
  •  Cooking spray

Preparation

Cook bacon in a skillet over medium heat. Remove bacon, reserving drippings in pan. Drain bacon; crumble. Increase heat to medium-high. Add onion to drippings in pan; sauté 5 minutes.

Preheat oven to 400°.

Combine buttermilk, olive oil, and egg.

Weigh or lightly spoon flour into a dry measuring cup; level with a knife. Combine flour and next 5 ingredients (through pepper) in a bowl, stirring well with a whisk. Make a well in center of flour mixture. Add milk mixture; stir just until moist.

Stir in bacon, onion, and cheese. Spoon into 12 muffin cups coated with cooking spray.

Bake at 400° for 13 minutes or until a wooden pick inserted in center comes out with moist crumbs clinging. Remove muffins from tins; cool on a wire rack.

For a printer-friendly version of this recipe, please click here:  Bacon, Onion, and Cheddar Corn Muffins

Cream Puffs

Cream Puffs

When I studied in France many years ago – I was enamored by the Patisseries.  This was over twenty years ago, when the dollar was very strong – and it cost less than a dollar for a beautiful looking éclair – or a tarte au fraise, one of my older daughter’s favorites.  So – every week I would treat myself to a different pastry in the shops – I wanted to make sure I was able to try each and every one by the time I left.  I actually think I came pretty close.  Still – the one that I kept coming back to was the éclairs.  There were a few different varieties, but it didn’t matter to me – it was not the filling that I craved, it was the pastry.  It was not sweet, and the outside was just slightly crisp, while the inside was soft and egg-like.  Just amazing.

Now when I visit France, I am still just as enthralled with the Patisseries, but the pastries cost much more than a dollar – and now it is my daughter who is on a mission to try as many as she can. I usually just get a couple of bites of whatever she chooses – which is fine by me – there is so much good food to eat in Paris – I have to save room for everything.  She is definitely into the éclairs as well – and would you believe, we actually have a favorite spot?  It is on the Isle St. Louis, and their chocolate éclairs are the best I have had.  They serve them fresh and cold, and the filling is just as bit as delicious as the pastry.

I am not sure why it has taken me so many years to make these – but for some reason it has.  I saw this recipe in Bon Appetit, and decided it was finally time.  I have a friend who thinks these are a snap to make – she whips them up all the time – well, she must have some seriously strong arms.  That was the hardest part – mixing in all those eggs.  Once I got past that part – the rest was pretty easy.  I may have taken them out of the oven a little too soon, because mine deflated slightly – but it didn’t matter a bit.  They were amazingly delicious, I was smiling from ear to ear.  So – the next time I need a little taste of France, I guess I can just whip these up – pretty soon I will have monster arms too…then maybe I could fly myself to France and get the real thing?  Good thing I have another trip planned.

Ingredients

  • 1/2 cup whole milk
  • 1/2 cup (1 stick) unsalted butter, cut into 8 pieces
  • 1 teaspoon plus 2 tablespoons sugar
  • 1 teaspoon kosher salt
  • 1 cup all-purpose flour
  • 6 large eggs
  • 2 1/2 cups heavy cream
  • Powdered sugar (for dusting)

Special Equipment:

  • Two pastry bag tips, 1/2-inch and 1/2-inch open star

Preparation

Line 2 baking sheets with parchment paper. Fit 1 large pastry bag (or a plastic freezer bag with 1/2-inch cut from one bottom corner) with plain 1/2-inch tip.

Bring milk, butter, 1 tsp. sugar, salt, and  1/2 cup water to a boil in a medium sauce-pan over medium heat, stirring occasionally. Add flour all at once; reduce heat to medium-low. Stir vigorously with a wooden spoon until a dough forms and pulls away from sides of pan, 1–2 minutes. Continue beating vigorously until a thin dry film forms on bottom and sides of pot, about 1 minute. Transfer to a bowl.

Add 1 egg and stir vigorously with wooden spoon until egg is incorporated  and dough looks dry again, about 2 minutes. Repeat with 4 more eggs, adding one at  a time and stirring vigorously to incorporate before adding the next. Dough should be smooth, shiny, and thickened.

Spoon dough into prepared pastry bag; pipe out 2 1/2-inch-diameter rounds on prepared sheets, leaving 2 inches between rounds.

DO AHEAD: Freeze the piped dough rounds on the baking sheets, then transfer to resealable plastic bags and freeze for up to 1 month. Place on parchment paper-lined baking sheets, spacing apart (do not defrost) before continuing with recipe.

Arrange racks in upper and middle thirds of oven and preheat to 450°. Whisk remaining egg with 2 tsp. water and  brush dough rounds all over with egg wash.

Transfer baking sheets to oven; turn  oven off. After 10 minutes, heat oven to 350° and bake for 10 minutes. Rotate pans front to back and top to bottom; continue baking until deep golden brown all over, about 10 minutes longer (puffs will deflate if removed from oven before fully baked). Transfer  puffs to a wire rack and let cool completely.

Using a serrated knife, gently slice the  top quarter off each puff; transfer tops to a plate. With your finger, gently push down the  soft film of cooked dough inside each puff.

Prepare a second pastry bag (or freezer bag) with 1/2-inch open-star tip. Beat heavy cream and remaining 2 Tbsp. sugar in a large bowl until soft peaks form. Spoon whipped cream into prepared pastry bag. Fill each puff with cream, finishing with a generous ring  of cream on top. Dust tops of cream puffs with powdered sugar; place atop puffs.

For a printer-friendly version of this recipe, please click here:  Cream Puffs

Cream Puffs 2

Carrot Cardamom Jam

Carrot Cardamon Jam

I have been in a little funk lately – and I think I finally figured out what it is.  I miss making jam – it has been at least a month since I have made a batch, and it is leaving a little bit of a void in my life.  I thought after making about 80 jars between June and December that I would need a couple of months just to get back into it – but I am ready.  I am ready to get back on that horse.  Now, there is just a couple of small problems…fresh fruit, and time.

Of all the jams I made this summer and fall, I hardly ventured into what I would call the “risky” jams.  Those are the jams that you don’t really use to make a peanut butter and jam sandwich.  I think my Fig Jam was the only one that came close – and after I saw her lick the spoon clean from the sample I gave her, I was pretty sure it would go perfect with peanut butter.  I remember when I had an open jar of the Mulled Cider Jelly in the refrigerator, and decided to use that on her sandwich.  I was sure I would hear about it that night – since that was my first attempt to broaden her from the berry or stone fruit jams.  That night as I started to make her a sandwich for the next day, she called from upstairs asking if I could use that really yummy jam again…success!

Last month when I attended the holiday gift workshop at The Pantry, I was overjoyed when I saw we were going to be making jam.  Not that I needed any more to give out – but I was so excited to try this jam, that would definitely go into the “risky” category.  Not only was this jam beautiful (look at the color!), it was delicious – especially with goat cheese.  This is the perfect appetizer jam.  So – aren’t you curious to see how this would go with peanut butter?  Well, you might have to make it to find out – and the good news is that you can get fresh carrots in the market pretty much all year.  I am holding out putting on my daughter’s sandwich – but if I run out of her other favorites…that might be next.

Ingredients

  • 1 pound 2 ounces fresh young carrots, peeled and cut into ½-inch chunks
  • Finely grated zest of 2 lemons
  • 1/3 cup freshly squeezed lemon juice
  • Finely grated zest of 1 orange
  • Freshly squeezed juice of 1 orange, about ½ cup
  • 1 ½ teaspoons roughly ground cardamom seed
  • 2 ¼ pounds sugar
  • 4 ½ ounces liquid pectin

 Preparation

Bring a large pot of salted water to a boil.  Add the carrots, reduce the heat slightly and simmer for about 8-10 minutes, until the carrots are tender but not mushy or falling apart.  Drain the carrots, run them under cold water to stop them from overcooking and set them aside in a colander to drain for a few minutes.

Place the carrots in a food processor and pulse until the carrots are finely chopped.  Be sure not to take them down to a puree.

Place the carrots, lemon zest and juice, orange zest and juice, and cardamom in a heavy bottomed stock pot.  Add the sugar and cook over high heat until the mixture comes to a boil.  Boil hard for 5 minutes, skimming and discarding any foam that rises to the surface.

Add the pectin and return to the boil.  Cook for another 1-3 minutes, testing for a set often.  When the jam has reached the desired consistency, remove the pot from the heat and ladle the jam into clean, sterilized jars.  Process as desired or cool and then store in the refrigerator.

For a printer-friendly version of this recipe, please click here:  Carrot Cardamom Jam

Chive and Black Pepper Popovers

Chive and Black Pepper Popovers 2

Happy New Year!  I can’t believe it is 2013 already, where did 2012 go?  Well, upward and onward – I am looking forward to see what the new year will bring.  I have certainly enjoyed being on vacation, and can’t believe I have to head back to work tomorrow.

So – I have been thinking a lot about what I am going to do differently in 2013 – and I decided that my resolution is to simplify.  I think I have said this before – but this time I mean it.  I am still not sure how I am going to achieve this goal – but I have to try.  I feel like my life is a constant marathon – I am always exhausted, never caught up – and know that I have miles to go before I am done.  As I am writing this, I am thinking about the 10 other things I should be doing.  I don’t want to give up the things I love doing, but again, maybe I can think differently about how to get them done.  It is only the 1st, I have 364 days to make this happen – but I have to look at each day and think about one thing I can do that will make things simpler for the future.

I have posted popovers before, and I swear, I can’t figure out why I don’t make them more often.  They are so ridiculously easy to make, and you can actually prepare the batter the day before!  These were something else – I scarfed down two of them in an instant.  I found the original recipe in Bon Appetit, but adapted slightly below. The girls also loved them, and they went great with the Lentil Soup I made for dinner.  They made our New Year’s Day dinner just a little more special.  And, do you want to know a little secret?  I only made half the batch tonight – and saved the rest of the batter for tomorrow night’s dinner – wow, I am already making good on my resolution to simplify – it doesn’t get any better than that!

And for those of you really paying attention, you will notice this is a different picture from last night…that is because they looked a little different the 2nd night, and just as delicious.  These look a little more authentic, so I decided to switch the picture…

Ingredients

  • 2 cups all-purpose flour
  • 2 tablespoons finely chopped chives
  • 1 tablespoon kosher salt
  • 1 teaspoon freshly ground black pepper
  • 3 large eggs
  • 2 1/2 cups whole  milk
  • 5 tablespoons melted unsalted butter, divided

Preparation

Whisk the first 4 ingredients in  a medium bowl. Whisk eggs and milk in a large bowl until well blended. Gently whisk in flour mixture, followed by 3 tablespoons of melted butter (do not  overmix).

DO AHEAD: Batter can be made 1 day ahead. Cover and chill.

Preheat oven to 425°. With the rest of the butter, grease 12 standard muffin cups with 1/2 teaspoons melted butter each. Pour batter into prepared muffin tins, filling cups three-quarters full  and dividing equally. Bake popovers until puffed, golden brown, and crispy around edges, 30-35 minutes. Using a thin knife or an offset spatula, remove popovers from pan. Serve immediately.

For a printer-friendly version of this recipe, please click here:  Chive and Black Pepper Popovers