Chocolate Peanut Butter Acorns

Chocolate Peanut Butter Acorns

Not only it is Thanksgiving at our house tomorrow – we are also celebrating the first day of Hanukkah – and my younger daughter’s 8th Birthday.  It is quite the celebration, the trifecta to end all trifectas.  There has been a lot of activity in the house this week – with the birthday party this weekend – and then guests arriving for the week.  It has been quite something – but the best is yet to come.

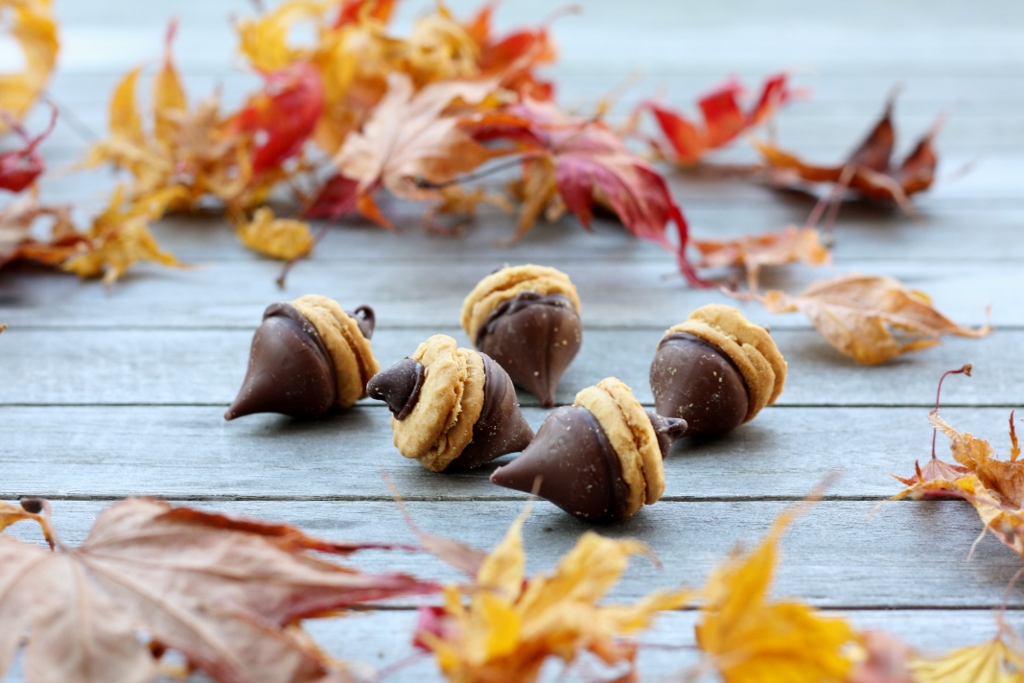
One of our special visitors this week is my sister-in-law – she is a “real” foodie (where I just play one on TV) – she does this for her career, so she actually knows what she is talking about.  One of the treats I made for Niela’s birthday party were these cute little acorns.  For the life of me, I can’t remember where I saw these, but I remembered there were 3 ingredients, and I knew they would be adorable.  I usually make treats from scratch, but occasionally I find something like this that I can’t resist.  When I saw her pop one in her mouth – I was a little worried, but she had the same reaction as me.  Wow, what a combination.  Nutter butter’s are not my favorite cookies – but stick a Hershey’s kiss on top, with a chocolate chip on the bottom, and boy do you have yourself a delectable morsel.  That got us talking about how there are certain combinations of foods that are just meant to go together.  Hands down – these win.  I can pass of a peanut butter cup any day of the week – but these babies are in a different league.

So, as you celebrate Thanksgiving tomorrow, take some time to remember what this holiday is all about.  I am so thankful for my family and friends, and the food I am always surrounded by.  I am thankful that I have a beautiful kitchen to cook in tomorrow, and my family around me to share the bounty.  I am thankful that my children understand they will not get Hanukkah presents tomorrow, but at some point this month they will…and I am thankful that my daughter’s birthday party this past weekend was a complete success, and that she is thrilled to be sharing her day with a turkey and a menorah tomorrow.  Happy BirthGivakkah everyone!!

Ingredients

  • Mini Nutter Butter Sandwich Cookies
  • Hershey Kisses
  • Chocolate Chips

Preparation

Place 1/2 cup chocolate chips in a microwave safe bowl.  Melt the chocolate in the microwave in 30-second intervals, stirring each time, until melted.  Dip the bottom of the Hershey Kiss in the melted chocolate, and stick onto one side of the cookie – do the same with the chocolate chip on the other side.  Let sit until the chocolate gets hard.

For a printer-friendly version of this recipe, please click here:  Chocolate Peanut Butter Acorns

Apple-Cranberry Jam

Apple-Cranbery Jam

Someone needs to shake some sense into me.  A wise man once said, “If it is worth doing, it is worth overdoing.”  Yes, I often feel like those are the words I live by – particularly this time of year.  If you look into my pantry right now, you would completely agree with me.  We are on the final countdown to Thanksgiving – but that is not the only thing going on in our family at the moment.  We are about to embark on the Trifecta of holidays – Thanksgiving, Hanukkah and my younger daughter’s birthday – yes, all on the same day.  She could not be more excited.  Me, well, I would rather spread the cheer, but it is what it is.

I got back from another adventure, only to be thrown right into the birthday celebrations.  Last week was not my best international travelling experience when it came to sleeping.  For some reason almost every night between 2:30 and 3:00am, I decided I had slept enough, and it was time for my body to wake up.  I was exhausted. Three hours of sleep a night is not nearly enough for me – I can get away with it for a couple of nights – but then I really turn to mush.  The good news – I was finally able to sleep on the airplane – I was just done.  I couldn’t take it any longer.

Aside from birthday baking this weekend, I had to get one last batch of jam in before I call it quits for the season.  With Thanksgiving coming right around the corner, I decided to try out a new recipe from Food in Jars using cranberries and apples – both which I found at the farmer’s market this weekend.  This jam is mighty delicious – and so versatile.  I could see this on a peanut butter sandwich, as well as a turkey sandwich.  Oh, and on a bagel with cream cheese – it would make it sing.  So – as you are preparing for your Thanksgiving feast – why not make a batch of this.  And if you really want to make your guests happy, give them a small jar as they are leaving.  Again – this is the time of year where people tend go a little overboard – and my philosophy is, if you can over do it now, then you can rest later.  Is it later yet?

Ingredients

  • 8 cups of peeled and diced apple (approximately 5-6 large apples, 1/2 inch dice. Use a softer apple like a Golden Delicious. Firm apples won’t cook down as well.)
  • 4 cups of whole cranberries
  • 6 cups sugar
  • 1 cup water
  • 2 lemons, zested and juiced

Instructions

Combine the apples, cranberries, sugar and water in a large pot (use a big one, this jam will bubble) over high heat. Bring to a boil, skimming off the foam that develops on the top of the fruit. Cook for 10-15 minutes, until the cranberries pop and the apples soften.

Add the lemon zest and juice and simmer until the liquid in the pot begins to thicken (because both apples and cranberries are naturally high in pectin, you won’t need any additional pectin to help this jam set, as long as you cook it until thick and syrup-y).  If you like a smoother jam, now is the time to use an immersion blender.

Ladle into prepared jars, wipe rims, apply lids and process in a boiling water canner for 10 minutes. Label nicely and distribute to those you love.

Makes about 4 (1-Pint) Jars.

For a printer-friendly version of this recipe, please click here:  Apple-Cranberry Jam

Double Chocolate Crispie Treats

Chocolate-Espresso Rice Krispie Bars

I am off on another adventure.  I am hoping that this one is even better than the last one.  India was quite an experience.  It was a place that I have been fascinated with for years.  I knew that eventually there would be a need for me to go there, but I really had no idea what I was in for.  Whenever I travel anywhere – it is always important for me to connect with the food.  It started in college when I travelled and I have continued that tradition.  Supermarkets are my museums, and finding just the right specialties of the region is what I am after.

When we were in India, we had a free night for dinner.  I didn’t want to go to a fancy restaurant, or someplace at the hotel – I wanted to experience some good local cuisine.  Fortunately at work, there are plenty of other people just like me, and when you work for a global company where people are always travelling, you can get some really good recommendations if you use your resources wisely.  There is an alias called “Food & Wine Enthusiasts” where there are over 1000 foodies just waiting to give you their thoughts and preferences on food and wine.  I sent a mail to the alias, and got exactly what I was looking for.  The restaurant actually had a website, although it pretty much just explained their safety precautions in cooking.  It was a vegetarian restaurant, so I felt safe about my seafood allergy.

The restaurant was in the old part of Bangalore.  It was actually an old house with 2 different restaurants inside.  There was a snack section, an a-la-carte area, and then a set menu where they just bring you food.  People hardly spoke English there, and so it took us a while to figure out that we were standing in the set menu area – we kept asking questions about the menu, and they kept saying “ALL”.  Finally we had figured it out.  When we asked how much it was – they told us 175 Rupies.  That equates to about $2.80.  How could we say no?  We were served bottled water, soup, curries, breads, rice dishes – it went on and on, and even bananas and ice cream for dessert.  It was a feast – and everything was absolutely delicious.

When I came home, I was craving simple food – and my girls were craving sweets.  Normally Rice Crispie treats is not where I would usually land, but I was up for something exactly like this.  Cooking Light had a whole section of these with all sorts of different options, and we decided to give one a try.  These were exactly what the doctor ordered – and the girls were super happy about having these in their lunches.

Ok – I have to go catch my flight – can’t wait to see what food is in store for me this week!

Ingredients

  • 2 tablespoons butter
  • 10 ounces marshmallows
  • 1/4 cup unsweetened cocoa
  • 6 cups rice cereal
  • 4 ounces bittersweet chocolate

Preparation

Melt butter and marshmallows over medium-low heat.  Add the cocoa into the melted marshmallows and cook for 3 minutes.  Add cereal, and toss well to combine.  Press cereal mixture into a 13×9-inch pan coated with cooking spray.  Heat chocolate in microwave at HIGH for 30 seconds, stir, and repeat until completely melted.  Drizzle over cereal mixture. Chill 10 minutes before slicing.

For a printer-friendly version of this recipe, please click here: Double Chocolate Crispie Treats

Pork Posole

Pork Posole

I have started trying something new on the weekends.  I have been very spoiled for some time now – my husband has a toy, it is called The Big Green Egg, and Sunday’s are egg day.  I am no longer responsible for Sunday night dinners, and haven’t been for a few years.  He has taken that responsibility (of course I help with the sides), and I have definitely been benefiting.  It allows me to focus on making jam and baking on Sunday, which is absolutely what I love to do.

The other weekend though I had a thought – cooking during the week is hard.  We cook every night (we are not a take out family, nor do we go to restaurants on school nights), and let me tell you – after being at work all day, it is hard to get home and then cook a meal from scratch every night.  Before we had kids – I would cook every weekend, for the entire week.  We worked even more back then, and when we got home at 8pm, we just wanted to be able to throw something in the oven, but still have a home cooked meal.  So why don’t I do more of that now?  Well, I have limited cooking time, and like I mentioned, I need to save some for jamming and baking.

So, I decided to make one meal over the weekend, that we could warm up later in the week – and I saw this recipe in Cooking Light and thought it would be perfect.  It was super easy to make, and it warmed up just perfectly.  I think it actually even had a better flavor after letting it sit in the refrigerator for a few days.  The pork was so ridiculously tender, and the hominy really softened up.  Let’s see if I can actually keep this going…and maybe add another meal in there at some point.  I can always dream.

Ingredients

  • 1 teaspoon olive oil
  • 12 ounces boneless pork shoulder, trimmed and cut into 1/2-inch pieces
  • 1 cup chopped onion
  • 4  garlic cloves, minced
  • 1 1/2 teaspoons ground cumin
  • 1/2 teaspoon ground red pepper
  • 1/2 cup beer
  • 2 cups unsalted chicken stock (such as Swanson)
  • 1/2 cup salsa verde
  • 1  (28-ounce) can hominy, drained
  • 1/4 cup cilantro leaves
  • avocado

Preparation

Heat a Dutch oven over medium-high heat. Add oil; swirl to coat. Add pork; sauté 5 minutes, turning to brown on all sides. Remove pork from pan, reserving 1 tablespoon drippings in pan. Add onion to pan; sauté 4 minutes, stirring occasionally. Add garlic; sauté 1 minute, stirring constantly. Return pork to pan; stir in cumin and pepper. Add beer; bring to a boil. Cook until liquid almost evaporates (about 9 minutes).

Add chicken stock, salsa, and hominy; bring to a boil. Cover, reduce heat, and simmer 1 hour and 10 minutes or until pork is very tender, stirring occasionally. Ladle 1 1/3 cups soup into each of 4 bowls. Top each serving with 1 tablespoon cilantro and avocado.

For a printer-friendly version of this recipe, please click here:  Pork Posole

Dairy-Free Apple Cake

Dairy-Free Apple Cake

The human body is just amazing – for so many reasons, I could go on for days.  If you have ever been hurt, and then in a very stressful situation, it is amazing how your adrenaline can make your pain go away.  I have read about it before – but only recently have truly experienced the power.  But what is the hormone that can help you if you are hurt emotionally?  Many people think it is food – they turn to food when they are upset – and more often than not, when that is the case – you are looking at a serious weight problem.  Other people are quite the opposite – they starve themselves when they are hurt or depressed – it seems as though depriving yourself food can make people feel more in control, and sometimes feel better.

Most of the time, when I am in this situation, I go right to the kitchen.  Not to eat, but to cook.  When I am cooking, it releases some type of chemical in me that makes me feel better.  I can get lost in the kitchen, forget about all of my troubles – and just focus on the food.  When it is all over, the hurt comes back, but at least for a few hours, I am able to put things aside, and just relax.  Now that my kids are getting older and they can be in the kitchen cooking along side of me – it is even better medicine – there is nothing I love more.

Today my husband and I celebrated our 17th anniversary.  It is hard to believe that I have spent more of my life with him than without him.  I am an unbelievably lucky person – he loves and supports me unconditionally, but always pushes me to be the best person I can be – he is the best father in the world, and has helped me to be the best mother – he has dedicated his life to cancer research, and never ever stops forging ahead.  I admire him more than he will ever know.

He has been staying away from dairy for some time now – but I know how much he loves cinnamon cake.  My mother sent me a recipe that her friend had made, who also stays away from dairy.  This is very similar to my mother’s recipe for blueberry cake – but for a cinnamon lover like my husband, this recipe definitely “took the cake.”  He absolutely loved this cake – I have a feeling I will be making this weekly for a while.  It is the least I can do, for all he does for me.

Ingredients

  • 2 cups sugar
  • 1 ½ cups vegetable oil
  • 1 tsp. vanilla extract
  • 3 eggs
  • 3 cups flour
  • 1 tsp. salt
  • 1 tsp. baking soda
  • 1 Tbs. cinnamon
  • 4 cups peeled, chopped apples
  • 2 tablespoons sugar
  • 1 tablespoon cinnamon

Preparation

Preheat oven to 350o. Grease and flour a 13×9 inch baking pan. In large bowl, cream together first four ingredients thoroughly. Sift together dry ingredients and add to creamed mixture, mixing well by hand. Stir in apples.  Spread batter into prepared pan.  Mix the 2 tablespoons of sugar and cinnamon in a bowl – and sprinkle over the top of the batter.

Bake for 25-35 minutes, or until straw inserted in center comes out clean. Cool completely.

For a printer-friendly version of this recipe, please click here: Dairy-Free Apple Cake

Fluffy Buttermilk Drop Biscuits

Fluffy Buttermilk Drop Biscuits

Accountability.  What an important word.  Over the years, it has become more and more important for various reasons.  It was not a word I really focused on until I was an adult – and the word really made an impression on me with respect to work.  When you are a kid – you always want to blame everyone else for anything that goes wrong.  Mom gets a big brunt of these…but seriously, it is always someone else’s fault.  At times, that can be accurate – but it most cases, everyone has some aspect of accountability in the situation.

We are dealing with a tricky issue right now with my younger daughter.  There is a boy in her class that has been bothering her for quite some time.  At first it seemed innocent enough, and that maybe he had a crush on her – but unfortunately it has gotten a little more serious, and he has started to get physical.  There is always a part of me that wonders if she is egging him on – but at some point you cross the line.  Even some slight antagonism does not deserve physical violence or disparaging language.  Fortunately we are on a good path forward though with the teacher’s support.

Some adults though never really learn to hold themselves accountable – and it can be extremely damaging.  Sometimes all it takes is just a little humility – to let the other person see that you are not perfect.  Sometimes though you wait too long to hold yourself accountable, and by the time it hits you, it is too late.  The damage is done, and there is no going back.

When I started this blog, one of my hesitations was around accountability.  If I was going to post recipes, tell you how great they turned out – then you try them and they are bust – that wouldn’t make me feel very good.  Now I know like everyone else – cooking is as much of an art as it is a science.  Ingredients have a lot to do with how the recipes come out – and ingredients can be different depending on where you live, how fresh they are, etc…  Just last week I got a comment on my banana bread recipe – the person’s banana bread didn’t rise, and she didn’t understand why.  I suspected it had to do with the baking soda/powder she used – and maybe one of them had gone bad.  She tried it again with fresh baking soda/powder, and fortunately – it came out perfectly.  One of the reasons why I post so many recipes from Cooking Light and Bon Appetit – is they have a team of testers that make these recipes before they are published.  Then I make it myself – and if it turns out good – usually I put it on the blog.  I hold myself accountable to posting good quality recipes  – and if you can follow directions, you will come out with good results – but that doesn’t always happen – and when it doesn’t – I am truly sorry.

I know people were eyeing the biscuits that I posted last week with the Broccoli-Cheese Soup – so here they are.  I make a lot of biscuits, but this recipe from Cooking Light is really a keeper.  I loved how quick and easy these were – and that they were seriously light as a feather.  They were by far some of the best biscuits I have ever made – and you can hold me accountable if you don’t agree.

Ingredients

  • 5.6 ounces unbleached all-purpose flour (about 1 1/4 cups)
  • 3.6 ounces white whole-wheat flour (about 3/4 cup)
  • 2 teaspoons baking powder
  • 1 teaspoon sugar
  • 3/4 teaspoon salt
  • 1/2 teaspoon baking soda
  • 1/4 cup unsalted butter
  • 1 1/4 cups very cold fat-free buttermilk
  • 1 tablespoon canola oil

Preparation

Preheat oven to 450°.

Weigh or lightly spoon flours into dry measuring cups; level with a knife. Combine flours, baking powder, sugar, salt, and baking soda in a large bowl, stirring with a whisk to combine.

Place butter in a microwave-safe bowl. Microwave at HIGH for 1 minute or until completely melted. Add cold buttermilk, stirring until butter forms small clumps. Add oil, stirring to combine.

Add buttermilk mixture to flour mixture; stir with a rubber spatula until just incorporated (do not overmix) and batter pulls away from sides of bowl. (Batter will be very wet.)

Drop batter in mounds of 2 heaping tablespoonfuls onto a baking sheet lined with parchment paper. Bake at 450° for 11 minutes or until golden. Cool 3 minutes; serve warm.

For a printer-friendly version of this recipe, please click here:  Fluffy Buttermilk Drop Biscuits

Basic Tomato Salsa

Basic Tomato Salsa

When I was pregnant with my first daughter, I felt horribly sick.  For the first three months, I had this nauseous feeling constantly.  Fortunately I never really got sick, but unfortunately I just couldn’t get that feeling to go away.  I ate a lot of saltines those first few months, and also craved salsa.  For the most part I only craved salty foods – in fact, sweet foods made me sick.  I could not even think about eating chocolate, that was out of the question.  I only wanted the savory stuff.

What surprised me the most is what I wanted with the salsa – it was primarily scrambled eggs.  Eating scrambled eggs by themselves made me want to be sick – but putting some delicious salsa all over the top made it into the most perfect meal ever.  I ate a lot of salsa those 9 months, and when I got pregnant for the second time – I knew exactly what I needed.  More salsa.

Most of my canning is focused on jams and jellies – and occasionally pickles.  This year though I promised myself I would branch out just a little further – and as I walked through the fall farmer’s market, looking at all those beautiful peppers and tomatoes – it was salsa that kept calling me.  I saw a recipe in the Food in Jars cookbook, and I figured like I had nothing to lose.  One way or another, I would find a way to use these amazingly fresh ingredients – even if the salsa came out tasting horrible.

Lucky for me – it was quite the opposite.  I kept going back to the pot for more tastes – I couldn’t believe how delicious this salsa was.  I seriously almost scrambled myself some eggs just to get the full effect – but I wanted to get as much as possible into the jars.  Once I processed them, they were just so beautiful, I couldn’t stop staring.  In fact – I had to strategically place them in the pantry so whenever I open the door – they are staring right back at me.  Salsa will always have a special place in my belly – and in my heart.

Ingredients

  • 6 cups chopped Roma or paste tomatoes (about 3 pounds)
  • 2 cups chopped yellow onion (about 2 medium onions)
  • 1 cup chopped red bell pepper (1 large pepper)
  • 1 3/4 cups cider vinegar
  • 1/4 cup granulated sugar
  • 3 jalapeno or pablano peppers, minced
  • 4 garlic cloves, minced
  • 2 tablespoons bottled lime juice
  • 1 tablespoon sea salt
  • 1 cup chopped fresh cilantro

Preparation

Prepare a boiling water bath and sterilize 4 regular-mouth 1-pint jars. Place the lids in a small saucepan, cover with water, and simmer over very low heat.

Combine the tomatoes, onion, chopped red pepper, vinegar, sugar, jalapenos, garlic, lime juice, and salt in a large pot. Bring to a boil, then reduce the heat and simmer for 10 minutes or until the salsa no longer looks watery. Stir in the chopped cilantro (or parsley). Taste and add additional jalapeno, lime juice, or salt if necessary.

Ladle the hot salsa into the prepared jars, leaving 1/2 inch of headspace. Wipe the rims, apply the lids and rings, and process in a boiling water bath for 15 minutes. When the processing time is up, remove the canning pot from heat and remove the lid. Let the jars sit in the pot for an additional 5 minutes This helps to prevent the salsa from reacting to the rapid temperature change and bubbling out of the jars.

For a printer-friendly version of this recipe, please click here:  Basic Tomato Salsa

Now for my friends in Australia – for specialized catering in Melbourne Click here , for a wide range of events such as corporate catering, product launches, conference catering, private functions and party catering.