Oatmeal Muffins

Oatmeal Muffins

Wow, can it actually be Valentine’s Day tomorrow already?  My girls have been excited for Valentine’s Day for weeks – the other night my older daughter asked if we could go to my closet and pick out my outfit.  For a split second I thought she was talking about for the next day…then I realized, she was talking about Valentine’s Day.  Let’s see if I can actually remember to wear red tomorrow morning – it is not really my thing, but I know it would make them so happy if I did.

So, my older daughter is having a Valentine’s Day brunch party at school – and I can’t believe it – but this is her last year of parties…next year she will be in middle school.  She was told to bring something you would eat for breakfast – she even gave me some suggestions on what she could bring – bacon, eggs, sausage…seriously?  How would that survive the bus ride, and then the couple of hours of school before the party?  I just laughed.  Then she suggested muffins – ok then, excellent choice.

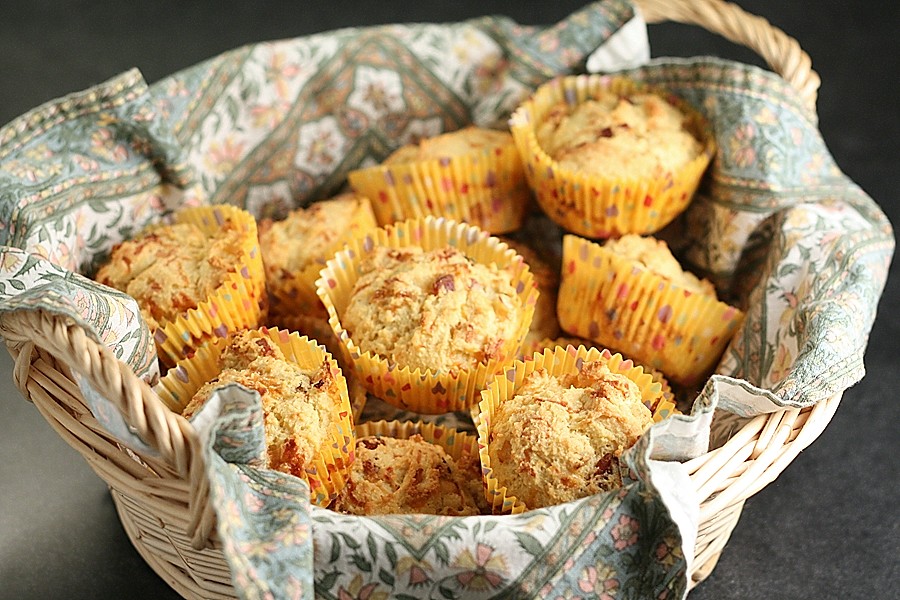
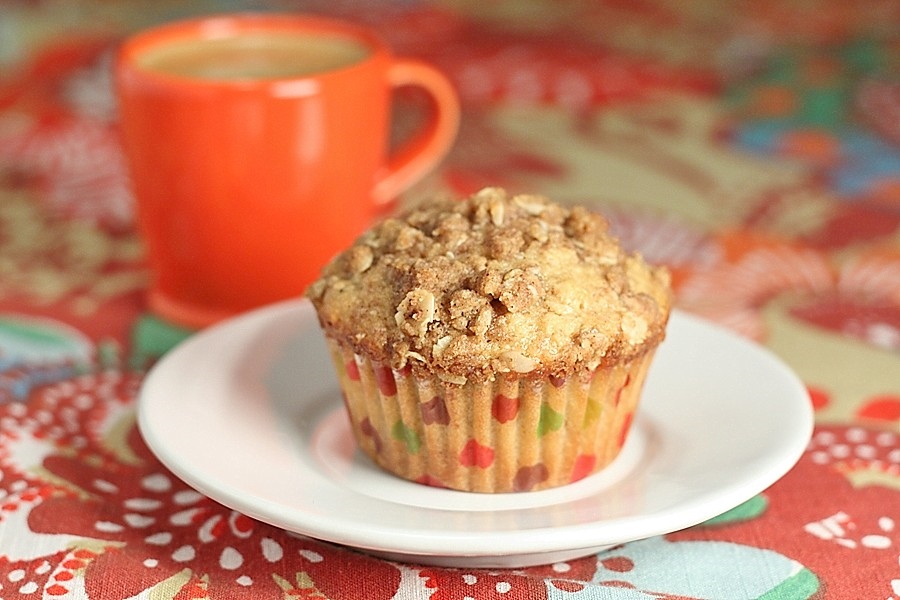
I went to the pantry to look in my recipe file, and there they were – sitting there, just waiting for an occasion.  I have to admit though, staring at the title, they did not sound that appealing.  I had to convince her that these would be delicious, even though I was definitely skeptical myself.  We made them this weekend, and I swear – these are better than the Quaker Maple and Brown Sugar Oatmeal you buy in those individual packets.  These were AMAZING!!  Cook’s Illustrated really hit a home run here.  The funny part of this recipe is that the batter actually looks like oatmeal!  These were some of the best muffins I have ever made – oh, and that topping – to die for!!  What a winning recipe.  So – if you are still up at this hour, trying to decide what to make for your loved ones tomorrow – how about surprising them with some of these lovely baked goods?  Oh, and don’t forget to wear red tomorrow!

Ingredients

Topping

  • 1/2 cup old-fashioned rolled oats (1 1/2-oz)
  • 1/3 cup all-purpose flour (1 2/3-oz)
  • 1/3 cup pecans, finely chopped (optional)
  • 1/3 cup packed light brown sugar (2 1/3-oz)
  • 1 1/4 teaspoons ground cinnamon
  • 1/8 teaspoon salt
  • 4 tablespoons unsalted butter, melted

Muffin Base

  • 2 tablespoons unsalted butter, plus 6 tablespoons unsalted butter, melted
  • 2 cups old-fashioned rolled oats (6-oz)
  • 1 3/4 cups all-purpose flour (8 3/4-oz)
  • 1 1/2 teaspoons salt
  • 3/4 teaspoon baking powder
  • 1/4 teaspoon baking soda
  • 1 1/3 cups packed light brown sugar (9 1/3-oz)
  • 1 3/4 cups milk
  • 2 large eggs, beaten

Preparation

Topping

Combine oats, flour, pecans, sugar, cinnamon, and salt in medium bowl. Drizzle melted butter over mixture and stir to thoroughly combine; set aside.

Muffins

Grease and flour 12-cup muffin tin. Melt 2 tablespoons butter in 10-inch skillet over medium heat. Add oats and cook, stirring frequently, until oats turn golden brown and smell of cooking popcorn, 6 to 8 minutes. Transfer oats to food processor and process into fine meal, about 30 seconds. Add flour, salt, baking powder, and baking soda to oats and pulse until combined, about 3 pulses.

Stir 6 tablespoons melted butter and sugar together in large bowl until smooth. Add milk and eggs and whisk until smooth. Using whisk, gently fold half of oat mixture into wet ingredients, tapping whisk against side of bowl to release clumps. Add remaining oat mixture and continue to fold with whisk until no streaks of flour remain. Set aside batter for 20 minutes to thicken. Meanwhile, adjust oven rack to middle position and heat oven to 375°F.

Using ice cream scoop or large spoon, divide batter equally among prepared muffin cups (about 1/2 cup batter per cup; cups will be filled to rim). Evenly sprinkle topping over muffins (about 2 tablespoons per muffin). Bake until toothpick inserted in center comes out clean, 18 to 25 minutes, rotating muffin tin halfway through baking.

Let muffins cool in muffin tin on wire rack for 10 minutes. Remove muffins from muffin tin and serve or let cool completely before serving.

For a printer-friendly version of this recipe, please click here:  Oatmeal Muffins

Apple Trefoils Crisp

Apple Trefoil Crisp

It is that time again – just when the holiday blues start wearing off, when you see those brightly colored boxes of delicious cookies.  Yes, it is Girl Scout Cookie time!  And like last year, the Girl Scouts of Western Washington are having another recipe contest.  Since I came in 2nd place last year, I figured I had to try again. And again, like last year – if I can win some money out of this contest, I would like to do something really special – I would like to donate the money to a charity – and I am going to ask you – my readers – to choose the charity.  That’s right – so stayed tuned for more on that – no sense in giving more details if I am not a finalist.

Unlike last year, where the sky was the limit when it came to making up a recipe – I really had to control myself this year.  After all, I am still on this simplicity kick – and not only that, I wanted to make something a little healthier.  I thought about fruit, and what I could do with Girl Scout Cookies and fruit, and then I remembered where I live – in Washington State…so how could I not make something with Washington Apples??  It is extremely important to support your local economy – especially in the midst of a contest.  So – there it was, staring me in the face – an apple crisp, and what could be better than making a topping using the tried and true Trefoils Shortbread Cookie.

I was pretty impressed with how good this came out.  I made it in a skillet and then put that skillet in the oven – how’s that for simplicity?  The crisp was delicious, especially the topping – but combined with those caramelized apples, boy was it a treat – and the best part of all, I let my kids have seconds.  I actually felt good about serving it for dessert.

Just a few reminders – Girl Scout Cookies are on sale from March 1-17! There is an awesome cookie locator, as well as an app, that tells you exactly where girls are selling cookies in your neighborhood! They won’t be updated until closer to the sale, but are very good to keep handy.  Then you too can buy some cookies and make this awesome and simple crisp, that supports our local farms!

Ingredients

Topping

  • 1 1/2 sleeves of Trefoils Girl Scout Cookies
  • 3/4 cup old-fashioned rolled outs
  • 1/4 cup packed light brown sugar
  • 1/2 teaspoon ground cinnamon
  • 1/2 teaspoon table salt
  • 4 tablespoons (1/2 stick) unsalted butter, melted

Filling

  • 3 pounds Golden Delicious apples, peeled, cored, halved, and cut into 1/2-inch-thick wedges
  • 1/4 cup granulated sugar
  • 1/2 teaspoon ground cinnamon
  • 1 cup apple cider
  • 2 teaspoons juice from 1 lemon
  • 2 tablespoons unsalted butter

Preparation

Make the topping:  Adjust the oven rack to the middle position and heat oven to 450 degrees.  Put the Girl Scout cookies in a food processor and crush until fine.  Combine the cookies, oats, brown sugar, cinnamon, and salt in a medium bowl.  Stir in butter until mixture is thoroughly moistened and crumbly.  Set aside while preparing the fruit filling.

Make the filling:  Toss the apples, granulated sugar, and cinnamon (if using) together in a large bowl;  set aside.  Bring cider to a simmer in a 12-inch oven-safe skillet over medium heat; cook until reduced to 1/2 cup, about 5 minutes.  Transfer reduced cider to a bowl or liquid measuring cup; stir in lemon juice and set aside.

Heat butter in a now empty skillet over medium heat.  When foaming subsides, add apple mixture and cook, stirring frequently, until apples begin to soften and become translucent, 12 to 14 minutes.  (Do not fully cook apples.)  Remove pan from heat and gently stir in cider mixture until apples are coated.

Sprinkle topping evenly over fruit, breaking up any large chunks.  Place skillet on baking sheet and bake until fruit is tender and topping is deep golden brown, 15 to 20 minutes.  Cool on a wire rack until warm, at least 15 minutes, and serve.

Serve the apple crisp warm or at room temperature with vanilla ice cream, whipped cream – or just by itself.

Serves 6-8

For a printer-friendly version of this recipe, please click here:  Apple Trefoils Crisp

Cool as a Cucumber

Cool as a Cucumber 1

Is it the weekend yet?  I’m not sure why, but this seemed like a really long week.  It may have started when my younger daughter – upset at her sister for trying to make her take a shower first – ripped the towel hook off the wall (and made a nice big hole in the wall) when her older sister asked her to hand her the towel.  Or when my older daughter called from school because her ear hurt, when I was just about to leave work to take my younger daughter to the doctor.  Or when I got an email about my younger daughter’s school that was in lock-down because of a man who robbed a bank 15 blocks from the school – and actually escaped.  Or maybe when I dumped rice all over the my office, and I had to pick up the pieces one by one before I stepped on them and smashed them into the dark brown solid colored carpet – who thought that color was a good idea?

I know these are all little things (ok, maybe not the bank robber), but they take their toll.  I am ready for a break.  I am ready for a drink.  When it comes to drinks, I am definitely partial to cucumber drinks.  I have posted my share on this site, and each one has been delicious in their own way – but this one was exceptionally good.  This one was actually healthy – there was no peeling of the cucumber – you just cut off the ends, and put the entire thing in a blender.  After you strain the solids, you end up with this beautiful green cucumber juice – crisp and clean.  Wow.

So, for those of you who don’t drink alcohol – you can still enjoy this refreshing drink, the cucumber juice with lime juice and simple syrup is definitely a treat.  Better yet, you can get your kids to eat their vegetables, and they would never in a million years believe you that this was good for them.  My mind is starting to churn…there is a lot I can do in this space.

Here’s to the weekend – that is not here yet, but soon enough.  For those of you on the east coast – blend your cucumber tonight, before the storm hits.  You will thank me later.  Stay safe and warm everyone – and Cool as a Cucumber!

Ingredients

  • 2 tablespoons strained cucumber, made from blending an English cucumber
  • 3 tablespoons Effen Cucumber Vodka
  • 1 tablespoon elderflower liquor
  • 1 tablespoon fresh lime juice
  • 1 tablespoon simple syrup or agave nectar

Preparation

Mix all ingredients together in a shaker with ice.  Serve in a martini glass with a garnish of cucumber (peel a long strip of cucumber and fold it onto a toothpick).

For a printer-friendly version of this recipe, please click here:  Cool as a Cucumber

Creamy Spinach and Feta Dip

Creamy Spinach and Feta Dip

I have to mark this day on the calendar.  It is not often that I am cooking on a Saturday (in preparation for another day), let alone posting.  To tell you the truth, it has been far too long since I have been organized enough for me to carve out part of my Saturday.  Well – I did it!!  I can’t believe I am sitting here typing while there is still light in the sky.  Amazing.

For the past few years, I really have become a “just in time” gal.  I was never like that before I had kids – life has gotten more complicated over the years, and I can never catch up.  I have to say, I hate it – I hate running from one thing to the next, barely on time, cramming as much as I can into each and every day.  Today things were different.  I planned my day very carefully, and my prize?  I am completely ready for tomorrow.  I am smiling from ear to ear.

So – the funny part of this whole thing?  I made a few appetizers to bring to our friend’s house, and I decided to set it all up outside to take pictures.  When my girls came downstairs to see what I was doing, they were completely confused.  They thought I forgot to tell them about a party we were having.   I can’t wait until they grow up and tell people about their mom the crazy food blogger.

It is not often that I post similar entries right in a row, but tomorrow is the Super Bowl, and I just finished making this for the big game, and had to share it with all of you.  Don’t get me wrong, the Caramelized Onion and Shallot Dip was delicious…but that was before I tried this one from Cooking Light.  This is a much healthier option, and more of a Mediterranean taste.  Not only is this great for vegetables, it would be amazing as a sauce for grilled chicken or steak, it would be delicious with pita, the list goes on and on.  If you are in the market for a good healthy dip, look no further.

So – I am going to go clean-up the mess I made, because after all, having a party definitely can make a mess.  Good thing I was the only one that attended – that means I will have more time to relax afterwards….YEAH!!!!

Ingredients

  • 6 ounces nonfat Greek yogurt
  • 3/4 cup crumbled feta cheese
  • 2 ounces 1/3-less-fat cream cheese, softened
  • 1/4 cup low-fat sour cream
  • 1  garlic clove, crushed
  • 1 1/2 cups finely chopped fresh spinach
  • 1 tablespoon fresh dill
  • 1/8 teaspoon black pepper

Preparation

Place yogurt, feta cheese, cream cheese, sour cream, and crushed garlic clove in a food processor; process until smooth. Spoon yogurt mixture into a medium bowl; stir in spinach, fresh dill, and black pepper. Cover and chill.

For a printer-friendly version of this recipe, please click here:  Creamy Spinach and Feta Dip

Caramelized Onion and Shallot Dip

Roasted Onion Dip

I hear there is a big football game this weekend – yes, the biggest game of the year.  Pretty much the only football game I actually even remotely pay attention to – and that is really just for one reason…the food that goes along with it.  Football is a very important part of my husband’s life.  Usually next week starts his mid-winter depression, not because of the weather, but because there is no more football, and baseball hasn’t started yet.

I haven’t decided what I am making for the big game yet, although I have a lot of different ideas.  Some may be repeats of the past few weeks – this whole simplicity thing is just not working for me.  One of the ways I have been trying to simplify is with my pictures for the blog.  In these long winter days, I hardly ever have a chance to get some good light.  Even on the weekends – it is ridiculously dark here when it is raining – oh, and have I talked about the fog we have had recently?  I feel like I have been stuck inside a cloud.  Just when we thought the fog was over, it came back again yesterday.  That does not help my light cause what so ever.

So – back to the original point – simplicity.  Instead of moving the food into the office where I have a nice lamp set up to give the artificial light my pictures need, I have been trying to photograph in the kitchen.  Things have not been going so well – and it is not helping that I snap about 5 pictures, and call it good.  I have never been much for taking a ton of pictures, but usually I have to take at least about 10 to get a decent shot.  Needless to say, I have been extremely disappointed with my pictures lately, and I have to turn things around.  So – you may be seeing some updated pictures on the blog – as I throw simplicity out the window – that is when it comes to photos.

So, just in case you are looking for something to make for the big game – how about a good old fashion homemade French Onion Dip?  Remember that stuff, with the Lipton Onion Soup?  I could eat that with a spoon.  Well – here is the real deal. If you like French Onion Dip – this recipe from Bon Appetit is for you.  It is definitely different – not nearly as salty – and you can actually tasted the roasted onion and shallot flavor.  Not even a month into this resolution, and I am already backing off on simplicity – and I am making homemade French Onion Dip.  It is going to be a long year…

Ingredients

  • 2 pounds large yellow or white onions, thinly sliced
  • 2 large shallots, thinly sliced  (about 6 ounces total)
  • 4 sprigs thyme
  • 1/4 cup olive oil
  • Kosher salt and freshly ground  black pepper
  • 1 cup dry  white wine
  • 2 tablespoons Sherry  vinegar
  • 2 cups sour cream
  • 1/4 cup minced fresh chives
  • 1/4 cup plain whole-milk Greek yogurt
  • 2 teaspoons onion  powder

Preparation

Preheat oven to 425°. Mix onions, shallots, thyme sprigs, and  oil in a large roasting pan. Season with salt and pepper.

Roast onion mixture, stirring and scraping down sides of pan  every 10 minutes, until mixture starts to break down and turn golden brown,  45–55 minutes.

Discard thyme sprigs. Add wine and vinegar; stir to scrape up  any browned bits from bottom of pan. Return onion mixture to oven. Continue  roasting, stirring occasionally, until deep golden brown and completely  caramelized, about 15 minutes longer. Spread onion mixture out on a rimmed  baking sheet to cool.

Transfer onion mixture to a work surface and mince. Transfer  to a medium bowl. Stir in sour cream, chives, yogurt, and onion powder. Season  with salt and pepper.

DO AHEAD Dip can be made 3 days  ahead. Cover; chill. 

For a printer-friendly version of this recipe, please click here:  Caramelized Onion and Shallot Dip

Roasted Red Pepper Soup Shots

Red Pepper Soup Shots

It is amazing what a good somewhat relaxing weekend can do for you.  For the first time in weeks, I am actually ready for the week to come.  I got a ton done this weekend, and caught up on some much-needed sleep.  I feel like a new person – now let’s see how long it takes for that to all come undone…

So lately I have had a bit of a glass fetish.  I find myself combing Etsy for the vintage glassware – and believe me, I have stocked my bar with some keepers.  I completely turned over my somewhat modern looking glassware for all vintage stuff – ranging from the 30s  (I think) through the Mad Men era.  I am quite pleased with my collection, and love having people over so I can try them out.  Most of my more modern glasses were pretty easy to part with.  I was never really fond of them, but they were what I had – and there was no use in getting new ones.  I brought a big bag over to Goodwill and had a good time thinking about how someday maybe these glasses would become vintage…but it will be quite a while before that happens.

As I was going through my glasses, I found these tall shot glasses that I had only used once before.  That right there should have been the nudge I needed to part ways, but there was something telling me that I should hold onto them.  So, I moved them to a different cabinet – one that wouldn’t make me think of them as glasses to drink out of, but instead glasses to serve from.  It was not long afterwards that I found this recipe in Bon Appetit for these Roasted Pepper Shooters – that was it.  That was exactly what is supposed to go in these glasses.  They are appetizer glasses – or as they say in fancy restaurants – for an “Amuse Bouche.”  Something to waken your palate in anticipation of the meal.  So – when I had some friends over, I whipped this up (and literally, that’s exactly what I did – they were that easy).  My only mistake is that I did not serve them chilled.  We had the leftovers the next night – nice and chilled, and they were fantastic.  I wanted an entire bowl – which is exactly what a good Amuse Bouche does.  Now, let the week begin!

Ingredients

  • one 16-ounce jar fire-roasted red peppers with  their juices
  • 1 tablespoon Sherry vinegar
  • 1/2 teaspoon  kosher salt
  • 1/4 teaspoon black pepper
  • 1/4 cup extra-virgin olive oil

Preparation

Purée the first four ingredients in a  blender on high speed until very smooth, about 1 minute. With motor running,  gradually add the olive oil. Season to taste  with salt, pepper, and more vinegar, if  desired.

DO AHEAD Soup can be made 1 day ahead. Cover;  chill.

Divide soup among small cups or shot glasses.

For a printer-friendly version of this recipe, please click here: Roasted Red Pepper Soup Shots

Sweet and Spicy Nut and Pretzel Mix

Snack Mix

Oh…the snack mix.  That wonderful mix of salty treats that you most often eat on an airplane.  I love them.  In fact, I have actually gone to the King Nut web page just to see how much it would cost to get some of that deliciousness.  We are not talking about the ordinary Chex Mix you get in the markets – this is a special mix that only the airplanes seem to have.  I always chicken out…but don’t think I haven’t come close.  I hate thinking I have to get on an airplane to eat the snacks I love.

Lately my family has been eating a lot of Chex cereal – it is gluten and dairy free (which makes one person in the family extremely happy), crunchy with milk, and as far as cereals go – low sugar content and pretty healthy.  One day the cereal was on the counter, and my daughter spotted the recipes.  I knew it was coming eventually.  She wanted to make the snack mixes.  Well, I had already been preparing for that day – and actually surprised her with an even better recipe – one that I found from Cooking Light.  We decided to take bits and pieces of each recipe, change a couple of ingredients to match what we had in the house – and make our own.   Wow was this good.  They were salty, buttery and sweet all at the same time – and then the heat kicks in – just the right amount of heat.  Perfect for serving with cocktails or any other type of beverage.

So – who needs King Nut now?  I certainly don’t.  What I need now is some more of this snack mix.  Oh, and a nice cocktail would be fabulous…

Ingredients

  • 3 tablespoons brown sugar
  • 2 teaspoons chopped fresh thyme, divided
  • 3/4 teaspoon kosher salt
  • 1/2 teaspoon ground cinnamon
  • 1/4  teaspoon ground red pepper (optional)
  • 1/2 cup cashews
  • 1/2 cup blanched almonds
  • 1 1/2 tablespoons butter
  • 3 cups tiny unsalted pretzels
  • 1 cup crispy rice cereal squares (such as Rice Chex)
  • 2 tablespoons maple syrup

Preparation

Preheat oven to 350°.

Combine brown sugar, 1 teaspoon thyme, salt, cinnamon, and red pepper in a small bowl.

Combine cashews and almonds on a jelly-roll pan. Bake at 350° for 10 minutes or until the nuts begin to brown. Combine the pecan mixture and butter in a medium bowl, stirring until butter melts. Gently stir in pretzels, cereal, and syrup. Sprinkle the sugar mixture evenly over pretzel mixture; toss gently to coat. Spread pretzel mixture in a single layer on jelly-roll pan. Bake at 350° for 10 minutes, stirring once. Sprinkle with the remaining 1 teaspoon thyme. Cool completely.

For a printer-friendly version of this recipe, please click here:  Sweet and Spicy Nut and Pretzel Mix

Potato Chip Cookies

Potato Chip Cookies

I am officially exhausted.  I am holding up the white flag.  So much for 2013 being the year of simplification – the last two weeks have been anything but that.  I think I knew that was going to be the case, and was trying to convince myself if I just focused on simplifying, everything would be ok.  Well, I survived.  I got through the last two weekends of visitors, 20 hours of rehearsals (for my older daughter), 5 performances of Bye-Bye Birdie (which she performed and I attended), and a surprise project at work that definitely had my mind working in overdrive.  I am really looking forward to normalcy, let alone simplification.  Normal sounds about perfect right now.

So what exactly is normal anyway?  I certainly don’t operate under normal conditions in any part of my life – particularly when it comes to food.  For those of you who follow this blog, you know I love a good twist on a recipe – candy sushi and meatloaf cupcakes are just a few of my favorites.  So – when my best friend from high school sent me this recipe for Potato Chip Cookies that she got from The Chew – even among all the craziness in my life the past couple of weeks – I just couldn’t put off making them.  Of course, I cut corners when it came to taking this picture, but I had to simplify somewhere, right?  These cookies were something else – and they got better the longer they sat – they were like a salty sweet shortbread cookie that was perfectly crunchy.  You either couldn’t live with the dark chocolate side, or you couldn’t live without it – I had both reactions from people.  Either way, this recipe is definitely a keeper.

So – I am signing off now, and heading to bed.  I hope when I wake up tomorrow, I feel like a new person – without a white flag attached to the top of my head.  I am allowed to dream, right?

Ingredients

  • 1 cup butter, softened
  • 3/4 cup sugar
  • 2 cups all-purpose flour
  • 1 teaspoon vanilla
  • 1 1/4  cups coarsely crushed potato chips, divided
  • 1/4 cup confectioner’s sugar
  • 7 oz. dark chocolate, melted

Directions

Preheat oven to 350 degrees.

In a large mixing bowl cream butter and sugar until fluffy.  Reduce mixer speed to low, and add 3/4 cup of crushed potato chips and mix well.  Add vanilla, then add the flour and mix just until combined, do not over mix the dough.

Use a spoon to scoop small 1-inch balls of dough onto a lightly greased or parchment lined cookie sheets, 2 inches apart.  Dust each cookie with a bit of confectioners sugar, and press flat.  Bake 10-15 minutes, or until light brown around the edges.  Remove to wire rack to cool.

Dip each of the cookies in the melted chocolate.  While the chocolate is still soft, place the chocolate covered portion into the rest of the crushed potato chips to lightly coat.  Allow to set before serving.

Makes about 3 dozen.

For a printer-friendly version of this recipe, please click here:  Potato Chip Cookies

Rosemary Cornmeal Biscotti

Biscotti

In Seattle, the trees and flowers never seem to stop growing.  Now before I really get into this post – I want to explain something – I am not a gardener.  That is my husband’s area.  I focus on the inside of the house – he deals with the outside.  I have never really had an interest in flowers or flowering trees – the only plants I really get into growing are herbs, and that is purely because I can use them in the kitchen.  It is so nice to always have fresh herbs to cook with.  So – it annoys me at times that in Seattle, there is always something blooming.  I just looked out the kitchen window the other day, and yes, in the dead of the winter, there are flowers starting to bloom.  At least I actually noticed them – I remember when I was in college, my mother asked me to water the flowers outside while they were away.  They came home, and the flowers were dead.  She was livid – and would you believe that I didn’t even realize there were flower boxes on attached to the house that she wanted me to water?  I just thought she was talking about the big pot outside the front door.

One of the most prolific plants out here is rosemary – I have actually seen it used as a hedge – it grows that much.  Rosemary is awesome, I love having a fresh rosemary plant that I can use whenever I am roasting meat, potatoes, vegetables – the sky is the limit.  But, I don’t often bake with rosemary – that was until I made these at The Pantry.  These were such a unique cookie – they were sweet, crunchy and herbaceous – which is really not how I have ever described a cookie before.  I couldn’t stop eating them because they were so unique.  So – if you are sick of looking at that overgrown rosemary plant in your back yard, here is an idea – instead of using it for your roasted chicken, how about a batch of these?  They almost made me appreciate my garden just a little bit more – which is a good thing – I think.

Ingredients

  • 2 ¼ ounces (1/2 cup) coarsely chopped almonds
  • 1 ounce (1/4 cup) coarsely chopped hazelnuts
  • 2 ounces (4 tablespoons) unsalted butter
  • 1 ½ tablespoons finely grated orange zest
  • 1 tablespoon minced fresh rosemary
  • 4 ½ ounces (1 cup) all-purpose flour
  • 2 ½ ounces (1/2 cup) coarse yellow cornmeal
  • 3 ¾ ounces (1/2 cup) sugar
  • 1 teaspoon baking soda
  • 1 teaspoon anise seeds
  • ¼ teaspoon kosher salt
  • 2 large eggs
  • Egg wash made with 1 egg and 1 tablespoon water

Preparation

Preheat oven to 350 degrees.  Spread the nuts on a baking sheet and toast them in the oven until they are lightly golden, about 8-10 minutes.  Set aside to cool; keep oven on.

In a small saucepan, melt the butter over medium heat.  Remove from heat and add orange zest and rosemary.  Set aside to cool.

In the bowl of a mixture, mix the flour, cornmeal, sugar, and baking soda, anise seeds and salt.  Add the eggs one at a time, mixing well after each egg.  Add the cooled butter mixture and mix to combine.  Stir in the nuts, then let rest for a few minutes.

With wet hands, form the dough into a log 2 inches wide and place it on a parchment-lined baking sheet.  Brush the log with the egg wash and bake until it is a deep golden brown, about 30 minutes.  Let it cool on a wire rack.  Reduce oven to 200 degrees.

Once cooled, using a serrated knife, slide the log on the diagonal into ¼ inch slides.  Arrange the biscotti on two parchment-lined baking sheets and bake until crisp, about 1 hour.

Cool completely before storing in an airtight container.

Makes about 30 biscotti.

For a printer-friendly version of this recipe, please click here:  Rosemary Cornmeal Biscotti

Bacon, Onion, and Cheddar Corn Muffins

Onion Cheddar Bacon Corn Muffins

When I was little we would go to my grandmother’s house during the summer – she lived near the ocean, where we would spend our days.  She was an excellent cook, but like all good grandmothers, she wanted her grandchildren to be happy, and always asked us what we wanted for breakfast and lunch.  Of course my sister and I would always choose the same things – and it was because we hardly got these at our house.  We asked for Jiffy Corn Muffins for breakfast, and Kraft Macaroni and Cheese for lunch.  We ate these treats every day – and never got sick of them.  In fact, even today, I often crave a good box of Jiffy Corn Muffins – it is a blast from the past for me to sink my teeth into those sweet little morsels.  Although, over the years, I have discovered that homemade corn muffins can actually taste even better.  I know, can you believe it?  It’s all about bacon…and seriously, what doesn’t taste better with bacon?

This reminds me of another story – and then I promise to get back to these corn muffins.  Years ago my husband’s parents took us to Napa Valley for the weekend, and we stayed at this beautiful B&B in Yountville – this was when Yountville barely existed, and I swear this B&B may have been the only thing in this town.  We woke up to the wonderful smell of bacon – it was incredible.  It got us right up out of the comfortable bed, all dressed – and downstairs for breakfast.  When they told us what was on the menu – we asked where the bacon was?   They laughed – that was just to get people up – they weren’t serving it.  ARE YOU FREAKING KIDDING ME????  We were besides ourselves, and the rest of the trip we were craving bacon.

So – what does these two stories have in common?  This recipe that I found in Cooking Light.  This recipe that combines a wonderful corn muffin with the perfect taste of bacon – and add a little onion and cheddar, then you have really have yourself a party in your mouth.  These are the perfect side dish to chili, soup or just about anything you serve for dinner.  Remember, everything is better with bacon – that is if you actually get to eat it…

Ingredients

  • 2  slices bacon
  • 3/4 cup chopped onion
  • 1 1/4 cups fat-free buttermilk
  • 1/4 cup olive oil
  • 1  large egg, lightly beaten
  • 4.5 ounces all-purpose flour (about 1 cup)
  • 3/4 cup yellow cornmeal
  • 2 teaspoons baking powder
  • 1/4 teaspoon baking soda
  • 1/4 teaspoon salt
  • 1/8 teaspoon ground red pepper
  • 2 ounces shredded sharp cheddar cheese (about 1/2 cup)
  •  Cooking spray

Preparation

Cook bacon in a skillet over medium heat. Remove bacon, reserving drippings in pan. Drain bacon; crumble. Increase heat to medium-high. Add onion to drippings in pan; sauté 5 minutes.

Preheat oven to 400°.

Combine buttermilk, olive oil, and egg.

Weigh or lightly spoon flour into a dry measuring cup; level with a knife. Combine flour and next 5 ingredients (through pepper) in a bowl, stirring well with a whisk. Make a well in center of flour mixture. Add milk mixture; stir just until moist.

Stir in bacon, onion, and cheese. Spoon into 12 muffin cups coated with cooking spray.

Bake at 400° for 13 minutes or until a wooden pick inserted in center comes out with moist crumbs clinging. Remove muffins from tins; cool on a wire rack.

For a printer-friendly version of this recipe, please click here:  Bacon, Onion, and Cheddar Corn Muffins