Fluffy Buttermilk Drop Biscuits

Fluffy Buttermilk Drop Biscuits

Accountability.  What an important word.  Over the years, it has become more and more important for various reasons.  It was not a word I really focused on until I was an adult – and the word really made an impression on me with respect to work.  When you are a kid – you always want to blame everyone else for anything that goes wrong.  Mom gets a big brunt of these…but seriously, it is always someone else’s fault.  At times, that can be accurate – but it most cases, everyone has some aspect of accountability in the situation.

We are dealing with a tricky issue right now with my younger daughter.  There is a boy in her class that has been bothering her for quite some time.  At first it seemed innocent enough, and that maybe he had a crush on her – but unfortunately it has gotten a little more serious, and he has started to get physical.  There is always a part of me that wonders if she is egging him on – but at some point you cross the line.  Even some slight antagonism does not deserve physical violence or disparaging language.  Fortunately we are on a good path forward though with the teacher’s support.

Some adults though never really learn to hold themselves accountable – and it can be extremely damaging.  Sometimes all it takes is just a little humility – to let the other person see that you are not perfect.  Sometimes though you wait too long to hold yourself accountable, and by the time it hits you, it is too late.  The damage is done, and there is no going back.

When I started this blog, one of my hesitations was around accountability.  If I was going to post recipes, tell you how great they turned out – then you try them and they are bust – that wouldn’t make me feel very good.  Now I know like everyone else – cooking is as much of an art as it is a science.  Ingredients have a lot to do with how the recipes come out – and ingredients can be different depending on where you live, how fresh they are, etc…  Just last week I got a comment on my banana bread recipe – the person’s banana bread didn’t rise, and she didn’t understand why.  I suspected it had to do with the baking soda/powder she used – and maybe one of them had gone bad.  She tried it again with fresh baking soda/powder, and fortunately – it came out perfectly.  One of the reasons why I post so many recipes from Cooking Light and Bon Appetit – is they have a team of testers that make these recipes before they are published.  Then I make it myself – and if it turns out good – usually I put it on the blog.  I hold myself accountable to posting good quality recipes  – and if you can follow directions, you will come out with good results – but that doesn’t always happen – and when it doesn’t – I am truly sorry.

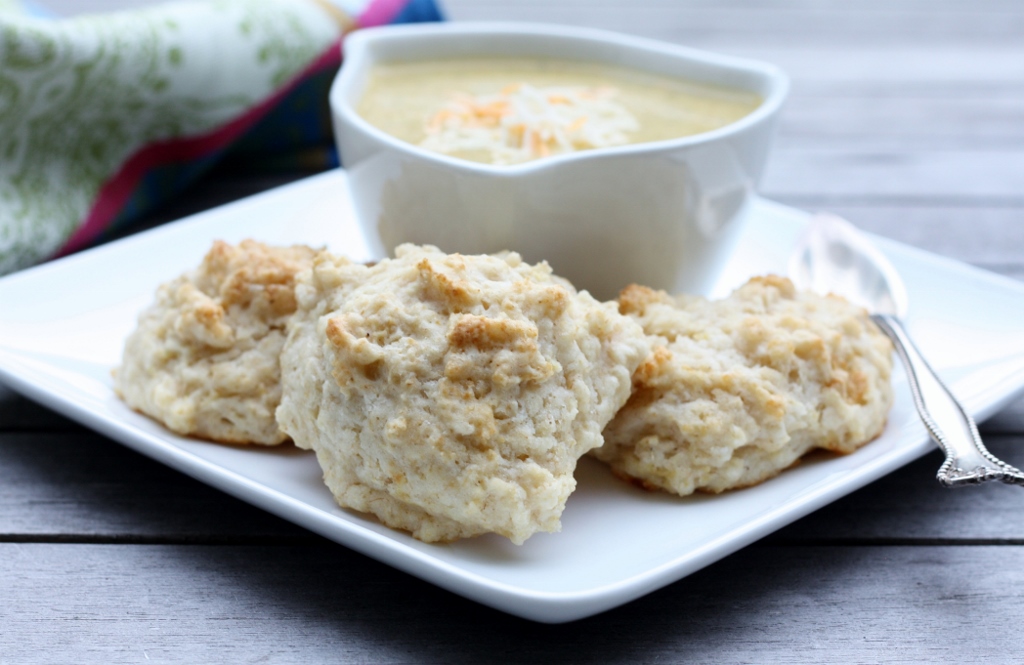
I know people were eyeing the biscuits that I posted last week with the Broccoli-Cheese Soup – so here they are.  I make a lot of biscuits, but this recipe from Cooking Light is really a keeper.  I loved how quick and easy these were – and that they were seriously light as a feather.  They were by far some of the best biscuits I have ever made – and you can hold me accountable if you don’t agree.

Ingredients

  • 5.6 ounces unbleached all-purpose flour (about 1 1/4 cups)
  • 3.6 ounces white whole-wheat flour (about 3/4 cup)
  • 2 teaspoons baking powder
  • 1 teaspoon sugar
  • 3/4 teaspoon salt
  • 1/2 teaspoon baking soda
  • 1/4 cup unsalted butter
  • 1 1/4 cups very cold fat-free buttermilk
  • 1 tablespoon canola oil

Preparation

Preheat oven to 450°.

Weigh or lightly spoon flours into dry measuring cups; level with a knife. Combine flours, baking powder, sugar, salt, and baking soda in a large bowl, stirring with a whisk to combine.

Place butter in a microwave-safe bowl. Microwave at HIGH for 1 minute or until completely melted. Add cold buttermilk, stirring until butter forms small clumps. Add oil, stirring to combine.

Add buttermilk mixture to flour mixture; stir with a rubber spatula until just incorporated (do not overmix) and batter pulls away from sides of bowl. (Batter will be very wet.)

Drop batter in mounds of 2 heaping tablespoonfuls onto a baking sheet lined with parchment paper. Bake at 450° for 11 minutes or until golden. Cool 3 minutes; serve warm.

For a printer-friendly version of this recipe, please click here:  Fluffy Buttermilk Drop Biscuits

Basic Tomato Salsa

Basic Tomato Salsa

When I was pregnant with my first daughter, I felt horribly sick.  For the first three months, I had this nauseous feeling constantly.  Fortunately I never really got sick, but unfortunately I just couldn’t get that feeling to go away.  I ate a lot of saltines those first few months, and also craved salsa.  For the most part I only craved salty foods – in fact, sweet foods made me sick.  I could not even think about eating chocolate, that was out of the question.  I only wanted the savory stuff.

What surprised me the most is what I wanted with the salsa – it was primarily scrambled eggs.  Eating scrambled eggs by themselves made me want to be sick – but putting some delicious salsa all over the top made it into the most perfect meal ever.  I ate a lot of salsa those 9 months, and when I got pregnant for the second time – I knew exactly what I needed.  More salsa.

Most of my canning is focused on jams and jellies – and occasionally pickles.  This year though I promised myself I would branch out just a little further – and as I walked through the fall farmer’s market, looking at all those beautiful peppers and tomatoes – it was salsa that kept calling me.  I saw a recipe in the Food in Jars cookbook, and I figured like I had nothing to lose.  One way or another, I would find a way to use these amazingly fresh ingredients – even if the salsa came out tasting horrible.

Lucky for me – it was quite the opposite.  I kept going back to the pot for more tastes – I couldn’t believe how delicious this salsa was.  I seriously almost scrambled myself some eggs just to get the full effect – but I wanted to get as much as possible into the jars.  Once I processed them, they were just so beautiful, I couldn’t stop staring.  In fact – I had to strategically place them in the pantry so whenever I open the door – they are staring right back at me.  Salsa will always have a special place in my belly – and in my heart.

Ingredients

  • 6 cups chopped Roma or paste tomatoes (about 3 pounds)
  • 2 cups chopped yellow onion (about 2 medium onions)
  • 1 cup chopped red bell pepper (1 large pepper)
  • 1 3/4 cups cider vinegar
  • 1/4 cup granulated sugar
  • 3 jalapeno or pablano peppers, minced
  • 4 garlic cloves, minced
  • 2 tablespoons bottled lime juice
  • 1 tablespoon sea salt
  • 1 cup chopped fresh cilantro

Preparation

Prepare a boiling water bath and sterilize 4 regular-mouth 1-pint jars. Place the lids in a small saucepan, cover with water, and simmer over very low heat.

Combine the tomatoes, onion, chopped red pepper, vinegar, sugar, jalapenos, garlic, lime juice, and salt in a large pot. Bring to a boil, then reduce the heat and simmer for 10 minutes or until the salsa no longer looks watery. Stir in the chopped cilantro (or parsley). Taste and add additional jalapeno, lime juice, or salt if necessary.

Ladle the hot salsa into the prepared jars, leaving 1/2 inch of headspace. Wipe the rims, apply the lids and rings, and process in a boiling water bath for 15 minutes. When the processing time is up, remove the canning pot from heat and remove the lid. Let the jars sit in the pot for an additional 5 minutes This helps to prevent the salsa from reacting to the rapid temperature change and bubbling out of the jars.

For a printer-friendly version of this recipe, please click here:  Basic Tomato Salsa

Now for my friends in Australia – for specialized catering in Melbourne Click here , for a wide range of events such as corporate catering, product launches, conference catering, private functions and party catering.

Broccoli-Cheese Soup

Broccoli Cheddar Soup

Some weeks I feel like I am on a treadmill, and I can’t get off.  I am exhausted, but I have to keep going – otherwise it could get dangerous.  It is weeks like this that I just focus on getting off the treadmill safely.  Making sure I do the things I absolutely must do, while putting the other things aside.  Because seriously – what else can you really do when you are on a treadmill, except walk.  Trying to balance something on your head at the same time is just plain crazy.

Last week I got some very sad news.  A former boss of mine was in a horrible tragic accident.  I won’t go into details, but basically his life was cut short when he made a terrible mistake.  He was a father, a grandfather, and a leader.  People looked up to him.  He was a very good listener, and gave lots of good advice.  I worked for him when I was pregnant with my first child – and I remember the day that I told him I was pregnant.  He was so happy for me, he had this sparkle in his eye – he was looking forward to grandchildren.  A few years later, he got that gift.  If only he had lived long enough to retire, and spend more time with them.

When I came back from maternity leave, he was the first person I told about my decision to cut back.  I couldn’t work the hours I had worked before my daughter was born.  I wanted to work part-time, and I was willing to move to another team to find the balance I needed.  It was shortly after we had that conversation that I found a group that was willing to take me part-time.  I knew he felt a little like I had let him down.  I could see it in his face.  I had a team of people who counted on me, but I needed to focus on my family.  We parted ways, but things were never the same.  The last conversation I had with him was a few months ago.  He wanted me to talk to someone on his team that had kids, and needed more balance in their life.  He said he thought that I could really help this woman.  What was interesting to me is that he never stopped thinking of me in that way – I have been working full-time again for years now.  I certainly don’t feel that I am the poster child for balance anymore, but it works for me.  I am extremely productive at work, and at home – and with technology these days, it is amazing how much work I can fit in.  I never got the chance to tell him that all I really needed was a break.  I had to slow down for a few years – but I came back, with more energy than ever.

I leave you with a recipe that doesn’t take a ton of energy to put together.  This recipe from Cooking Light is just about as simple as it gets.  With an immersion blender, you just bought yourself even less time and energy.  When you are on that treadmill, you need a good healthy home cooked meal – and it doesn’t get much better than this.  Be careful out there…one wrong move is all it takes – particularly when you are balancing on that treadmill.  The goal is to have a nice steaming bowl of healthy soup when you get off, and someone to share it with.

Ingredients

  • 3 cups unsalted chicken stock
  • 1 3/4 cups broccoli florets, coarsely chopped (about 8 ounces)
  • 1 cup diced yellow onion
  • 1/2 cup chopped carrot
  • 3/8 teaspoon salt
  • 1/4 teaspoon freshly ground black pepper
  • 2  garlic cloves, minced
  • 3/4 cup half-and-half
  • 4 ounces shredded reduced-fat extra-sharp cheddar cheese, divided
  • 1/4 cup fresh flat-leaf parsley leaves

Preparation

Combine first 7 ingredients in a large saucepan; bring to a boil. Reduce heat, and simmer 10 minutes or until broccoli is tender. Pour soup into a blender. Remove center piece of blender lid (to allow steam to escape); secure lid on blender. Place a clean towel over opening in blender lid (to avoid splatters). Blend until smooth. Return soup to pan. Stir in half-and-half and 2 ounces cheese. Top evenly with remaining cheese and parsley.

For a printer-friendly version of this recipe, please click here:  Broccoli-Cheese Soup

Dairy-Free Cinnamon Apple Crisp

Dairy-Free Apple Crisp

How can it be the end of October already?  Fall is my absolute favorite baking season, and I feel like I have hardly scratched the service.  I cannot wait to get to the farmer’s market this weekend, and catch up on some much needed kitchen time.  I love travelling to new places, but boy it is good to get home.  I am in between cities right now, and I swear I could write an entire blog post about the food I have experienced this week – but it is apple time…

My husband has really been trying to stay away from dairy, and I have been encouraging it.  It is pretty easy to cook without dairy – and if I am making something with cheese, I just put cheese on part of it.  Therefore everyone is happy.  Baking is a different story though, and I am slowly learning what I can use to substitute with.  Milk and buttermilk is pretty easy – I can almost always use coconut milk, and the final product actually tastes even better – butter is a different story though.

My neighbors brought us a bunch of apples from their trees on the peninsula – and they were calling me to bake something with. I instantly thought of a crisp – and I had to make it dairy free.  I found this simple recipe on Bon Appetit online but was on a quest.  I found these earth balance sticks – and decided to give it a try.  They are not a great substitute for butter when making a cake – oil is much better for that, but I thought for a crisp they might just do the trick.  I was right – this crisp was amazing.  I shared it with my neighbors, and everyone agreed.  You would never have known that this was made without butter.  The topping was extremely simple – and gave it a nice sweet crisp bite – if you want, you could definitely add some oats for additional texture but I didn’t think it needed it.

OK – 8 days left in October and I am going to make the most of it…stay tuned!

Ingredients

  • 1/2 cup firmly packed golden brown sugar
  • 1 tablespoon ground cinnamon
  • 1 tablespoon fresh lemon juice
  • 3 1/2 pounds Granny Smith apples, peeled, cored,  sliced
  • 1 cup all purpose flour
  • 1 cup sugar
  • 1/2 cup (1 stick) chilled Earth Balance sticks, cut into  pieces (or butter, if you can eat dairy)

Preparation

Preheat oven to 450°F.  Butter 13x9x2-inch glass baking dish. Combine brown sugar and cinnamon in large bowl. Add apples and lemon juice, and toss to coat. Transfer apple mixture to prepared dish.

Combine flour, 1 cup  sugar and Earth Balance in a medium bowl. Using pastry blender or fingertips, blend  ingredients until coarse meal forms. Spread flour mixture evenly over apples.

Bake crisp 20 minutes.  Reduce oven temperature to 350°F. Bake crisp until apples are tender and topping  is golden brown, about 30 minutes. Let stand 15 minutes before serving.

For a printer-friendly version of this recipe, please click here:  Dairy-Free Apple Crisp

Butterscotch Blondies

Butterscotch Blondies

As my younger daughter would say, I am in another land.  A far away land – but with technology, fortunately I am never completely absent.  I woke up this morning to Skype my family, and it really made me homesick.  The girls were in the middle of baking cookies for their lunches this week – what fun.  This has become more and more of a Sunday afternoon ritual where my older daughter finds a recipe and goes at it.  They want to make sure they have fresh-baked goods for their lunches – and who wouldn’t?

The other weekend there was too much homework going on, so I actually got to orchestrate the weekend baking project for lunches.  My daughter picked out the recipe, and came back and forth from the kitchen to her homework – checking how things were going, helping here and there when she could.  I loved the recipe that she picked out, even before we made it.  Another Cooking Light special, and I knew it would be great.  The unique aspect of this recipe was the fact that it was a butterscotch batter…instead of just adding butterscotch chips once the batter is made.  The cake part was so moist and delicious with a strong butterscotch flavor, which was nicely offset by the dark chocolate chips.  I had to sneak a few myself – once for this lunch sac, one for me, one for the other lunch sac, another for me…

As I sit here typing this, I wonder what the school lunches look like here.  My daughter asked me last week what kids in France took for lunch at school, and I was reminded that they actually come and eat at home.  If they do take a lunch, one of the favorites I remember was the hot dog stuffed into a baguette.  I can pretty much guarantee that is not the case here.  Now off to what I hope is an authentic meal in this far away land.  No Butterscotch Blondies in this land!

Ingredients

  • 4.5 ounces whole-wheat pastry flour (about 1 cup)
  • 1/2 teaspoon baking powder
  • 1/2 teaspoon salt
  • 1/4 cup butterscotch morsels
  • 2 tablespoons half-and-half
  • 3/4 cup packed brown sugar
  • 3 tablespoons canola oil
  • 3 tablespoons butter, melted
  • 1 teaspoon vanilla extract
  • 2  large eggs
  • 1/3 cup semisweet chocolate chips
  • Cooking spray

Preparation

Preheat oven to 350°.

Weigh or lightly spoon flour into a dry measuring cup; level with a knife. Combine flour, baking powder, and salt in a medium bowl; stir with a whisk until thoroughly combined.

Combine butterscotch morsels and half-and-half in a medium microwave-safe bowl; microwave at HIGH for 45 seconds, stirring every 15 seconds. Stir until smooth. Add brown sugar, canola oil, butter, vanilla, and eggs, and beat with a mixer at high speed for 2 minutes. Add flour mixture to butterscotch mixture, stirring just until combined. Stir in chocolate chips. Pour batter into an 8-inch square metal baking pan coated with cooking spray. Bake at 350° for 40 minutes or until a wooden pick inserted in center comes out with moist crumbs clinging. Cool in pan on a wire rack.

For a printer-friendly version of this recipe, please click here:  Butterscotch Blondies

Butterscotch Blondies 4

Red Lentil Dahl

Red Lentil Dal

This is going to be brief, but I need to share this recipe.  What a week – I can hardly believe it is almost over.  I really feel like I blinked, and it went from Monday to Thursday night.  It didn’t help that I was in meetings pretty much all week, and have barely had a chance to catch my breath – and in the process came down with a nasty cold. My body was definitely trying to tell me something…maybe I just need some soup.

Fall came really quickly this year, and all of a sudden it became soup and stew weather.  Not only is it pretty easy to make (for the most part), you can make a large batch and it usually it gets better the longer it sits.  One of my favorite recipes to make when the weather turns is Dahl.  I just love Indian food – those wonderful flavors and spices all blended together, and Dahl is just super easy to make – particularly this recipe from Cooking Light.

We used to eat Indian food quite a bit, but with my husband’s dairy allergy we have really cut that out of our routine.  The girls also have not embraced Indian food as much as they have embraced other international flavors.  This dish though got them a little closer to asking for it – they both loved it, and even ate the large pieces of spinach.  Hopefully they will be able to ward off this cold – and I will be seeing some Indian food in my future….more soon.

Ingredients

  • 5 cups water, divided
  • 3/4 cup dried small red lentils
  • 1 tablespoon canola oil
  • 3/4 cup chopped onion
  • 1 tablespoon minced peeled fresh ginger
  • 1 tablespoon minced garlic
  • 1 teaspoon kosher salt
  • 1/2 teaspoon ground cumin
  • 1/2 teaspoon garam masala
  • 1/2 teaspoon curry powder
  • 2  serrano chiles, minced (optional)
  • 2 ounces spinach (about 4 cups loosely packed)

Preparation

To prepare dal, combine 3 cups water and lentils in a bowl. Let stand 20 minutes; drain.

Heat a medium saucepan over medium-high heat. Add 1 tablespoon oil; swirl to coat. Add the chopped onion; sauté 3 minutes. Add ginger and next 6 ingredients (through serranos); sauté for 30 seconds. Add lentils and remaining 2 cups water to pan. Bring to a boil; reduce heat, and simmer 23 minutes. Stir in spinach; cook 2 minutes or until spinach wilts.

To prepare salad, combine 2 tablespoons oil, rind, juice, and sugar in a medium bowl, stirring with a whisk. Add carrot, sliced onion, and cilantro; toss to coat.

To prepare flatbreads, shape each dough portion into a 5-inch circle on a lightly floured surface. Coat dough with cooking spray. Heat a grill pan over high heat. Add 2 dough portions to pan; cook 2 minutes on each side or until lightly charred. Repeat the procedure with remaining dough. Combine coriander and 1/4 teaspoon salt; sprinkle over hot flatbreads. Serve with rice, dal, and salad.

For a printer-friendly version of this recipe, please click here:  Red Lentil Dahl

Red Lentil Dahl 2

Mango Lassi Smoothie

Mango Lassi Smoothie

This hasn’t been the best cooking day for me – that happens every once in a while – but thank goodness it is not often.  I can see how easy it is to get frustrated and stop cooking when you follow a recipe, and it comes out horribly.  My daughters are obsessed with this Pillsbury Halloween Cookbook that I bought years ago – it is one of those little recipe magazines that you find when you are checking out at the supermarket.  Fortunately I don’t get suckered anymore, since I stopped going to markets that actually sell those…which makes this little recipe booklet even more valuable to the girls.  Of course this weekend my older daughter pulled it out and found a recipe for Spider Pancakes, and begged me to make them.  I looked at the recipe, and I was very skeptical, but I knew if I said no to that one, another would follow.

I decided that we would make them for lunch today – at least I wasn’t going to attempt these first thing in the morning.  Now, it could have been the organic canned pumpkin that I got at Trader Joes – but I actually think it was the recipe,  It was horrible.  The pancakes were so thick and heavy, they were just raw inside – and making the spiders were next to impossible.  I managed to make a couple that looked decent, but unfortunately they tasted horrible – so it didn’t matter.  The recipe needed more sugar, less pumpkin, and more liquid to make them less like cupcake batter.

I looked at this big bowl of batter, and didn’t know what to do.  I didn’t want to make anymore pancakes – so I decided to scoop them into muffin cups and see if they would turn out like muffins.  It was looking promising until I actually tasted one.  Wow, it just might be the worst baked good I have ever eaten.  I didn’t even call the girls downstairs to ask what they thought.  You can’t win them all.

Fortunately I had some fresh mangos and was able to redeem myself with these delicious Mango Lassi Smoothies from Cooking Light.  We all drank them down in a heartbeat – they were that tasty.  Now I have to go work on my Halloween recipes, since the spider pancakes were a bust, I owe the girls something else…

Ingredients

  • 1 1/2 cups 1% low-fat milk
  • 1 cup plain low-fat yogurt
  • 1 tablespoon honey
  • Dash of ground cardamom
  • 2 cups chopped peeled ripe mango, frozen (about 2 medium)

Preparation

Combine first 4 ingredients in a blender; pulse to combine. Add mango to blender; process until smooth.
For a printer-friendly version of this recipe, please click here:  Mango Lassi Smoothie

Two-Cheese Mac and Cheese

Two Cheese Mac and Cheese

It’s interesting to watch people change over time.  I look at my daughters now, and wonder how they will turn out 10, 20, 30 years from now.  When I was younger, I hated to write.  Stick me in front of a stack of numbers, and I was happy as a clam – but ask me to do any type of writing, and I would just panic.  To this day, I am still much more comfortable with numbers (or quantitative data), than I am with any other type of information – but there is a part of me that longs to write.  It is a way to let things out in a non-obtrusive sort of way – to let some of the stress out that builds up throughout the day.  Fortunately I have other healthy ways to deal with stress, but writing actually does allow me to cope in a way that I had never experienced before.

Jealousy is a horrible word.  It is horrible for so many reasons, but it has taken on a whole new meaning for me over the past several years.  I have watched it destroy people – and for no good reasons what so ever.  There is never any winning when jealousy is involved.  It only ends up hurting people.  And sometimes you can dig yourself into such a big hole, that there is no coming out unscathed.  It is at those times that you wish you could turn back the clock – and remind the person how this could end.  Maybe, just maybe that would resonate. Sometimes you just don’t know how good you have it.  It is not just a horrible word, it is a horrible state.

I have never been much of a jealous person, although I have definitely been guilty of food envy.  Going to a restaurant is a little bit like opening a box of chocolates. You can look at the menu and read about the dishes, but until you get a chance to taste – you don’t really know what you are going to get.  Macaroni and Cheese is a whole different story.  Seriously – when have you ever had a macaroni and cheese that you did not like?  Ok – so as I write that, I can remember over the years eating plenty of mac-n-cheese that looked amazing, but when you actually took a bite it either had no flavor, was dry, or just tasted like someone melted some cheese over pasta.  Now – just to keep it real, of course I have never turned away mac-n-cheese, even if it didn’t taste fantastic – but I will never give up finding that perfect mac-n-cheese recipe, and just when I think I have found it, I am sure there is another one out there that is even better.

The other week while my husband was travelling, I decided it was time to try out a new mac-n-cheese recipe.  One of my daughters is not a big fan of cream cheese, but I figured this might just change her mind.  And boy did it ever.  The girls thought this was hands down the best mac-n-cheese I have ever made.  It was super creamy, flavorful, and worth every single bite – and the best part of all, it came from Cooking Light.  So no need to ever have food envy with this recipe in your stash.  And don’t worry, it feeds a big crowd – so no one else will have food envy either.  It’s a win-win for everyone – and isn’t that the way life should be.

Ingredients

  • 10 ounce large elbow macaroni
  • 2 tablespoons canola oil
  • 3  garlic cloves, crushed
  • 2 1/4 cups unsalted chicken stock (such as Swanson), divided
  • 1/2 cup 2% reduced-fat milk
  • 8 teaspoons all-purpose flour
  • 4 ounces 1/3-less-fat cream cheese
  • 1/2 teaspoon salt
  • 1/4 teaspoon freshly ground black pepper
  • Cooking spray
  • 3 ounces extra-sharp cheddar cheese, shredded (about 3/4 cup)

Preparation

Cook pasta according to package directions, omitting salt and fat; drain. Set aside.

Preheat broiler to high.

Heat a Dutch oven over medium heat. Add oil to pan; swirl to coat. Add garlic to pan; cook 3 minutes or until garlic is fragrant, stirring frequently (do not brown). Stir in 1 cup stock; bring to a boil. Cook 1 minute. Combine remaining 1 1/4 cups stock, milk, and flour; stir with a whisk until flour dissolves. Add milk mixture to garlic mixture, stirring with a whisk. Bring to a boil; cook 5 minutes or until mixture begins to thicken. Remove milk mixture from heat; add cream cheese, stirring until smooth. Stir in salt and pepper. Add cooked pasta to milk mixture, tossing to coat. Let stand 5 minutes. Pour pasta mixture into a 2-quart baking dish coated with cooking spray. Sprinkle cheddar evenly over pasta mixture. Broil 3 minutes or until cheese melts and begins to brown. Let stand 5 minutes.

For a printer-friendly version of this recipe, please click here: Two Cheese Mac and Cheese

Double Chocolate Swirl Pound Cake

Marble Bundt Cake

Unfortunately there will be no stories tonight…I am afraid that anything I say will be misunderstood.  Instead of waiting until I am in a better place, I am doing something different – I am leaving you with a recipe.  That’s really what this blog is about anyway.  I am a little different from most – I do not eat when I am upset – I react in the opposite way.  Some people would say that is a blessing.

Many people think that making a healthy cake is worthless – I see it as a challenge.  And this was a challenge well worth taking.  I love a good bundt cake, but most of the good bundt cakes I make have at least 2 sticks of butter.  Even with the oil, this was a much healthier version – and we all thought it was delicious.  No, I didn’t make this today, but this was something I made a while ago and have not had the chance to share it with you.  With fall coming, this is a great dessert that definitely feeds a crowd.  You might even have enough for seconds…

Ingredients

Cake:

  • 1 3/4 cups sugar
  • 1/3 cup canola oil
  • 6 tablespoons butter, softened
  • 2  large eggs
  • 1/2 teaspoon vanilla extract
  • 9 ounces all-purpose flour (about 2 cups)
  • 3.4 ounces whole-wheat pastry flour (about 3/4 cup)
  • 1 teaspoon baking powder
  • 1/4 teaspoon baking soda
  • 1/4 teaspoon salt
  • 1 cup light sour cream
  • 1/4 cup 2% reduced-fat milk
  • 1 teaspoon canola oil
  • 1 ounce chopped bittersweet chocolate
  • 2 tablespoons unsweetened cocoa
  • Baking spray with flour

Glaze:

  • 2/3 cup powdered sugar
  • 2 tablespoons 2% reduced-fat milk
  • 1 tablespoon unsweetened cocoa
  • 1/4 teaspoon vanilla extract
  • 1/8 teaspoon salt

Preparation

Preheat oven to 350°.

Combine first 3 ingredients in a large bowl; beat with a mixer at medium speed until light and fluffy. Add eggs, beating until incorporated. Stir in 1/2 teaspoon vanilla.  Weigh or lightly spoon flours into dry measuring cups; level. Combine flours, powder, soda, and 1/4 teaspoon salt. Combine sour cream and 1/4 cup milk. Add flour mixture and sour cream mixture alternately to butter mixture, beginning and ending with flour mixture.  Combine 1 teaspoon canola oil and chopped bittersweet chocolate in a microwave-safe dish. Microwave at HIGH for 1 minute, stirring every 20 seconds until smooth. Stir in 2 tablespoons cocoa. Remove 2 1/2 cups vanilla batter; add to chocolate mixture, and stir.  Using 2 ice-cream scoops or 2 large spoons, add batters alternately to a 10-cup Bundt pan coated with baking spray; swirl.

Bake at 350° for 50 minutes or until a wooden pick inserted in center comes out clean. Cool in pan 15 minutes. Remove from pan; cool on wire rack.

Combine powdered sugar, 2 tablespoons milk, 1 tablespoon cocoa, 1/4 teaspoon vanilla, and 1/8 teaspoon salt; stir until smooth. Drizzle glaze over cake.

For a printer-friendly version of this recipe, please click here:  Double Chocolate Swirl Pound Cake

Pigs in Sleeping Bags

Pigs in Sleeping Bags

I feel like pork is the new “in thing.”  For me, it has never lost it’s luster, but I really feel like it has been making a big comeback since this commercial: “Pork, the other white meat…”  When we were in NYC this summer we ate at Swine, definitely a place that was all about the Pig, and in Seattle they are hyping up another new restaurant focusing on that pink animal – Le Petit Cochon.  It always cracks me up when someone finds out that I am jewish, then assumes that I don’t eat pork.  I realize that my grandparents would probably not like this post very much – but I have to admit, it has a very fond place in my heart.  Come on, everything is better with bacon, even butter.

This recipe was in my pile for a very long time – after finding it in Bon Appetit.  It was one of those recipes that I knew I had to make, but I also had to find the right time to make it.  It called for Dufour puffed pastry, which just happens to be one of the most delicious puffed pastry that you can buy frozen.  I am sure that the ratio of butter to flour is ridiculous, but it is completely worth it.  So – how about some pig with that butter?  And that’s all she wrote.

This recipe is not for everyone – there are multiple steps, and you really much have a very large spatula in which to transfer these babies onto the cookie sheet – otherwise, think ahead, and place the puffed pastry on the cookie sheet before placing the filling on top.  If you do attempt this though – you will certainly not be disappointed – this was outstanding.  The girls really loved them as well – even though they were both very afraid when they saw the sauerkraut.  I served them for dinner – by cutting them in half – but you could easily slice these unto small pieces and serve them as an appetizer, as the recipe says below.

Ok – off to get rid of this headache I have had all week.  In fact, rolling up into a sleeping bag sounds just about perfect right now – I promise to come out for bacon.

Ingredients

  • 1 tablespoon unsalted butter
  • 1/4 cup minced shallot
  • 2 large garlic cloves, minced
  • 3 tablespoons panko (Japanese breadcrumbs)
  • 3 tablespoons whole milk
  • 3/4 cup drained sauerkraut
  • 1 tablespoon Dijon mustard plus more for serving
  • 3/4 teaspoon caraway seeds, toasted, lightly crushed
  • Kosher salt and freshly ground black pepper
  • 8 ounces ground pork
  • 1 14-ounce package Dufour Pastry Kitchens frozen puff pastry, thawed
  • All-purpose flour (for dusting)
  • 1 large egg, beaten to blend

Preparation

Melt butter in a small skillet over medium heat. Add shallot and cook, stirring occasionally and reducing heat if needed to prevent burning, until soft,  4-5 minutes. Add garlic and cook, stirring occasionally,  until aromatic, about 1 minute. Transfer shallot mixture to a large bowl and let cool.

Combine panko and milk in  a small bowl; let stand until milk is absorbed, 2-3 minutes. Add to bowl with shallot mixture. Squeeze any excess liquid from sauerkraut; coarsely chop and add to bowl. Stir in 1 tablespoon Dijon mustard and caraway seeds; season with salt and pepper. Mix well. Add pork; using a fork or your hands, gently mix until just combined (do not overmix).

Line a baking sheet with parchment paper. Roll out pastry on a lightly floured surface to a 14×10-inch rectangle. Cut lengthwise into three 14×3 1/3-inch strips. Transfer strips to prepared baking sheet. Using one-third of sausage filling and leaving a 1-inch border at each end, pat sausage to form a thin log of filling down the center of 1 pastry strip. Fold pastry over sausage mixture to enclose, then press pastry together to seal. Fold seam under to ensure that sausage is tightly wrapped. Repeat with remaining pastry and sausage mixture.

Cut small diagonal slits at  1 inch intervals along top of pastries (to help release steam). Brush top and sides of pastry with beaten egg; chill in freezer for about 30 minutes. DO AHEAD: Pastries can be made 2 weeks ahead. Cover tightly with plastic wrap, then foil, and keep frozen.

Preheat oven to 425°. Bake pastries (if frozen, no need  to thaw) until puffed and light brown, about 15 minutes. Reduce heat to 350°; continue baking until sausage is cooked through and pastry is golden and completely puffed, about 25 minutes. Let cool slightly. Cut sausage rolls crosswise  into 1 inch pieces. Serve with a bowl of Dijon mustard for dipping.

For a printer-friendly version of this recipe, please click here:  Pigs in Sleeping Bags