Chocolate Chip Ricotta Scones

Chocolate Chip Ricotta Scones

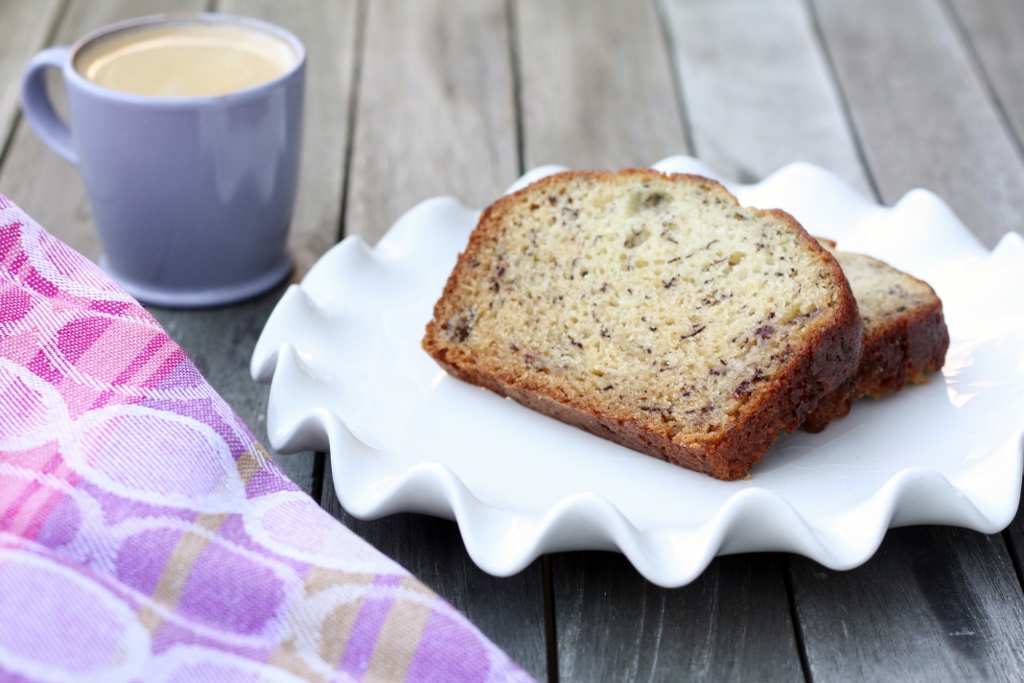
Here we are back to breakfast.  My daughter got sick of the banana bread that I made every week for the past month.  The good news is that I finally used up the huge bag of frozen bananas we had in the freezer.  So of course I got the question on Sunday morning, “What am I going to eat for breakfast this week?”  I guess cereal was not the answer she was looking for.  Why is it that they can listen to the same song over and over again, but they get sick of my wonderful banana bread after a month?

To digress just for a moment, for some reason as I was looking at these beautiful scones typing away, the song Waltzing Matilda came into my head.  Why?  I have no idea how my mind works sometimes.  But nevertheless, it did.  I started singing the song, and asked my husband if he remembered it – of course he did.  We only listened to it about 100,000 times – it was on a Dan Zanes album that the girls absolutely loved when they were little.  And if you have small kids, you know that when they enjoy a song in the car – you keep playing it.  When I Binged it – the first YouTube video that was listed was by Slim Dusty.  Wow.  What a blast from the past.  My husband and I were in the office singing at the top of our lungs – of course intriguing my older daughter who was trying to finish up her homework, and all of a sudden the three of us were in the office having a little sing-a-long.  Gotta love that song…

Back to the scones – so needless to say, cereal was not going to cut it – fortunately Cooking Light came to the rescue – with some very interesting looking scones.  I adapted them to fit my daughter’s tastes – which of course has to include some chocolate.  These scones were soft and flakey and absolutely delicious.  She actually rationed them out so they lasted the entire week.  Just 30 seconds in the microwave was all they needed in the morning, and they were as fresh as can be.  Let’s see how many weeks in a row she can eat these – surely not as long as Waltzing Matilda – but maybe longer than banana bread?

Ingredients

  • 1 cup part-skim ricotta cheese (such as Calabro)
  • 1/4 cup packed brown sugar, divided
  • 1 teaspoon vanilla extract
  • 1/3 cup plus 1 tablespoon fat-free buttermilk, divided
  • 2 tablespoons canola oil
  • 4.5 ounces whole-grain pastry flour (about 1 cup)
  • 3.4 ounces unbleached all-purpose flour (about 3/4 cup)
  • 1 tablespoon baking powder
  • 1/2 teaspoon salt
  • 4 tablespoons cold unsalted butter, diced
  • 1/2 cup chocolate chips
  • 1 large egg, lightly beaten
  • 1 tablespoon turbinado sugar

Preparation

Preheat oven to 425°.

Combine ricotta cheese, 1 tablespoon sugar, and vanilla in a medium bowl. Reserve 1/2 cup of the ricotta mixture. Add 1/3 cup buttermilk and canola oil to remaining ricotta mixture, stirring until smooth.

Weigh or lightly spoon flours into dry measuring cups; level with a knife. Combine flours, remaining 3 tablespoons sugar, baking powder, and salt in a large bowl; cut in butter with a pastry blender or 2 knives until mixture resembles coarse meal. Add chocolate chips; toss. Add buttermilk mixture; stir just until combined.

Turn dough onto a counter lighted dusted with flour.  Pat into a 1 inch thick circle, and then cut into eight wedges shaped pieces. Combine egg and remaining 1 tablespoon buttermilk, stirring with a whisk. Gently brush top and sides of dough with egg mixture. Sprinkle with turbinado sugar.

Bake at 425° for 15 to 16 minutes or until golden. Remove from pan; cool slightly on a wire rack. Beat the reserved ricotta mixture at medium speed 3 minutes or until fluffy. Serve with warm scones if you would like.

For a printer-friendly version of this recipe, please click here:  Chocolate Chip Ricotta Scones

Advertisement

Dairy-Free Banana Bread

Dairy-Free Banana Bread 2

Sometimes you just need a little comfort.  This could be in many different forms – although comforting food seems to be what people gravitate towards when that need exists.  No wonder we have such an obesity problem in the United States – comfort food restaurants are everywhere, and unless you choose wisely when to indulge (and maybe balance it out with some exercise), it can be dangerous.

I definitely love my comfort good – but all in moderation.  Friday night we went to our absolute favorite restaurant/bar in Seattle, and ordinarily I would never order something like this – but it was calling for me.  It was a wonderful bowl of carbonara – with a perfectly poached egg on top.  I am telling you – this dish of homemade angel hair pasta with the smoky ham – it was decadent, and I enjoyed every single bite.  If that wasn’t enough, I had a piece of peanut butter pie for dessert with a small scoop of banana ice-cream.  I went all out.  The next morning, I couldn’t get to the gym fast enough.  Thank goodness for Tabata.  But everyone deserves an indulgent night now and then.

Most of the time what comforts me the most are the simple pleasures – like banana bread.  My mother’s banana bread recipe is just as perfect as it could be.  Although this time I decided to see if could survive the dairy-free challenge.  I substituted coconut milk for buttermilk – and you would have never known.  My husband and I couldn’t believe it – this was something he used to be nuts about, and when he gave up dairy, he had to give this up as well.  Not anymore though – this is now back in our lives, and better than ever.  Thank goodness for the small comforts in life…because seriously, sometimes that’s all you need.

Ingredients

  • 3 very ripe bananas, mashed
  • 2/3 cup vegetable oil
  • 1 2/3 cup sugar
  • 2/3 cup coconut milk
  • 1 teaspoon vanilla
  • 2 eggs
  • 2 1/2 cups all-purpose flour
  • 1 1/4 teaspoon baking powder
  • 1 1/4 teaspoon baking soda
  • 1/2 teaspoon salt
  • 2/3 cups chopped nuts (optional)

Preparation

Pre-heat oven to 350.  Mash bananas with a fork and set aside.  Mix oil, sugar, coconut milk, vanilla and eggs well.  Add mashed bananas.  Mix dry ingredients in a small bowl, and add to banana mixture with nuts (optional) until just combined well.  Pour into 2 greased and floured 9 x 5″ loaf pans.  Bake for 40-45 minutes, or until a toothpick inserted in the middle comes out clean.  Remove from pans while still warm and wrap with plastic.

For a printer-friendly version of this recipe, please click here:  Dairy-Free Banana Bread

Dairy-Free Banana Bread

Adare Manor Scones

Adare Manor Scones

This morning I woke up late – I slept later than I have slept in months.  I was up at 5:30am, like I normally am, but some time over the next hour, I finally fell back asleep – and the next time I looked at the clock, it was almost 9am.  My body really needed that sleep – it has been craving it for months, at least since last summer when I was on vacation and probably got 10 hours of sleep a night.  It is amazing to me how long my body can stand to get such little sleep, and then all of a sudden once it gets a little more – it requires a ton.  I think I am to that point where I need to go on a break, just to catch up on sleep.

When I finally woke up – it was scones that got me out of bed.  Not smelling them, but the thought of making them.  Our friends are visiting, and with 5 kids in the house, it is always good to have something around for breakfast besides cereal.  This recipe from Bon Appetit has been sitting in my pantry for only a couple of months, but reading about these scones put them pretty much on the top of my pile.  I love scones, and especially love plain ones that are not sweet.  With only 2 tablespoons of sugar in the entire batch – and seeing that they were more like biscuits than scones – I knew they would be perfect with my homemade jam.  What I didn’t realize is how quickly they would disappear with 5 kids – and one of them had cereal instead!  It has been hilarious to see the number of dishes we go through every day.  Having 5 kids would definitely eat me out of house and home – and there was only one teenager in the bunch.  The appetites only get bigger from here…

These scones reminded me of the ones we get at the Puyallup Fair every fall.  After last year though, we vowed not to go back, and so it is up to me to make the scones.  No problem here – I found the recipe.  I served these with my fresh raspberry jam – and they were as close to perfect as they could have been.  Of course we had them right out of the oven – and they were tender and flakey – with a little crust on top.  Next time I am making a double batch – and maybe I will make them the night before.  Although I must say – waking up to that dough in my fingers was almost as good as waking up to the smell of fresh scones in the oven.

Ingredients

  • 1 1/4 teaspoons baking powder
  • 3/4 teaspoons kosher salt
  • 1 1/2 cups all-purpose flour plus more for work  surface
  • 1/4 cup (1/2 stick) chilled unsalted butter, cut  into 1/2″ pieces
  • 1/2 cup whole milk
  • 2 tablespoons sugar
  • 1 large egg, beaten to blend
  • Clotted cream, raspberry jam, and/or lemon curd  (for serving)

Preparation

Preheat oven to 425°F.  Whisk baking powder, salt, and 1 1/2 cups flour in a large bowl. Add butter and  blend with your fingertips until pea-size pieces form. Add milk and sugar and  mix with a fork until a shaggy dough forms. Transfer dough to a lightly floured surface and gently knead until dough just comes together, 3 or 4 times.

Gently pat dough into a  1″-thick round. Using a 2″ round biscuit cutter or inverted small glass, cut out  scones. Gather scraps and repeat, patting out and cutting to make 10 scones.  Transfer to a parchment lined rimmed baking sheet and brush with egg.

Bake scones until golden  brown, 15-20 minutes. Transfer to a wire rack. Serve warm or at room  temperature, split, with clotted cream, jam, and/or lemon curd.

DO AHEAD: Scones can  be made 8 hours ahead. Let cool completely and store airtight at room temperature.

For a printer-friendly version of this recipe, please click here:  Adare Manor Scones

The Blueberry Blossom Pancake

Blueberry Blossom Pancake

I can’t believe it is blueberry season already – boy does that make me happy.  Even though you will never find me popping blueberries in my mouth, they are one of my most favorite fruits to bake with.  This weekend my cousin was visiting, and after dragging him to Boot Camp Saturday morning, our reward was going to the Farmer’s Market.  Before we got there though, I had to stop at my favorite fruit stand.  Not only are their prices better than at the Farmer’s Market, they are just so nice, I love supporting their farm.  I knew that I wanted to make Blueberry Jam this weekend, and wasn’t sure if I would have enough leftover to make something else.  Of course I forgot to mention the Jam to my cousin, so when I walked back to the car with a flat of blueberries, his eyes popped out of his head.  It was a similar look when I took him into my pantry to show him my stash…of jam that is.

I reminded him about my jam problem, and then it made sense.  He immediately offered to hold the blueberries on our way to the market.  He couldn’t stop popping them in his mouth, and I could tell my younger daughter in the back seat was getting a little nervous.  He offered her a handful, and she said emphatically, “No!  You have to stop eating them, my Mommy needs to make jam!”  I started laughing – she is definitely the biggest jam lover of the family.  As we were walking and eating our way through the market this weekend, we got to the jam stand.  My older daughter tried some strawberry jam (that they sell for $8.75) and came running over to me – she told me that my jam is much better.  I had already bought her a pastry, so she wasn’t buttering me up for anything…maybe just hoping I would quit my job and stay home to make jam for a living.

Fortunately I had plenty of blueberries, and I remembered this recipe I had just looked at in this month’s Bon Appetit.  With a name like The Blueberry Blossom Pancake, how could it be anything but beautiful!  Wow were these good pancakes.  I seriously thought I was at a restaurant.  I know I make good pancakes, but these were just incredible.  So light and fluffy, with a burst of blueberry in every bite.  Oh, and did I mention the streusel on top?  Seriously, what is not better with streusel?  It added a crunchy texture that really knocked my socks off.  So – this weekend, if you are looking for a way to make your family happy – look no further.  Waking up to these beauties will definitely make your day blossom.  Don’t delay, blueberry season will not last forever!

Ingredients

Blueberry Syrup

  • 3/4 cup pure maple syrup
  • 1/4 cup blueberries

Streusel

  • 1/2 cup old-fashioned oats
  • 1/4 cup all-purpose flour
  • 2 tablespoons light  brown sugar
  • 1/4 cup (1/2 stick) unsalted butter, melted

Pancakes

  • 1 cup all-purpose flour
  • 2 tablespoons sugar
  • 1 teaspoon baking  powder
  • 1/2 teaspoon baking  soda
  • 1/2 teaspoon kosher  salt
  • 1 large egg
  • 1 1/2 cups buttermilk
  • 2 tablespoons unsalted  butter, melted, slightly cooled
  • Vegetable oil (for  skillet)
  • 1 cup blueberries (about 5 ounces)

Preparation

Blueberry Syrup

Purée syrup and blue-berries in a blender until smooth; set  aside.

Streusel

Preheat oven to 350°. Combine oats, flour, and brown sugar on  a small rimmed baking sheet; drizzle with butter and toss to coat. Bake,  stirring occasionally, until golden brown, 15–20 minutes. Let cool.

DO AHEAD: Streusel can be made 1 week  ahead. Store airtight at room temperature.

Pancakes

Whisk flour, sugar, baking powder, baking soda, and salt in a  large bowl. Whisk egg, buttermilk, and butter in a medium bowl, then whisk  into dry ingredients.

Heat a large nonstick skillet over medium heat and lightly  coat with oil. Working in batches, pour 1/4 cupfuls of batter into skillet and  top each with 2 tablespoons berries. Cook pancakes until bottoms are golden brown and bubbles form on top, about 3 minutes. Flip and cook until golden brown  and cooked through, about 2 minutes longer. Serve pancakes topped with syrup and  streusel.

For a printer-friendly version of this recipe, please click here:  The Blueberry Blossom Pancake

Chocolate-Chocolate Chip Muffins

Another weekend down, and only two more before school gets out.  Our weekends have been jam-packed with end-of-the-year activities.  Fortunately most of them come with an opportunity to bake – unfortunately there doesn’t seem to be a lot of time to do so – but I am finding time when I can, and so far I have been pretty happy with the results of my “power baking” – as I like to call it.  I have lots of fun stuff to share…so stay tuned.

So what exactly is the different between a cupcake and a muffin?  Aside from the fact that people often feel like it is ok to eat a muffin, like they are healthy or something , as opposed to a cupcake.  I am starting to think that the difference is the frosting.  The muffin doesn’t have any, while the cupcake does.  Although, the muffin can have a topping, just as long as it is not creamy?  I’m pretty sure that must be the definition.  I decided to “Bing-It” and see the real answer.  Well, obviously this is not the first blog post to cover this topic – in fact, it seems as though I may have just discovered the most popular food blog topic out there.  And yes, I was indeed correct – everyone basically came to the same conclusion.

I found these beauties in Cooking Light, and my younger daughter decided she needed to help.  She hopped on the counter, and was ready.  She did a great job, especially placing the chocolate chips on top.  She took her job very seriously, and as you can see, she was meticulous.  These cupcakes – I mean muffins – were decadent – definitely on the edge of a cupcake without the frosting.  They were moist and chocolately, and definitely good with a cup of coffee – although just as good after dinner (we had them both ways).  So, give these a try, and make sure you tell people they are muffins, maybe they will feel better about eating a few…

Ingredients

  • 7 9/10 ounces all-purpose flour (about 1 3/4 cups)
  • 1/2 cup packed brown sugar
  • 1/4 cup unsweetened cocoa
  • 1 teaspoon baking powder
  • 1 teaspoon baking soda
  • 1/4 teaspoon salt
  • 1 cup warm water
  • 1/4 cup canola oil
  • 1 tablespoon red wine vinegar
  • 1 teaspoon vanilla extract
  • 1 large egg, lightly beaten
  • 1/2 cup semisweet chocolate minichips, divided
  • Cooking spray

Preparation

Preheat oven to 400°.

Weigh or lightly spoon flour into dry measuring cups; level with a knife. Combine flour and next 5 ingredients (through salt) in a large bowl, stirring with a whisk. Make a well in center of mixture. Combine 1 cup water and next 4 ingredients (through egg) in a bowl, stirring well with a whisk. Stir in 1/4 cup minichips. Add oil mixture to flour mixture, stirring just until moist.

Place 12 muffin-cup liners in muffin cups, and coat liners with cooking spray. Divide batter evenly among prepared muffin cups. Sprinkle remaining 1/4 cup minichips evenly over batter. Bake at 400° for 15 minutes or until a wooden pick inserted in center comes out clean. Cool for 5 minutes in pan on a wire rack.

For a printer-friendly version of this recipe, please click here:  Chocolate-Chocolate Chip Muffins

Add to FacebookAdd to DiggAdd to Del.icio.usAdd to StumbleuponAdd to RedditAdd to BlinklistAdd to TwitterAdd to TechnoratiAdd to Yahoo BuzzAdd to Newsvine

Sweet Streusel Muffins

Before I say anything else, my daughter saved these muffins.  Yes, I am serious.  So, things have been pretty busy lately, so busy that I haven’t had a lot of time to bake.  My blog is definitely suffering…as well as my family, but don’t worry, I have some plans to bake for our temple auction – and boy have I picked out some goodies.  Let’s hope they turn out well.  I just love baking things for the first time when they are to be used for raising money, no stress at all…

Ok, back to my daughter saving these muffins.  I was baking muffins for my other daughter’s Valentine’s Day breakfast, when my older daughter walked into the kitchen.  She wanted to know what I was making, and at that point I was sprinkling the streusel topping on the batter before covering the topping with more batter – and I have to admit, the topping did not look right, I couldn’t believe there was no butter.  I was just about done when my daughter took the book where the recipe was – The Wooden Spoon Bread Book – and informed me that I forgot to turn the page.  She was right – and there was the last ingredient – the butter.  I love this book – everything I make from it comes out wonderfully – but the recipes are printed differently.  Instead of listing all of the ingredients first, then giving you the instructions – it mixes everything up.  So you will get a few ingredients and then instructions on what to do with those ingredients, then some more ingredients, and some more instructions.  It is great – as long as you read the recipe entirely before starting – which of course I failed to do.

So – fortunately she caught me at the perfect time.  I made another batch of topping – and I was good to go.  The muffins turned out beautifully – and very delicious – not too sweet, and perfect with a nice cup of coffee, or glass of milk if you happen to be under 10.  I highly recommend them, but remember to read the whole recipe first…

Ingredients

muffins

  • 2 cups all-purpose flour
  • 1/2 teaspoon salt
  • 2 teaspoons baking powder
  • 1 egg
  • 1/2 cup sugar
  • 1/3 cup oil
  • 1 cup milk

topping

  • 4 tablespoons all-purpose flour
  • 1/2 cup sugar
  • 1 teaspoon cinnamon
  • 4 tablespoons butter

Preparation

Preheat the oven to 375 degrees.  Grease a 24-cup mini mufin pan.  Sift together and set aside the flour, salt and baking powder.  In a mixing blowl, beat the egg and stir into the egg the sugar, oil, milk, and sifted dry ingredients in that order.

Make the streusel topping by combining the flour, sugar, cinnamon and butter in a bowl.  Rub the butter into the flour mixture with your fingers or cut with a pastry blender.

Spoon a teaspoon of batter into each muffin cup.  Sprinkle a teaspoon of topping in each cup.  Divide the remaining batter evenly and spoon over the streusel in muffin cups. Divide the remaining streusel evenly and sprinkle over the top of the batter.  Bake for 15-20 minutes, or until lightly browned.  Serve warm.

Makes 24 muffins.

For a printer-friendly version of this recipe, please click here:  Sweet Streusel Muffins

Add to FacebookAdd to DiggAdd to Del.icio.usAdd to StumbleuponAdd to RedditAdd to BlinklistAdd to TwitterAdd to TechnoratiAdd to Yahoo BuzzAdd to Newsvine

Bacon and Egg Muffins

As I have mentioned before, most of my friends do not cook – and although all of my friends like to eat, I have very few that are obsessed with food like me, or that I would consider a “foodie.”  Most of my friends find it humourous that I want to talk about food and restaurants all the time .  Other friends are just happy that I love to cook, and definitely benefit from the endless baked goods that come from my kitchen.

Last year my older daughter had a secret crush on a boy in her class.  I say it is secret, because she didn’t talk about it – but it was obvious to me.  One day she asked if I could become friends with his mother so that I could invite her over to our house, and his son could come too.  Ok, that was how I figured out about the crush…  I don’t have a lot of free time in my life to socialize, but over the course of the school year, I realized that we actually did have a lot in common – specifically food.  On the occasion I would make it to school to pick my daughter up, it was so great to talk to someone about food and restaurants while  waiting for the bell to ring.

A few months ago she told me about these muffins she made – and she said I had to make them for the blog.  When someone like that gives me a tip, I listen.  She said they were delicious, and looked outrageous – and she was right.  I made these for dinner one night, and they were a big hit – the tender muffin with big chunks of salty bacon – and that egg in the center, delicious!!  They are super easy, but read the directions carefully.  Thanks for the great recipe and for sharing my love for food!

Ingredients

  • 2 cups all-purpose flour
  • 3/4 teaspoon salt
  • 2 teaspoons baking powder
  • 1 tablespoon sugar
  • 1/2 pound thick-cut bacon, cooked crisp and finely chopped
  • 1/4 cup chopped fresh chives
  • 1/2 cup grated parmesan cheese
  • 1 cup whole milk
  • 7 large eggs
  • 5 tablespoons unsalted butter, melted

Preparation

Preheat the oven to 375 degrees.  Grease 6 jumbo muffin tins (or 1-cup ramekins) with non-stick spray and set aside.

Whisk the flour, salt, baking powder, sugar, bacon, chives and cheese in a large bowl.  Combine the milk and one egg in a small bowl, and add to the dry ingredients, along with the melted butter.  Fold the ingredients together gently until no dry spots remain.

Spoon about 1/4 cup batter into each of the muffin tins.  Using a soft spatula, spread the batter up the sides of the tins a bit, leaving a depression in the middle of the batter.  Crack an egg into the center of each cup, and divide the remaining batter between the cups, making sure you cover the yolkIt’s easiest if you work with small dollops of batter.  When you cover the yolk, it will spread out when it bakes.

Bake the muffins for 20 to 25 minutes, until the visible egg white is set and the muffins are just barely beginning to crack.  (They won’t be very brown.)  Cool 5 minutes, then run a small knife around the edges of each muffin to release.  Serve hot.

Makes 6 muffins.

For a printer-friendly version of this recipe, please click here:  Bacon and Egg Muffins

Add to FacebookAdd to DiggAdd to Del.icio.usAdd to StumbleuponAdd to RedditAdd to BlinklistAdd to TwitterAdd to TechnoratiAdd to Yahoo BuzzAdd to Newsvine

Savory Spinach, Feta, and Roasted Pepper Muffins


I have been trying really hard to improve the photos in my blog, but every once in a while, my patience is low, I am feeding guests, and I am starving.  I just can’t get a good picture, and I give up.  This is exactly what happened here – so I apologize.  I know it is always so much more appealing to make something when the picture looks good – but trust me, these were excellent – so much better than the picture portrays.

I saw this recipe in Bon Appetit, and I just love the idea of a savory muffin.  You don’t see a lot of savory muffin recipes – mostly they are savory biscuit type recipes – which I happen to love.  Therefore, I had to make these – I thought they would go great with an egg dish – for dinner.  The muffins were delicious.  They were slightly sweet – but the cheese really solidified them as a savory muffin.  They were plenty moist, and went perfectly with the quiche I made for dinner.  I couldn’t find parpadew peppers, so I just used roasted red peppers, which are also slightly sweet – so they were a perfect substitution.  These also would be great for brunch – and they are very easy to make.  So – sorry about the picture, but trust me, they are worth making.

Ingredients

  • Nonstick vegetable oil spray
  • 2 3/4 cups all purpose flour
  • 1/4 cup sugar
  • 2 teaspoons baking powder
  • 1 teaspoon paprika
  • 3/4 teaspoon salt
  • 3/4 cup whole milk
  • 1/2 cup vegetable oil
  • 2 large eggs
  • 1 cup thinly sliced spinach leaves
  • 3/4 cup crumbled feta cheese
  • 1/2 cup chopped drained mild Peppadew peppers or roasted red peppers from a jar

Preparation

Preheat oven to 375°F. Spray 12 standard (1/3-cup) muffin cups or 6 large (3/4-cup) muffin cups with nonstick spray. Whisk flour, sugar, baking powder, paprika, and salt in medium bowl. Whisk milk, oil, and eggs in large bowl to blend. Add dry ingredients; whisk just until blended. Add spinach, feta, and peppers; fold to incorporate evenly. Divide batter among prepared muffin cups (cups will be filled to top).

Bake muffins until tester inserted into center comes out clean, 25 to 28 minutes for standard muffins and 33 to 35 minutes for large muffins. Cool 5 minutes. Run knife around muffins to release from pan. Invert pan to release muffins, then turn muffins right side up and cool completely.

Makes 12

For a printer-friendly version of this recipe, please click here:  Savory Spinach, Feta, and Roasted Pepper Muffins

Add to FacebookAdd to DiggAdd to Del.icio.usAdd to StumbleuponAdd to RedditAdd to BlinklistAdd to TwitterAdd to TechnoratiAdd to Yahoo BuzzAdd to Newsvine

Coconut Pancakes

After the last batch of pancakes were a total bust (Oatmeal pancakes) – my girls were not overly thrilled when I told them I was going to make them pancakes for breakfast.  I assured them these would be better.  There was a lot of pressure on me – waiting for food first thing in the morning is not easy for kids – especially when they get their hopes up that it is something good.  I saw this recipe in Cooking Light, and I knew they had to be better than the Oatmeal pancakes.  Adding coconut milk to anything makes it taste good – at least that’s what I was hoping.

Thank goodness I was right.  These pancakes were incredible.  Even adding just light coconut milk made all the difference – I can’t imagine adding regular coconut milk, they would be decadent.  The pancakes were ridiculously delicious – and so thick and fluffy – look at the picture, I am not joking!  These pancakes were so good, I had them for dessert that night – I just warmed one up in the microwave, served it with a little syrup – and it was such a treat.  The coconut milk was not overpowering, but gave the pancakes just a wonderful essence of coconut flavor.  If you are looking for pancakes that are just a little different – look no further.  And make some extras for the next morning – they are awesome warmed up in the microwave, unless you are like me, and can’t wait for morning to have more…

Ingredients 

  • 1 cup all-purpose flour
  • 1 tablespoon sugar
  • 2 teaspoons baking powder
  • 1/4 teaspoon salt
  • 1 cup light coconut milk
  • 1 1/2 tablespoons canola oil
  • 1 egg

Preparation

Whisk together coconut milk, canola oil and 1 egg.  Combine with dry ingredients.  Cook as usual for pancakes.

Serves 4

For a printer-friendly version of this recipe, please click here:  Coconut Pancakes

Add to FacebookAdd to DiggAdd to Del.icio.usAdd to StumbleuponAdd to RedditAdd to BlinklistAdd to TwitterAdd to TechnoratiAdd to Yahoo BuzzAdd to Newsvine

Apricot Scones

There is a reason most of my recipes come from Bon Appetit and Cooking Light – they have a test kitchen, and supposedly make all the recipes they publish.  I actually believe them, because 90% of the time, the recipes I choose are right on.  A friend of mine pointed out that I am good at reading recipes, and knowing which ones will come out – I take that as a huge compliment, but I also know that most of the recipes are just accurate.

Every once in a while I find a recipe from a different source.  That is when I really use my cooking/baking brain to figure out if I think the ingredients will come together in perfect harmony to make a successful final product.  Every week in my market basket, they provide a handful of recipes based on the seasonal produce you are receiving.  I have to say, the majority of the recipes I am either not interested in, or they are so basic, I have my own version already.  I have been getting a lot of apricots lately – and I noticed a recipe for apricot scones in my box.  I looked at the 4 apricots from the previous week still sitting there, and the 4 new ones I just received, and knew what I had to do.  I tried this recipe – and I have to say, I did not think they would come out at all – the batter was so wet, I really had to add a lot of flour to roll them out – but they were fantastic.  Right out of the oven, they were soft and fluffy, and just the right sweetness.  I would make them again in a second – thanks for the great recipe Full Circle Farm!

Ingredients

  • 2 cups flour
  • 3 tablespoons sugar, divided
  • 2 teaspoons baking powder
  • 1/2 teaspoon salt
  • 1/3 cup butter
  • 1 cup diced fresh apricots
  • 1/4 cup milk
  • 2 eggs

Preparation

Preheat oven to 450 degrees.  Combine and mix flour, 2 tablespoons sugar, baking powder and salt.  Add butter and cut into flour mixture until mixture resembles coarse cornmeal.  Add apricots and toss until pieces are coated with flour mixture.   Reserve 1 tablespoon milk; mix remaining milk and eggs together and lightly blend.  Add milk mixture to flour mixture and stir until moistened.  On a lightly floured service, knead dough gently about 10 times.  Pat dough into a 3/4-inch thick round; cut into 8 wedge-shaped pieces.  Place dough on lightly oiled baking sheet; brush with reserved milk and sprinkle with remaining sugar.  Bake at 450 degrees for 12 to 15 minutes, or until lightly brown and wooden pick inserted near center comes out clean.

Makes 8 scones.

For a printer-friendly version of this recipe, please click here:  Apricot Scones

Add to FacebookAdd to DiggAdd to Del.icio.usAdd to StumbleuponAdd to RedditAdd to BlinklistAdd to TwitterAdd to TechnoratiAdd to Yahoo BuzzAdd to Newsvine