Cream Puffs

Cream Puffs

When I studied in France many years ago – I was enamored by the Patisseries.  This was over twenty years ago, when the dollar was very strong – and it cost less than a dollar for a beautiful looking éclair – or a tarte au fraise, one of my older daughter’s favorites.  So – every week I would treat myself to a different pastry in the shops – I wanted to make sure I was able to try each and every one by the time I left.  I actually think I came pretty close.  Still – the one that I kept coming back to was the éclairs.  There were a few different varieties, but it didn’t matter to me – it was not the filling that I craved, it was the pastry.  It was not sweet, and the outside was just slightly crisp, while the inside was soft and egg-like.  Just amazing.

Now when I visit France, I am still just as enthralled with the Patisseries, but the pastries cost much more than a dollar – and now it is my daughter who is on a mission to try as many as she can. I usually just get a couple of bites of whatever she chooses – which is fine by me – there is so much good food to eat in Paris – I have to save room for everything.  She is definitely into the éclairs as well – and would you believe, we actually have a favorite spot?  It is on the Isle St. Louis, and their chocolate éclairs are the best I have had.  They serve them fresh and cold, and the filling is just as bit as delicious as the pastry.

I am not sure why it has taken me so many years to make these – but for some reason it has.  I saw this recipe in Bon Appetit, and decided it was finally time.  I have a friend who thinks these are a snap to make – she whips them up all the time – well, she must have some seriously strong arms.  That was the hardest part – mixing in all those eggs.  Once I got past that part – the rest was pretty easy.  I may have taken them out of the oven a little too soon, because mine deflated slightly – but it didn’t matter a bit.  They were amazingly delicious, I was smiling from ear to ear.  So – the next time I need a little taste of France, I guess I can just whip these up – pretty soon I will have monster arms too…then maybe I could fly myself to France and get the real thing?  Good thing I have another trip planned.

Ingredients

  • 1/2 cup whole milk
  • 1/2 cup (1 stick) unsalted butter, cut into 8 pieces
  • 1 teaspoon plus 2 tablespoons sugar
  • 1 teaspoon kosher salt
  • 1 cup all-purpose flour
  • 6 large eggs
  • 2 1/2 cups heavy cream
  • Powdered sugar (for dusting)

Special Equipment:

  • Two pastry bag tips, 1/2-inch and 1/2-inch open star

Preparation

Line 2 baking sheets with parchment paper. Fit 1 large pastry bag (or a plastic freezer bag with 1/2-inch cut from one bottom corner) with plain 1/2-inch tip.

Bring milk, butter, 1 tsp. sugar, salt, and  1/2 cup water to a boil in a medium sauce-pan over medium heat, stirring occasionally. Add flour all at once; reduce heat to medium-low. Stir vigorously with a wooden spoon until a dough forms and pulls away from sides of pan, 1–2 minutes. Continue beating vigorously until a thin dry film forms on bottom and sides of pot, about 1 minute. Transfer to a bowl.

Add 1 egg and stir vigorously with wooden spoon until egg is incorporated  and dough looks dry again, about 2 minutes. Repeat with 4 more eggs, adding one at  a time and stirring vigorously to incorporate before adding the next. Dough should be smooth, shiny, and thickened.

Spoon dough into prepared pastry bag; pipe out 2 1/2-inch-diameter rounds on prepared sheets, leaving 2 inches between rounds.

DO AHEAD: Freeze the piped dough rounds on the baking sheets, then transfer to resealable plastic bags and freeze for up to 1 month. Place on parchment paper-lined baking sheets, spacing apart (do not defrost) before continuing with recipe.

Arrange racks in upper and middle thirds of oven and preheat to 450°. Whisk remaining egg with 2 tsp. water and  brush dough rounds all over with egg wash.

Transfer baking sheets to oven; turn  oven off. After 10 minutes, heat oven to 350° and bake for 10 minutes. Rotate pans front to back and top to bottom; continue baking until deep golden brown all over, about 10 minutes longer (puffs will deflate if removed from oven before fully baked). Transfer  puffs to a wire rack and let cool completely.

Using a serrated knife, gently slice the  top quarter off each puff; transfer tops to a plate. With your finger, gently push down the  soft film of cooked dough inside each puff.

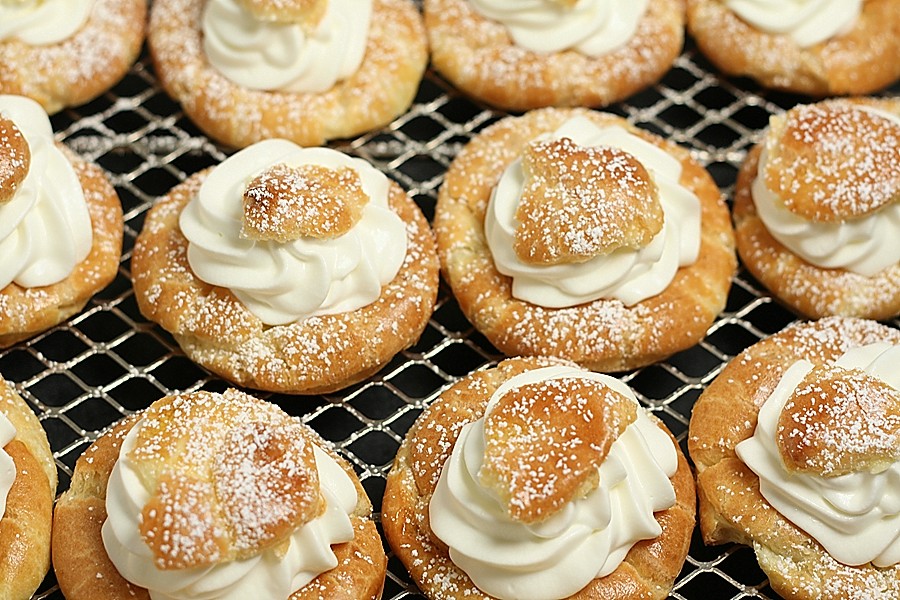
Prepare a second pastry bag (or freezer bag) with 1/2-inch open-star tip. Beat heavy cream and remaining 2 Tbsp. sugar in a large bowl until soft peaks form. Spoon whipped cream into prepared pastry bag. Fill each puff with cream, finishing with a generous ring  of cream on top. Dust tops of cream puffs with powdered sugar; place atop puffs.

For a printer-friendly version of this recipe, please click here:  Cream Puffs

Cream Puffs 2

Carrot Cardamom Jam

Carrot Cardamon Jam

I have been in a little funk lately – and I think I finally figured out what it is.  I miss making jam – it has been at least a month since I have made a batch, and it is leaving a little bit of a void in my life.  I thought after making about 80 jars between June and December that I would need a couple of months just to get back into it – but I am ready.  I am ready to get back on that horse.  Now, there is just a couple of small problems…fresh fruit, and time.

Of all the jams I made this summer and fall, I hardly ventured into what I would call the “risky” jams.  Those are the jams that you don’t really use to make a peanut butter and jam sandwich.  I think my Fig Jam was the only one that came close – and after I saw her lick the spoon clean from the sample I gave her, I was pretty sure it would go perfect with peanut butter.  I remember when I had an open jar of the Mulled Cider Jelly in the refrigerator, and decided to use that on her sandwich.  I was sure I would hear about it that night – since that was my first attempt to broaden her from the berry or stone fruit jams.  That night as I started to make her a sandwich for the next day, she called from upstairs asking if I could use that really yummy jam again…success!

Last month when I attended the holiday gift workshop at The Pantry, I was overjoyed when I saw we were going to be making jam.  Not that I needed any more to give out – but I was so excited to try this jam, that would definitely go into the “risky” category.  Not only was this jam beautiful (look at the color!), it was delicious – especially with goat cheese.  This is the perfect appetizer jam.  So – aren’t you curious to see how this would go with peanut butter?  Well, you might have to make it to find out – and the good news is that you can get fresh carrots in the market pretty much all year.  I am holding out putting on my daughter’s sandwich – but if I run out of her other favorites…that might be next.

Ingredients

  • 1 pound 2 ounces fresh young carrots, peeled and cut into ½-inch chunks
  • Finely grated zest of 2 lemons
  • 1/3 cup freshly squeezed lemon juice
  • Finely grated zest of 1 orange
  • Freshly squeezed juice of 1 orange, about ½ cup
  • 1 ½ teaspoons roughly ground cardamom seed
  • 2 ¼ pounds sugar
  • 4 ½ ounces liquid pectin

 Preparation

Bring a large pot of salted water to a boil.  Add the carrots, reduce the heat slightly and simmer for about 8-10 minutes, until the carrots are tender but not mushy or falling apart.  Drain the carrots, run them under cold water to stop them from overcooking and set them aside in a colander to drain for a few minutes.

Place the carrots in a food processor and pulse until the carrots are finely chopped.  Be sure not to take them down to a puree.

Place the carrots, lemon zest and juice, orange zest and juice, and cardamom in a heavy bottomed stock pot.  Add the sugar and cook over high heat until the mixture comes to a boil.  Boil hard for 5 minutes, skimming and discarding any foam that rises to the surface.

Add the pectin and return to the boil.  Cook for another 1-3 minutes, testing for a set often.  When the jam has reached the desired consistency, remove the pot from the heat and ladle the jam into clean, sterilized jars.  Process as desired or cool and then store in the refrigerator.

For a printer-friendly version of this recipe, please click here:  Carrot Cardamom Jam

Chive and Black Pepper Popovers

Chive and Black Pepper Popovers 2

Happy New Year!  I can’t believe it is 2013 already, where did 2012 go?  Well, upward and onward – I am looking forward to see what the new year will bring.  I have certainly enjoyed being on vacation, and can’t believe I have to head back to work tomorrow.

So – I have been thinking a lot about what I am going to do differently in 2013 – and I decided that my resolution is to simplify.  I think I have said this before – but this time I mean it.  I am still not sure how I am going to achieve this goal – but I have to try.  I feel like my life is a constant marathon – I am always exhausted, never caught up – and know that I have miles to go before I am done.  As I am writing this, I am thinking about the 10 other things I should be doing.  I don’t want to give up the things I love doing, but again, maybe I can think differently about how to get them done.  It is only the 1st, I have 364 days to make this happen – but I have to look at each day and think about one thing I can do that will make things simpler for the future.

I have posted popovers before, and I swear, I can’t figure out why I don’t make them more often.  They are so ridiculously easy to make, and you can actually prepare the batter the day before!  These were something else – I scarfed down two of them in an instant.  I found the original recipe in Bon Appetit, but adapted slightly below. The girls also loved them, and they went great with the Lentil Soup I made for dinner.  They made our New Year’s Day dinner just a little more special.  And, do you want to know a little secret?  I only made half the batch tonight – and saved the rest of the batter for tomorrow night’s dinner – wow, I am already making good on my resolution to simplify – it doesn’t get any better than that!

And for those of you really paying attention, you will notice this is a different picture from last night…that is because they looked a little different the 2nd night, and just as delicious.  These look a little more authentic, so I decided to switch the picture…

Ingredients

  • 2 cups all-purpose flour
  • 2 tablespoons finely chopped chives
  • 1 tablespoon kosher salt
  • 1 teaspoon freshly ground black pepper
  • 3 large eggs
  • 2 1/2 cups whole  milk
  • 5 tablespoons melted unsalted butter, divided

Preparation

Whisk the first 4 ingredients in  a medium bowl. Whisk eggs and milk in a large bowl until well blended. Gently whisk in flour mixture, followed by 3 tablespoons of melted butter (do not  overmix).

DO AHEAD: Batter can be made 1 day ahead. Cover and chill.

Preheat oven to 425°. With the rest of the butter, grease 12 standard muffin cups with 1/2 teaspoons melted butter each. Pour batter into prepared muffin tins, filling cups three-quarters full  and dividing equally. Bake popovers until puffed, golden brown, and crispy around edges, 30-35 minutes. Using a thin knife or an offset spatula, remove popovers from pan. Serve immediately.

For a printer-friendly version of this recipe, please click here:  Chive and Black Pepper Popovers

Streusel Quick Bread

Streusel Bread

Sometimes I like to think that Christmas and New Year’s are the chocolate cookies of the Oreo, and the time between those two holidays is the cream filling.  For me, this is the best part. You have one holiday down, one to go – and now you have a week in between to enjoy yourself.  There was a time when I liked to work during those days – it was nice and quiet as most people were on vacation, and you could get a lot of stuff done.  Now that both of my kids are off from school – I like to be home with them.  Some years we go away, other years we are home just doing nothing.  Those are the days that baking usually ends up being the activity.

I have been on this kick lately to have my older daughter make Banana Bread all by herself.  I have a ton of frozen bananas and so whenever I know she has some free time, I pull some bananas out of the freezer and send her on her way. The last batch she made was terrific.  So – when does a sweet bread turn into a quick bread?  I have wondered this for a long time.  So – I decided to Bing it and find out.  The first thing that came up was a definition from Wikipedia:

“Quick bread is a type of bread which is leavened with leavening agents other than yeast. Quick breads include many cakes, brownies and cookies, as well as banana bread, beer bread, biscuits, cornbread, muffins, pancakes, scones, and soda bread.”

Well, now that makes a ton of sense.  Technically most of the sweets I make without yeast can be considered a quick bread.  So now that we have settled, we can move onto this latest recipe from Cooking Light.  This was definitely a quick bread, and a delicious one at that – and completely suitable for kids to make.  It is great for dessert with some whipped cream on the side, or with a nice espresso in the morning.  It is definitely quicker than making a coffee cake, but then again, without yeast, isn’t that just another quick bread?

Ingredients

Streusel:

  • 1/3 cup packed brown sugar
  • 1/3 cup old-fashioned rolled oats
  • 1 tablespoon all-purpose flour
  • 1/4 teaspoon ground cinnamon
  • Dash of salt
  • 2 tablespoons butter, melted
  • 2 tablespoons chopped walnuts

Bread:

  • 9 ounces all-purpose flour (about 2 cups)
  • 1/2 teaspoon baking soda
  • 1/2 teaspoon baking powder
  • 1/2 teaspoon salt
  • 5 tablespoons butter, softened
  • 2/3 cup granulated sugar
  • 3  large eggs
  • 1 teaspoon vanilla extract
  • 1 cup fat-free buttermilk
  • Baking spray with flour (such as Baker’s Joy)

Preparation

Preheat oven to 350°.

To prepare streusel, combine first 5 ingredients in a medium bowl. Add 2 tablespoons melted butter, stirring until well combined. Stir in nuts. Set aside.

To prepare bread, weigh or lightly spoon 9 ounces flour into dry measuring cups; level with a knife. Combine flour, baking soda, baking powder, and 1/2 teaspoon salt in a bowl, stirring well with a whisk. Combine 5 tablespoons butter and granulated sugar in a large bowl; beat with a mixer at medium-high speed until well blended. Add eggs, 1 at a time, beating well after each addition; beat in vanilla. Beating at low speed, add flour mixture and buttermilk alternately to sugar mixture, beginning and ending with flour mixture; beat just until combined.

Scrape half of batter into a 9 x 5-inch loaf pan coated with baking spray; sprinkle with half of streusel mixture. Spread remaining batter over streusel; swirl. Sprinkle remaining streusel on top of batter. Bake at 350° for 50 minutes or until a wooden pick inserted in center comes out with moist crumbs clinging. Cool 10 minutes in pan on a wire rack. Remove from pan; cool completely on wire rack.

For a printer-friendly version of this recipe, please click here:  Streusel Quick Bread

Cocoa Nib Pecan Shortbread

Pecan Shortbread

We made it – the kids are done with school, the gifts have been delivered, and now we can sit back and relax.  It’s amazing how this year I really thought I was doing everything ahead of time with all the jam sessions, but I was still scrambling up until the last week.  So – I am hear to write about one more delicious gift from the kitchen – knowing that some of you out there may be looking for just one more thing.
I have never been a huge nut person when it comes to baking – I love eating nuts as snacks, but I like my baked goods pure.  I omit the nuts in my banana bread, as well my chocolate chip cookies.  Even when I bake with peanut butter, I always use creamy.  Heck – I prefer creamy peanut butter just about always.  So – when I saw we were making these Pecan Cocoa Nib Shortbread at The Pantry’s Holiday Gift Making class, I was a little hesitant.
Well – this recipe was different – it really needed those nuts – and the secret?  Chopping those nuts up into really small pieces. It made all the difference.  Basically the nuts were not only used for flavor, but just a hint of texture.  Oh, and the cocoa nibs?  Out of this world.  If you don’t have cocoa nibs though, just chop some high quality chocolate up into small bits.
Now – if you have kids – I highly suggest these – although this recipe is also extremely easy.  You will just have to help with the chopping.  Now go get moving, and hopefully you can carve out some downtime as well this holiday.

Ingredients

  • 3 ½ ounces pecans
  • 8 ounces all-purpose flour
  • 2 ounces whole wheat flour
  • ½ teaspoon kosher salt
  • 8 ounces butter, soft
  • 5 ounces sugar
  • 1/3 cup cocoa nibs

Preparation

Toast the pecans in a 325 degree oven (300 convection) for about 8 minutes.  Remove from the oven and cool until cook enough to handle.  Chop into small pieces.

Whisk together the flours and the salt.  Set aside.

In a stand mixer with the paddle attachment, mix the butter and sugar on low speed until smooth.  Add the chopped pecans and cocoa nibs and mix until just incorporated.  Add the flour mixture and mix on low until just incorporated.

Roll the dough into logs and chill for several hours.  Slice into cookies and chill until ready to bake.

Bake at 350 degrees (325 convection) until browned, about 16-18 minutes.

Makes about 30 shortbread cookies.

For a printer-friendly version of this recipe, please click here: Pecan Cocoa Nib Shortbread

Sticky Ginger Cake

Sticky Ginger Cake

I feel like we are in the home stretch.  The holidays are over for some of us, and for others, they are just around the corner.  All of the treats have been made, the teacher gifts are wrapped and ready to be handed out, and winter vacation is just a few days away. Wow – I can’t believe I am almost there.

I can’t let this season go by without making at least one gingerbread recipe.  Every year I try something different  – but I always get the same result – a beautifully flavorful cake that is rich in spices and incredibly moist.  This time the recipe came from Cooking Light – from a 10-year-old girl.  She has started to write a column for the magazine each month – and I just love it.  These are definitely recipes that my daughter could easily make.  In fact – my birthday is coming up – and would you believe that my older daughter asked me what kind of cake I want??  I couldn’t believe it – she is actually going to make me a cake for my birthday.  It is like a dream come true – I usually go pick out my own cake because I am so picky – it can’t be just any cake, if we are going to spend money on it – it has to be better than one I could make myself.  Seriously she could make me just about anything, and I would love it.

Ok – back to this cake.  So – since this came from a 10-year-old, it is super easy – and just the recipe you need as you come into the home stretch.  So – if you spent all your energy on your main course – and need a quick and easy dessert for this time of year – here is your answer.  Better yet – find a 10-year-old, and they can make it for you…

Ingredients

  • 4.5 ounces all-purpose flour (about 1 cup)
  • 1 teaspoon baking soda
  • 1 teaspoon ground ginger
  • 1 teaspoon ground cinnamon
  • 1/2 teaspoon ground allspice
  • 1/4 teaspoon salt
  • 1 cup low-fat buttermilk
  • 2  large eggs, beaten
  • 5 tablespoons honey, divided
  • 5 tablespoons molasses, divided
  • 1/4 cup dark brown sugar
  • 2 tablespoons butter
  • 2 teaspoons grated fresh ginger
  • 1 tablespoon water
  • 1 teaspoon powdered sugar

Preparation

Preheat oven to 400°.

Lightly coat an 8-inch square metal baking pan with cooking spray. Set prepared pan aside.

Weigh or spoon flour into a dry measuring cup; level with a knife. Combine flour and next 5 ingredients (through salt); stir with a whisk. Combine buttermilk and eggs. Combine 1/4 cup honey, 1/4 cup molasses, brown sugar, butter, and fresh ginger in a pan over medium heat. Stir constantly until sugar melts. Remove pan from heat; cool 5 minutes. Add egg mixture to honey mixture, stirring with a whisk. Add egg mixture to flour mixture; stir until well combined.

Pour batter into pan. Bake at 400° for 25 minutes. Place on a rack; pierce surface with a skewer. Combine 1 tablespoon honey, 1 tablespoon molasses, and 1 tablespoon water; brush over hot cake. Cool. Dust with powdered sugar.

For a printer-friendly version of this recipe, please click here:  Sticky Ginger Cake

Espresso Marshmallows with Dark Chocolate

Espresso Marshmallows

I have to say, I have been putting off this post for a few days now.  Friday’s news really hit a little too close to home for me.  On Friday, it was bad enough learning about what happened – in the state where I went to elementary school.  But Saturday, when I learned that it was two first grade classrooms, it was a little too much to swallow.  My younger daughter is in first grade, and I just can’t imagine what a nightmare those poor families are living right now.  I tried to stay away from the computer all weekend – and we didn’t have the television on except for football on Sunday – but today I couldn’t avoid it any longer.  It was hard enough leaving the house knowing my kids would be at school today.  I got to my office and just cried.  I wanted to call the schools, and make sure they were going to start locking the doors during the day – but I decided they would get many hysterical calls today, and I wouldn’t add to the chaos.  This is just part of the world we live in, and it makes me sick.  We have to enjoy every minute we have – especially with our little ones.  My heart goes out to all the people suffering from this horrendous tragedy.  I hope we can look back at this as the event that changed things in this country.  We can always hope.

——————————————————————————————————————————

Last week I took a Holiday Gift Making class at my favorite community kitchen – The Pantry.  It was awesome, although I really didn’t need any more edible gifts.  I have about 80 jars of jam I made this summer and fall…  It was really fun, and I came home with 12 more nicely wrapped gifts from the kitchen.  As if that wasn’t enough – my older daughter asked when we were going to make our annual holiday pretzels.  Seriously?  Did we need more treats – of course we did, how could a holiday season go by without making those?  So – on Sunday afternoon, we got out the supplies, and the girls and I hammered out another 7 bags of gifts.  I swear we could go into business at this point.  Does anyone need any?

These marshmallows were one of the treats we made at the class last week – and what an incredible treat they were.  I was snacking on them the entire time.  There were not the easiest of the holiday treats, but they were definitely worth the trouble.  Be careful if you make these with kids – they need to watch you pour the syrup into the egg whites.  They will have great fun decorating though!

Ingredients

  • 1 tablespoon vegetable oil
  • 1/4 cup powdered sugar
  • 1/4 cup cornstarch
  • 1 tablespoon sugar
  • 1 vanilla bean
  • 1/4 cup instant espresso
  • 1/2 cup water
  • 1 ounce powdered gelatin
  • 14 ounces sugar
  • 1 tablespoon corn syrup
  • 3/4 cup water
  • 2 1/2 ounces egg whites, room temperature
  • 1/4 teaspoon kosher salt
  • good quality dark chocolate for decorating

Preparation

Mix the cornstarch and powdered sugar together.  Prepare a 9×13″ pan by greasing it lightly with the vegetable oil.  Dust it with half of the powdered sugar mixture and lightly shake off any excess.

Mix together the vanilla bean seeds and sugar.  Rub with your fingers until the seeds are incorporated into the sugar.  Mix the water and vanilla sugar in a small saucepan and bring to a boil.  Stir in the instant espresso until it is completely dissolved.  Transfer to a bowl and place in the fridge until thoroughly chilled.

When the coffee is chilled, slowly sprinkle the gelatin on top, stirring it in to keep it from clumping.  Place this over a pot of hot water to melt the gelatin, stirring occasionally.

Combine the sugar, corn syrup and 3/4 cup of water in a pot over low heat.  Stir until the sugar is dissolved.  Stop stirring and bring to a boil.  You want the syrup to eventually reach 260 degrees.  When the syrup reaches 240 degrees, begin beating the egg whites until they begin to look like meringue.  The goal is to get the egg whites to whip up at the same time the sugar syrup reaches 260 degrees, adjusting the speed of the mixer as needed.  Once they are stiff and syrup is at 260 degrees, begin slowly pouring in the syrup while continuing to beat the whites on medium high-speed.

If needed, re-warm the gelatin mixture and then pour it into the meringue.  Continue whipping until the marshmallow mixture is glossy, tripled in volume and doesn’t visibly have steam rising from it.  Immediately pour into the prepared pan and quickly smooth the top flat.  Let the marshmallow sit, uncovered, for at least 3 hours at room temperature.

Dust a work surface with the rest of the sugar cornstarch mixture.  Run a knife along the edges to loosen the marshmallow and turn out onto the surface.  Cover with a layer of powdered sugar and rub in with your fingers.  Cut the marshmallow up into squares and toss the squares in the powdered sugar mixture.  Decorate the marshmallows with the melted chocolate.  Store in an airtight container for up to a week.

For a printer-friendly version of this recipe, please click here: Espresso Marshmallows with Dark Chocolate

Fall Classic Cocktail

Fall Classic Cocktail

It is so easy to make summer cocktails – it seems as though anything fruity on ice is just perfect to drink in the summer.  I think it is harder to make a really great fall/winter cocktail – without making a warm drink.  You want to create something that gives the aura of warmth, something with an intense flavor.

When my husband and I go to New York City, one of our favorite places for a delicious cocktail and dinner is the Gramercy Tavern.  The restaurant is very fancy – but we stick to the bar – in fact we have never even been to the dining room.  They have a wonderful prix fix meal that is extremely reasonable, and some of the best cocktails around.  They are classic cocktails – not the kind that are completely outrageous, but just good solid drinks.

I saw this recipe printed in Bon Appetit last month – and because it was from the Gramercy Tavern, I had to give it a try.  I changed things up a little – since I have been trying to make cocktails without using simple syrup – so I substituted for Snap Liquor – a wonderful sweet liquor with all the flavors of fall – like a Gingerbread treat.  I thought this was amazing, and our friends liked it as well.  It will definitely be my favorite this season.

Bon Appetit – Gramercy Tavern

Ingredients

  • 2 tablespoons apple brandy (such as Calvados or Laird’s)
  • 2 tablespoons bourbon
  • 1 tablespoon Snap Liquor
  • 2 tablespoons fresh  apple cider
  • 1 tablespoon fresh  lemon juice
  • 1 dash of Angostura bitters
  • Dried or fresh apple slice  (optional)

Preparation

Fill a cocktail shaker with ice. Add apple brandy, and next 5 ingredients. Shake cocktail vigorously 10-15  times and strain into a chilled Martini glass. Garnish with apple slice, if  desired.

For a printer-friendly version of this cocktail, please click here:  Fall Classic Cocktail

Red Lentil-Pumpkin Soup

Red Lentil Pumpkin Soup

I am not really a huge kitchen gadget person – believe me, I have a lot of gadgets in my kitchen, but I am shocked to look through my drawers at what I use, and what just sits there collecting dust.  Since we are in the gift giving season, I have decided to post my all-time favorite kitchen gadgets.  Please note, I have not been paid what-so-ever to promote any of these items – these are all mine, and I am giving you my honest feedback.  I would give you a top 10 list, except that I cam really only think of my top 5 – would you believe that I really don’t have more than 5, with all the cooking I do? I think that says a lot right there – I use the same things over and over…these are in no particular order.

  1. Giant Spatula – I use this for everything: cakes, roasts, pommes Anna – anything I need to move from one place to another.
  2. Ice Cream Scoops – mostly I use these to bake with, and I have multiple sizes: cookie dough and cupcakes.
  3. Silicone Pastry Brush – fabulous because you can stick it in the dishwasher and it comes out perfectly clean!
  4. 1/4-Cup Measuring Cup – great for baking, and for making cocktails!
  5. Immersion Blender – what an amazing thing this is – it saves tons of dishwashing time.

Speaking of immersion blenders – I really don’t know what I would do without mine.  Before I had one, this soup would have been a pain in the neck.  I hate putting hot liquids into the blender, it always makes me nervous.  This soup was one of the easiest dinners I have made in a long time – and the best part of all was how few dishes I had to wash.  Oh, the other bonus is that this soup is vegan, dairy-free and gluten-free (as long as you skip the yogurt garnish) – and for my husband these days – that is a really good thing.  The soup was delicious, and perfect for this time of year.  You even have enough pumpkin left over to make some pumpkin bread.

So – with all the craziness of the season, do yourself a favor – get yourself an immersion blender, make this soup for dinner – and then order the rest of the gifts above for your friends and family.   Done, done, and done.

Ingredients

  • 2 teaspoons canola oil
  • 1 cup chopped onion
  • 1 teaspoon minced garlic
  • 3 1/2 cups organic vegetable broth, divided
  • 1 cup dried small red lentils
  • 1 teaspoon ground cumin
  • 1/4 teaspoon salt
  • 1/4 teaspoon ground cinnamon
  • 1/8 teaspoon ground red pepper
  • 1 cup water
  • 3/4 cup canned pumpkin
  • 1 tablespoon grated peeled fresh ginger
  • 1 tablespoon fresh lemon juice
  • 3 tablespoons plain low-fat yogurt (optional)
  • 1/4 cup unsalted pumpkin seed kernels, toasted (optional)
  • 1/4 cup chopped fresh cilantro (optional)

Preparation

Heat a large Dutch oven over medium-high heat. Add oil to pan; swirl to coat. Add onion and garlic to pan; sauté 4 minutes. Stir in 3 cups broth, lentils, and next 4 ingredients (through red pepper); bring to a boil. Cover, reduce heat, and simmer 10 minutes or until lentils are tender.

Use an immersion blender to blend until smooth.  If you don’t have one, place the lentil mixture in a blender. Remove center piece of blender lid (to allow steam to escape); secure blender lid on blender. Place a clean towel over opening in blender lid (to avoid splatters). Blend until smooth. Return lentil mixture to pan over medium heat. Add remaining 1/2 cup broth, 1 cup water, and pumpkin to pan; cook 3 minutes or until thoroughly heated. Stir in ginger and lemon juice.

Ladle 1 1/2 cups soup into each of 4 bowls; top each serving with about 2 teaspoons yogurt, 1 tablespoon pumpkin seeds, and 1 tablespoon cilantro if using.

For a printer-friendly version of this recipe, please click here:  Red Lentil-Pumpkin Soup

Chocolate Sandwich Cookies

Chocolate Sandwich Cookies

Is it Friday yet?  Boy, what a week, I still feel like I am recovering from the bunnies this weekend!  I am definitely looking forward to a bunny-free weekend.  After all, it is December – time to really start some serious baking.  I am still on the fence as to whether I am going to go with my old standbys, or if I am going to try out some new stuff.  Knowing me, I have to try at least a few new things, but I am also looking forward to these and definitely these.

I have always secretly been intrigued with sandwich cookies.  It has taken me years to figure out why – and I think I finally nailed it.  It is also why my kids seem to go nuts with them as well.  Cookies are great, but sandwich cookies are awesome – you get double the cookie with a bonus of filling.  As a kid, who never got any cookies – to get a sandwich cookie was really hitting the jack pot.  Normally I only let my kids pack one cookie in their lunch as dessert – but when I have sandwich cookies in the house – they get two cookies in one!  Wow, how has this been staring me in the face all this time?

I saw these cookies in Cooking Light, and thought these would be great to kick-start the holiday season.  The chocolate filling was delicious and rich, and the cookies were nice and chewy soft.  Plus, at 156 calories per sandwich, you are really getting a good deal.  You can choose any cookie cutter that floats your boat – we chose hearts and stars.  Then you can make baby cookies out of those shapes – just don’t let them burn, they cook faster than the bigger round cookies.  Now is it Friday yet?

Ingredients

Cookies:

  • 8 ounces cake flour (about 2 cups)
  • 1/2 teaspoon salt
  • 1/4 teaspoon baking powder
  • 1 cup powdered sugar
  • 1/2 cup butter, softened
  • 2 tablespoons 2% reduced-fat milk
  • 1 1/2 teaspoons vanilla extract

Filling:

  • 1 1/2 ounces bittersweet chocolate, finely chopped
  • 2 tablespoons 2% reduced-fat milk
  • 1/2 cup powdered sugar
  • 2 tablespoons Dutch process cocoa
  • Dash of salt

Preparation

Preheat oven to 350°.

To prepare cookies, weigh or lightly spoon flour into dry measuring cups; level with a knife. Combine flour, 1/2 teaspoon salt, and baking powder, stirring with a whisk. Place powdered sugar and butter in a large bowl. Beat with a mixer at medium-high speed until well blended. Add 2 tablespoons milk and vanilla; beat 1 minute or until well combined. Add the flour mixture; beat on low-speed until just combined.

Shape the dough into a 6-inch disk. Cover tightly with plastic wrap; chill 30 minutes. Discard plastic. Roll dough to a 1/4-inch thickness on a lightly floured surface. Cut out 36 (2-inch) round cookies, rerolling scraps as necessary. Using a small decorative cookie cutter, cut a heart-shaped opening in 18 rounds. Place cookies 1 inch apart on baking sheets lined with parchment paper. Bake at 350° for 14 minutes or until lightly browned. Cool on a wire rack.

To prepare filling, combine chocolate and 2 tablespoons milk in a microwave-safe dish; microwave at HIGH for 1 minute or until melted, stirring every 15 seconds. Stir just until smooth. Combine 1/2 cup powdered sugar, cocoa, and dash of salt in a bowl, stirring well with a whisk. Add chocolate mixture to sugar mixture; stir just until smooth. (Mixture will thicken as it cools.) Divide chocolate mixture evenly among 18 whole cookies; spread in a thin, even layer. Top each cookie with a cut-out cookie.

For a printer-friendly version of this recipe, please click here:  Chocolate Sandwich Cookies