Israeli-Style Hummus

Israeli Style Hummus

Hummus is one of those go to appetizers that everyone loves.  It is great with vegetables and crackers, and much healthier than the traditional “onion dip” which is why it has such a great reputation, and you can pretty much find it anywhere.  But how many of you have actually tried to make it from scratch?  I am not just talking about making it with canned chickpeas, I am talking the real deal – nothing from a can.

Last year my dear friend and colleague from Israel brought me some real Israeli tahini during one of her visits to the states.  At that point, I thought about making hummus, but the canned chickpeas where dragging me down.  I just didn’t want to ruin that authentic tahini with something canned.  Then something happened.  A pound of dried chickpeas showed up in my weekly market basket.  I had never even seen them before – but they had hummus written all over them.  Again though – they sat in my pantry for months – until the last and final sign came.  It was this recipe printed in Bon Appetit.  Seriously, the universe was somehow telling me that I had to make this.  So this time I listened – and wow.  This is no ordinary hummus – this is silky smooth, and packed with a nutty fresh flavor.  I could eat it with a spoon.  And it was so good, I made another batch two weeks later.  I know, I have no time to cook, bake, or post on this blog anymore, but somehow I carved out enough time to make this hummus twice in a month.  That’s saying something right there…

Ingredients

  • 1 cup dried chickpeas
  • 2 teaspoons baking soda, divided
  • 4 garlic cloves, unpeeled
  • cup (or more) fresh lemon juice
  • 1 teaspoon kosher salt, plus more
  • cup tahini
  • ¼ teaspoon (or more) ground cumin
  • Olive oil (for serving)

Preparation

Place chickpeas and 1 tsp. baking soda in a medium bowl and add cold water to cover by 2″. Cover and let sit at room temperature until chickpeas have doubled in size, 8–12 hours. Drain and rinse.

Combine soaked chickpeas and remaining 1 tsp. baking soda in a large saucepan and add cold water to cover by at least 2″. Bring to a boil, skimming surface as needed. Reduce heat to medium-low, partially cover, and simmer until chickpeas are tender and really falling apart, 45–60 minutes. Drain; set aside.

Meanwhile, process garlic, lemon juice, and 1 tsp. salt in a food processor until coarsely puréed; let sit 10 minutes to allow garlic to mellow.

Strain garlic mixture through a fine-mesh sieve into a small bowl, pressing on solids to release as much liquid as possible. Return liquid to food processor; discard solids. Add tahini and pulse to combine. With motor running, add ¼ cup ice water by the tablespoonful and process (it may seize up at first) until mixture is very smooth, pale, and thick. Add chickpeas and cumin and process, occasionally scraping down sides, until mixture is extremely smooth, about 4 minutes. Thin with more water if you prefer a looser consistency; taste and season with salt, more lemon juice, and more cumin as desired.

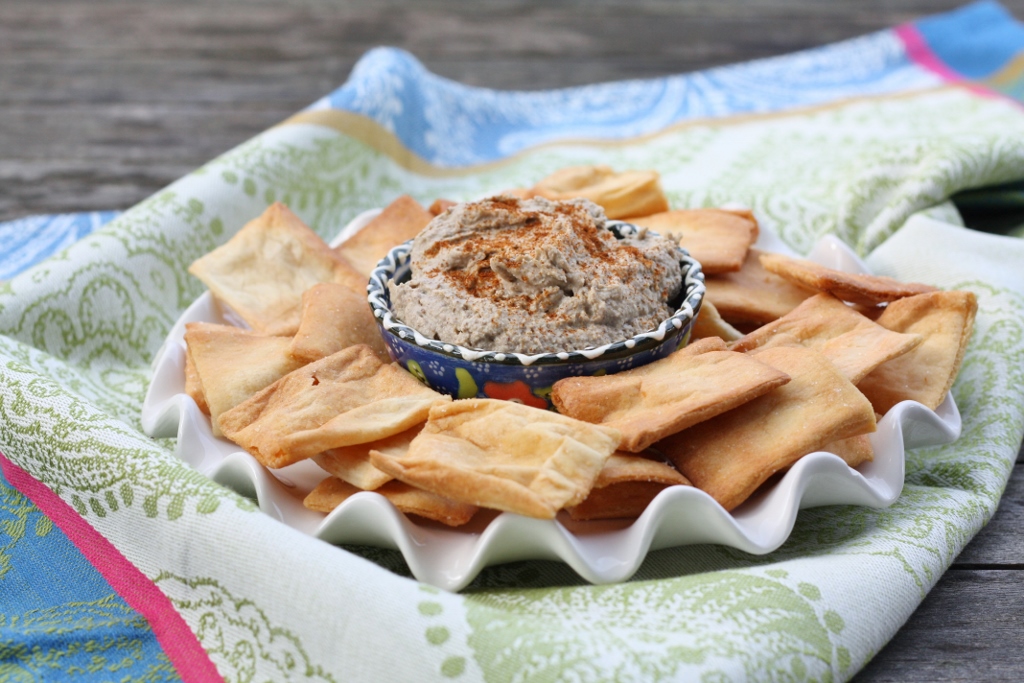
Spoon hummus into a shallow bowl, making a well in the center, and drizzle liberally with oil. Top as desired.

For a printer-friendly version of this recipe, please click here:  Israeli Style Hummus

Advertisement

Warm Spiced Cashews

Warm Spiced Cashews

Sometimes you feel like a nut, sometimes you don’t…one of my all-time favorite jingles.  Even though they were talking about candy, I relate it to my state of being.  Most of the time I feel like a nut because of all that I have going on in my life.  I remember a couple of years ago my New Year’s resolution was simplify – and I really feel like I did a good job – I simplified my personal life so that my work life could continue to get crazier and crazier.  These days, if I can spend more than a couple of hours in the kitchen actually being creative, I feel like a new person.  I am very sorry that my blog posts are getting more and more infrequent, but that’s reality these days.  And as far as my New Year’s resolution this year, it’s called thrival.  I know it is not a real word, but I am sure you can imagine what it means.

A few years ago I started getting into making cocktails – not because I drink a lot of alcohol, but because it was a way for me to create something with almost instant gratification – I didn’t need to wait for it to cook or bake, and all of a sudden, I had a complex flavor creation that I could share with others.  Because at the end of the day, that’s what this is really all about – sharing.  Now what goes great with a nice cocktail, some awesome nuts!  I saw this recipe in Cooking Light, and I was so excited to be able to whip these up in an instant – seriously it was that easy.  They made the house smell like an exotic restaurant – and they went great with our New Year’s Eve cocktails.  At this moment, I was definitely experiencing thrival.

Ingredients

  • 2 teaspoons peanut oil
  • 2 teaspoons dark brown sugar
  • 1/2 teaspoon five-spice powder
  • 1/2 teaspoon ground cumin
  • 1/4 teaspoon freshly ground black pepper
  • 1/4 teaspoon ground red pepper
  • 2 teaspoons water
  • 1 cup roasted, unsalted cashews
  • 1/2 teaspoon kosher salt

Preparation

Preheat oven to 350°. Line a large rimmed baking sheet with parchment paper.

Heat peanut oil in a medium saucepan over medium heat. Add brown sugar, five-spice powder, cumin, black pepper, red pepper, and water to pan. Stir until sugar dissolves and mixture begins bubbling. Add cashews to pan; cook 2 minutes or until well coated, stirring constantly.

Spread cashews evenly on prepared baking sheet, using 2 forks to separate them and leaving as much room as possible between nuts. Sprinkle nuts evenly with salt. Bake at 350° for 7 minutes or until fragrant. Cool slightly on pan before serving.

For a printer-friendly version of this recipe, please click here:  Warm Spiced Cashews

Chocolate Chunk-Pumpkin Seed Cookies

Chocolate Chunk-Pumpkin Seed Cookies

I have some exciting news!  First Look, Then Cook has finally joined the Instagram revolution!  I know I have been horrible about posting this year, and if you could shadow me for a day, you would completely understand why – but I figured this would be a great way to be able to share more with you – and not just what I am posting on the blog – but the amazing sandwich I ate yesterday, and other foods that I find when I travel.  I am super excited about it – so please check it out!  Right now I don’t have any followers – who will be my first?  Now for the post, as you can see by the picture, that has been ready now for a while…but is there ever a bad time to make cookies?

Making a decision is tough enough.  But imagine if you felt like everyone should have a say in every decision made – and worse, that everyone needs to agree.  You might feel good because your opinion really does matter – but imagine how often in life you can get everyone to agree on something.  Sometimes it is good for someone to make a decision that you don’t agree with – it opens your mind up to new ideas, to take risks, and to grow as a person.

Now think about applying that strictly to food – can you imagine if everyone in your family had to agree on what you made for dinner every night?  Wow, what a nightmare.  I would say that we have a 70% hit rate at home – where the majority of the time, everyone is happy with the dinner options – but there are definitely some times when my children are not happy.  Then out of those times, I would say that 50% of the time, they end up really liking it anyway.  Those are pretty good numbers right there.  And because of that, I continue to stretch the boundaries – making sure they are continuously trying new things.

There are other times when everyone is super excited about what I am making, and then the outcome is not what was expected.  I found this recipe in Bon Appetit, and it had been a while since I made some cookies – so I decided to give them a try.  The batter was delicious, but I decided to make the cookies smaller than they suggested in the recipe – and unfortunately I probably cooked them a little longer than I should have.  It did not impact the flavor at all, but these were definitely more on the crispy side.  My older daughter LOVED them, but my younger one, not so much.  She only likes soft chewy cookies, and although she did give them a try, they were just not her favorite.  Oh well, you can’t please everyone all the time – but that’s ok.  It was still an excellent decision to make the cookies.

Please note – I left the recipe exactly as it was printed below, and if you decide to make the cookies smaller, I would only cook them about 8 minutes max.

Ingredients

  • cups raw pumpkin seeds (pepitas)
  • cups all-purpose flour
  • ½ cup unsweetened cocoa powder
  • 2 teaspoons kosher salt
  • ½ teaspoon baking soda
  • ½ teaspoon ground cinnamon
  • ¼ teaspoon hot smoked Spanish paprika
  • cups (packed) light brown sugar
  • 1⅓ cups granulated sugar
  • 1 cup plus 2 tablespoons unsalted butter, room temperature
  • 2 large eggs
  • cups bittersweet chocolate chunks or chips
  • Flaky sea salt

Preparation

Place racks in upper and lower thirds of oven; preheat to 350°. Toast pumpkin seeds on a large rimmed baking sheet on upper rack, tossing occasionally, until golden brown, 8–10 minutes. Let cool.
Meanwhile, whisk flour, cocoa powder, kosher salt, baking soda, cinnamon, and paprika in a large bowl. Using an electric mixer on medium-high speed, beat brown sugar, granulated sugar, and butter in a large bowl until pale and fluffy, about 4 minutes. Add eggs one at a time, beating to blend after each addition. Reduce speed to low; add dry ingredients in 3 additions, mixing until well blended after each. Fold in chocolate and pumpkin seeds.
Portion dough into 18 balls (about ¼ cup each) and divide between 2 parchment-lined baking sheets, spacing 3″ apart. Sprinkle with sea salt and bake cookies, rotating pans halfway through, until edges are slightly browned and firm but centers are still soft, 18–20 minutes. Transfer to wire racks; let cool.
For a printer-friendly version of this recipe, please click here:  Chocolate Chunk-Pumpkin Seed Cookies

Pumpkin-Caramel Tart

Pumpkin Caramel Tart

All too often we forget about the “assist.” I won’t even go into how this applies at work – that would be a white paper, not a one page blog post.  But I am talking about at home – particularly around the holidays.  Last year stress was at an all-time high.  We had two major events we were planning, one of them taking us away for almost 3 months – and work was its normal state of chaos.  The holidays were just a blur – and I remember vowing that I would never try to cram everything in ever again.  I remember having to explain to my daughters why we would not have time to make the holiday treats – they were crushed.  There was just too much going on, and it wasn’t until I was on an airplane flying far, far away, that I was able to take a breath.

This year my older daughter decided to take matters into her own hands.  A few weeks ago she sat me down to talk about our “holiday strategy” this year.  I loved it.  She wanted to help plan out everything we wanted to do, so we would have time to get that holiday baking in, and we would not be stressed.  We decided on a plan of attack, and the execution has been flawless.  We are already so far ahead of where we were last year – it is amazing.  All it took was a little planning, and some help.  It’s amazing what you can accomplish when you work together.

Thanksgiving was a quiet day for us – this was the first year ever that it was just the 4 of us. We decided that for dessert we would get together with our friends from the street – fortunately there were enough of us that we got to do a lot of baking, which meant experimenting in the kitchen.  Every once in a while a recipe comes along that really knocks my socks off.  This is one of those recipes.  It wasn’t until after I took a bite of this tart that I decided it MUST go into the blog – for nothing else than to document the fact that this was a home run winning recipe.  After all, that’s what this blog was intended to be – a way to document recipes for years to come.  I definitely adapted this one, but Bon Appetit deserves the credit here – thanks for yet another assist – I couldn’t have done it without you!

Ingredients

Crust

  • cups graham cracker crumbs
  • 1/4 cup sugar
  • 1/3 cup melted butter

Filling and Assembly

  • Pinch of cream of tartar
  • cups granulated sugar, divided
  • 1 cup heavy cream
  • 1 cup canned pumpkin purée
  • 2 tablespoons light brown sugar
  • 1 tablespoon all-purpose flour
  • teaspoons finely grated peeled ginger
  • ¾ teaspoon ground cinnamon
  • ¾ teaspoon kosher salt
  • 3 large eggs
  • Whipped cream (for serving)

Special Equipment

  • A 9-inch springform pan

Preparation

In a small bowl, combine the crumbs and sugar; add butter and blend well. Press onto the bottom and up the sides of an ungreased 9-inch springform pan. Bake at 375° for 8-10 minutes or until crust is lightly browned. Cool on a wire rack before filling.

Bring cream of tartar, 1 cup granulated sugar, and 2 Tbsp. water to a boil in a medium saucepan over medium heat, stirring until sugar dissolves. Increase heat to medium-high and cook, swirling pan occasionally (do not stir), until caramel is a deep amber color, 8–10 minutes. Remove from heat. Whisking constantly, carefully add cream (mixture will be extremely hot and will bubble vigorously); whisk until smooth. Let caramel cool slightly in pot.

Whisk pumpkin purée, brown sugar, flour, ginger, cinnamon, and salt in a large bowl. Gradually add caramel and eggs, whisking until well blended. Scrape filling into prepared crust.

Bake tart, rotating halfway through, until filling is set around edges and center barely jiggles, 30–35 minutes. Transfer to a wire rack and let cool in pan.

Serve with whipped cream.

For a printer-friendly version of this recipe, please click here:  Pumpkin-Caramel Tart

Sesame-Peanut Bars

Sesame-Peanut Bars

As my grandmother would say, “What a revolting development…”  I heard her say that when things were pretty grim.  That was exactly what came into my head when I learned what was going on in Paris.  The city that we lived in this summer for 6 wonderful weeks.  The city that I get, and where I belong, despite it’s unrest.  They chose places where locals hang out – it wasn’t the tourist places this time.  But it did happen to be an area that we spent quite a bit of time in.

I remember waking up this summer fearful every morning for something like this, but it didn’t stop me.  I was careful and aware at all times.  I remember one day we were walking around near the Place de la Republique (very close to the attacks), and all of a sudden there were armed police everywhere.  They came out of no where.  I looked around, and told my girls we had to walk quickly.  We needed to get out of there, and we were not about to board the subway.  So, we took off, down some sides streets, but quickly we were far enough away that I felt better.  I still never found out what was going on, but there must have been a threat of something, and I was very thankful that no one was hurt that day.  Unfortunately, Friday was different.

I am slowly getting myself back into a regular schedule, after being gone for 3 months.  I can’t believe it has taken me this long, but it has.  I am now to the point where I am starting to go through my pantry and use up ingredients that have been sitting there a little too long.  Take these black sesame seeds – I wasn’t really sure what I was going to do with them, until I saw this recipe in Bon Appetit.  It couldn’t have been more perfect.  I wasn’t sure how these were going to turn out, but they were right up my husband’s alley.  He has confiscated the rest for snacks at work this week.

Paris will always be in my thoughts, and I am always looking forward to my next trip.  Even now, after this revolting development.  They need our support now more than ever.  I hope they feel all the love from around the world, helping them to feel safe again.

Ingredients

  • 1/4 stick of butter
  • 1 1/4 cups white and/or black sesame seeds
  • 3/4 cup unsweetened shredded coconut
  • 1/4 cup unsalted, roasted peanuts
  • 1/4 teaspoon kosher salt
  • 1/4 cup honey
  • 2 tablespoons creamy peanut butter
  • 1/4 teaspoon vanilla extract

Preparation

Butter an 8×8″ glass baking dish; line with parchment paper, leaving a generous overhang on all sides. Mix 1 1/4 cups white and/or black sesame seeds, 3/4 cup unsweetened shredded coconut, 1/4 cup unsalted, roasted peanuts, and 1/4 teaspoon kosher salt in a large bowl. Mix 1/4 cup honey, 2 tablespoons creamy peanut butter, and 1/4 teaspoon vanilla extract in a small bowl. Add to sesame seed mixture and mix well.

Scrape mixture into prepared baking dish; press firmly into an even layer. Bake at 350°F until golden brown around the edges, 20–25 minutes. Transfer to a wire rack and let cool until firm, 30–40 minutes. Lift out of baking dish (if it starts to crumble, let cool longer) and cut into 16 bars. Let cool completely.

Do Ahead:  Bars can be made 3 days ahead. Store tightly wrapped at room temperature.

For a printer-friendly version of this recipe, please click here:  Sesame-Peanut Bars

6tag_130715-162307


No-Bake Chewy Granola Bars

No-Bake Chewy Ganola Bars

What did you do with your extra hour?  Did you get some much needed sleep?  Did you finish that project that you just haven’t been able to fit in?  I know, there are always too many things on the list, and not enough time to get to everything.  That extra hour though is a gift, a luxury, and one that I look forward to each and every year.

This fall things have been a little crazier than normal, with all of the Seattle Public School drama that has been going on.  From the changing bell times, to the budget cuts, the district has kept my family and I on our toes for what has been a very tumultuous ride.  Just when I think that things are getting better, another tree falls in the middle of the road, and you just stop and wonder how you are going to keep moving.  The latest email I received once again brought my older daughter to tears.  She has seen it all – and it has not always turned out for the best – but she is dealing with it.  At 13, she is definitely experiencing real life.

For weeks we have been broaching the subject of High School, and where she will go – because we actually thought she would have a choice.  If the School Board votes for the latest proposed changes – she will no longer have a choice, and may no longer be part of a curriculum that fits her needs.  Let’s see what happens, we shouldn’t jump the gun just yet – but we have been here before, and the worst has happened.  And she knows that…

So what did I do with my extra hour?  I made some granola bars – some delicious chewy no-bake granola bars which I adapted from Cooking Light. And the best news is that it didn’t take the whole hour.  And because of that, I actually had some time to post these tonight.  So if you haven’t decided what to do with your extra hour…why not spend it in the kitchen?  It certainly made my day a little brighter.

Ingredients

  • 1 1/4 cups quick-cooking oats
  • 1 cup ancient-grain cereal blend (such as Cheerios + Ancient Grains)
  • 1/4 cup unsweetened shredded coconut
  • 1/4 cup chopped unsalted pistachios
  • 1/2 teaspoon vanilla extract
  • 1/4 teaspoon kosher salt
  • 1/3 cup creamy peanut butter
  • 1/3 cup honey
  • 1/4 cup mini-chocolate chips
  • Cooking spray

Preparation

Combine first 6 ingredients (through salt) in a large bowl.

Combine peanut butter and honey in a saucepan over medium heat. Cook 3 minutes or until peanut butter melts, stirring frequently.  Mix in the chocolate chips.

Pour peanut butter mixture over oat mixture; stir well to combine. Spread mixture into an 8-inch square baking pan coated with cooking spray; press firmly to form a compact, even layer. Place pan in freezer for 10 minutes. Remove from freezer, and cut into 12 bars.

For a printer-friendly version of this recipe, please click here: No-Bake Chewy Granola Bars

Sweet Corn Chowder with Red Pepper and Onion

Sweet Corn Chowder with Red Peppers

It’s hard to believe that I have been home for a month already.  Not one day goes by that I don’t think about my wonderful summer.  Fortunately I happen to live in a food city, because I swear I don’t know what I would do if that were not the case.  Right now the farmer’s markets are just filled with amazing fall produce.  More on that later…

One of the surprises I had coming back to Seattle after almost 3 months away, was the number of new restaurants that had opened while I was gone.  It was fun adding new places to my list – and I finally updated my favorites on this blog.  The other weekend at the Food Blogger’s Conference, we were fortunate enough to have a tasting fair with many of Seattle’s most popular restaurants, cooking us delicious bites.  It was almost too good to be true.  It was not too crowded, and you could try whatever you liked.  There were 3 restaurants that really won the prize that night in my book.  One of them you might notice is on my favorites list already…

  • Skillet Diner made their incredible chicken and waffles – crispy fried chicken on top of a delicious tender on the inside and crispy on the outside waffle, with a delicious maple syrup drizzle – I am telling you, it is comfort food at it’s finest.
  • Hot Cakes had this drinking chocolate that was out of this world – people were latterly standing there in awe – among the other treats of deliciousness that they were handing out.
  • Molly Moons served their vegan coconut ice cream – yes, I have had this before, but it still amazes me that it is dairy free, yet so creamy and rich.

So there you have it – if you happen to be in the area, you can’t go wrong with any of those places.  Now back to the markets.  My market basket is just wowing me with amazing produce every week, and last week they sent me with all the ingredients to make this delicious vegan soup (and the recipe!).  I wasn’t sure that it would really taste like chowder without any dairy – but it certainly did.  It was such a nice treat to come home after work, and so quickly be able to warm up this soup for a wonderful meal.  There is no doubt that France is a special place for food, but until I get back there, I am lucky to be right here in Seattle.

Ingredients

  • 3 cups corn kernels, shucked from ears
  • 1 sweet onion, peeled and diced
  • 2 Topepo Rosso peppers, seeded and diced
  • 4 cups vegetable stock
  • 6 fresh sage leaves, chopped
  • Pinch red pepper flakes
  • 2 teaspoons olive oil
  • Sea salt

Preparation

Heat the oil in a 4-quart pot until shimmering. Add the onion and peppers and sauté until lightly tender, 2 to 3 minutes. Add the corn, sage and chile pepper flakes; saute for 1 minute. Season with salt to taste. Stir in the broth and bring to a boil. Reduce the heat to medium low and simmer until vegetables are all tender, about 5 minutes.

Carefully pour half the mixture into a blender and purée until smooth (remember the soup is hot, so be careful). Stir the puréed mixture back into the pot with the remaining soup. Taste the soup and add more salt, if desired. Ladle into bowls, garnish with a few chile flakes and serve hot.

For a printer-friendly version of this recipe, please click here: Sweet Corn Chowder with Red Pepper and Onion

Summer Vegetable Frittata

Summer Vegetable Frittatta

What a weekend…all focused on food.  Ok, so maybe most of my weekends are all focused on food – but this was different.  I attended the International Food Bloggers Conference here in Seattle, and not only did we eat (and did we ever), but there were multiple sessions focused on photography, technology and writing.  When I attend a conference like this, I realize how little I actually know – and how little time I actually have to spend on my blog.  I know I could have prioritized it more during my summer sabbatical, but to be honest, I just didn’t want to sit behind a computer when I was in the most glorious food cities in the world.  I am happy with my decision…and maybe someday I will be able to devote more time here.

Aside from eating and learning, I actually met some really great people.  The two blogs I would like to highlight have something in common – these women got their significant other’s involved in their blogs!  I love it!!  The first blog is Dang that’s Delicious – an adorable blog with outstanding photos.  And would you believe they actually met at the food blogger’s conference a couple of year’s ago??  He was not attending, but they met at a bar downtown – what an amazing story.

The next blog is A Tasty Mess – and they travelled all the way from Houston to attend the conference.  They wasted no time at all, and even fit in a UW Husky game!  I loved getting the chance to talk to them, they are young and energetic – and by the look’s of that incredible blog – they have a beautiful life eating, drinking and writing about their adventures.  Next year’s conference is going to be in Sacramento – so if you are a blogger looking for a great way to learn and grow, definitely check it out.

So what do I do after a weekend of eating and drinking?  Turn to vegetables.  Vegetables from my incredible market basket.  The market basket that I look forward to every Thursday.  This week’s basket contained all the ingredients for this delicious frittata (even the eggs!!) – and this recipe below.  It was completely dairy-free, and tasted like summer.  Fresh and delicious.  And next week we get to visit the farm!

Ingredients:

  • 8 eggs
  • 8-10 fingerling potatoes, washed and thinly-sliced
  • 2 sweet Bullhorn peppers, washed, seeded and chopped
  • 1 sweet onion, finely chopped
  • 1 tablespoon fresh thyme, chopped
  • 1 clove garlic
  • 2 tablespoons olive oil
  • Sea salt and fresh ground pepper

Preparation

Preheat oven to 375°.

Heat 1 tablespoon olive oil in a large oven-safe skillet over medium heat. Add the sliced potatoes to the skillet and sauté for about 6 to 8 minutes, until tender but firm. Remove from skillet. Add another tablespoon oil, then add the peppers, onions and garlic. Sauté for an additional 2 to 4 minutes or until the peppers and onions are softened, and garlic is fragrant. Season vegetables with salt and pepper. Remove from skillet.

In a medium bowl, beat together the eggs and thyme with a pinch of salt and pepper. Return the potatoes to the skillet, arranging in an even layer. Top with vegetable mixture and then pour eggs evenly over the vegetables. Drizzle olive oil around the edge of the pan to ensure easy removal.

Transfer to oven and bake for 15-20 minutes, until the eggs have completely set in the center. Serve straight out of the skillet, cut into wedges, or flip onto a serving plate.

For a printer-friendly version of this recipe, please click here: Summer Vegetable Frittata

Caramelized Onion, Tomato and Blue Cheese Galette

Caramelized Onion, Tomato and Blue Cheese Galette

It has never felt so good to be back in the kitchen.  I had the summer of a lifetime, but there was one thing missing…my kitchen.  I thought it would be strange to cook after no kitchen time for a couple of months, but I got right back into it – with a little help from my market basket.  I still miss all the produce and wonderful food products from France and Italy, but this is the best time of year in Seattle – the markets are overflowing with beautiful produce.

It is also hard to believe it is September – not only the beginning of my favorite season – but the IFBC is just around the corner!  I can’t want to hear about the latest food/blogging trends and share them with you.

This week I had the opportunity to visit Coyle’s Bakeshop where she showed us how to make a delicious flakey pie crust.  It is very similar to my recipe (without the sugar) – and she made us a savory and a sweet galette.  It just so happened that the next day when my market basket arrived, it came with the perfect ingredients.  So here you go, my re-entry galette…  If you would rather make your own crust (which I highly recommend), please follow my recipe – omitting the sugar – and then use one disk for galette.

Ingredients

  • Pie crust dough (found in the refrigerator section)
  • 1 sweet onion
  • 1 red bell pepper
  • 1 tablespoon olive oil
  • 1/2 cup sherry or white wine
  • 1 tablespoon butter
  • 1 cup cherry tomatoes
  • 1/4 cup crumbled blue cheese

Preparation

Melt the olive oil and butter in a saute pan, over medium heat. Add thinly sliced onion and red bell pepper.  Saute, stirring, for a while, until the onions start browning and getting soft.  Add 1/4 cup of the sherry or white wine to deglaze the pan.  Keep stirring until all the liquid is evaporated and then add the rest.  The entire process should take around 25 minutes, and the onion and pepper should be nice and soft.

Preheat the oven to 350 degrees.  Roll out the pie crust in a 10″ circle.  Place on a baking sheet lined with parchment.  Add the caramelized onion and pepper mixture, leaving a rim around the edge (to fold over).  Cut the cherry tomatoes in half, and sprinkle on top.  Then sprinkle the blue cheese.  Fold over the dough, creasing every couple of inches.  Bake for about 20-25 minutes, or until the crust is golden brown.  Serve warm or at room temperature.

For a printer-friendly version of this recipe, please click here:  Caramelized Onion, Tomato and Blue Cheese Galette

Monkey 47 Martini

Monkey 47 Martini 1

Traveling is such a gift – getting to explore new areas, having new experiences, but most of all – eating and drinking the local specialties. A few years ago when I was in Paris, I noticed this beautiful bottle of Gin. Ok, so I must admit, I am a sucker for the labels. If a bottle has a nice label, it must taste good – right? Now, I know that is not always true, but since I know absolutely nothing about wine (except that French wines – in France – are my favorite), that is usually how I choose which bottle to buy. Ok, I diverge…so back to this Gin. It just looked interesting, and I had never seen it before – so I asked the bartended about it. He told me it was made in Germany, and then went on to rave about all the botanicals that it was made from. I asked him if I could smell it (not sure if that was completely appropriate, but went for it anyway), and he said yes. He was right, this Gin smelled incredible. The price was a little high for my taste though, so I decided to defer tasting the Gin to another time..

I never forgot about that Gin, but was waiting for the right time to indulge. I looked for it in the US, but they don’t export it yet, so I knew that I had to wait until I was back in Europe. So this summer I was on a quest to try this Gin – but I couldn’t see spending the money on getting it at a restaurant or bar – cocktails in Paris are incredibly high – so I decided I was going to buy a bottle instead. It couldn’t be bad, and if it was, I would figure out a way to make it palatable. I found a liquor store that carried the Gin, and purchased it along with my favorite French vermouth (Dolin). I then waited for the right occasion – Bastille Day – to make myself a martini.

You would think that with all these years of anticipation that I would be let down, but no – quite the opposite. It was better than I could have ever imagined. I was in love. It was the best martini I had ever had. It was wonderfully smooth, flavorful, and if you are not a Gin drinker – you would be after tasting this. Who knew that a German Gin could steel my heart away like this?  That’s what travelling is all about…

Ingredients

  • 2 oz. Monkey 47 Gin
  • 1/2 oz. Dolin Blanc Vermouth
  • Lemon Twist

Preparation

Mix together the gin and vermouth in a glass with ice – stir for about 30 seconds or until very cold.  Strain into a martini glass, and serve with a twist of lemon.

Makes 1 cocktail.

For a printer-friendly version of this recipe, please click here: Monkey 47 Martini

Monkey 47 Martini 4