Onion Tart

My 8 year old daughter is part of a book club.  It’s amazing to see these 3rd graders get so into these books – and of course the moms get into them as well.  This is my first book club – I always heard about them, but I never had enough time – and since I really only read about food, I figured it wouldn’t be for me – unless I started my own “food book club,” but then who would I get to join me, since most of my friends laugh at the fact that I only read about food.  So, when the invitation came for my daughter to join her friends in this book club, along with the moms, I decided it was finally time.

There are a few rules we have to follow – we all take turns hosting, and the host orders the pizza.  That’s right – instead of slaving all day in the kitchen, you pick up the phone and order the pizza – DONE!  Then, everyone else brings stuff to the host’s house – appetizers, drinks, salad, dessert, fruit…and anything else people can think of.  My stand-by is the dessert – if all fails, I know I can always bring a dessert – and I am starting to feel like a dessert hogger – since we sign up in email, first come first server, and secure what we are bringing, so we don’t end up with just desserts – and nothing else except pizza.

This month I held my breath and replied appetizer.  I had no idea what I was going to bring, but I wanted to give someone else a chance for dessert.  I saw this recipe in Cooking Light – and even though it was very similar to pizza, I had to give it a try.  I just love onions, especially the sweet ones.  This was super easy – and it was excellent – it had a really beautiful soft onion flavor, and the crust (even though I cheated and used pre-made) was still fantastic around those onions.  I was pretty full when it was time to eat the pizza, but that meant there was more leftovers for the host – or the host’s husband…which is always appreciated, especially in my house.

Ingredients

  • 1 tablespoon olive oil
  • 2 1/2 pounds onion, sliced
  • 2 tablespoons chopped fresh thyme
  • 3/4 teaspoon kosher salt
  • 1/4 teaspoon black pepper
  • 1/2  (14.1-ounce) package refrigerated pie dough (such as Pillsbury)
  • 1/4 cup (1 ounce) crumbled reduced-fat feta cheese
  • 1/4 cup (1 ounce) shredded reduced-fat Swiss cheese
  • 1  large egg, lightly beaten

Preparation

Preheat oven to 425°.

Heat oil in a skillet over medium-high heat. Add onion, thyme, salt, and pepper; cook 20 minutes, stirring occasionally.

Roll dough out on a parchment paper-lined baking sheet. Sprinkle feta cheese in center, leaving a 1 1/2-inch border; top with onion. Sprinkle with Swiss cheese. Fold piecrust border up and over onion mixture, pleating as you go, leaving a 6-inch-wide opening. Combine egg and 2 tablespoons water; brush over dough. Bake at 425° for 25 minutes or until golden. Cool for 10 minutes.

For a printer-friendly version of this recipe, please click here:  Onion Tart

Add to FacebookAdd to DiggAdd to Del.icio.usAdd to StumbleuponAdd to RedditAdd to BlinklistAdd to TwitterAdd to TechnoratiAdd to Yahoo BuzzAdd to Newsvine

Steamed Chinese Dumplings

Steamed Dumplings…a food from my childhood.  Not just any type of food though – the kind I would get super excited about whenever they were in my future.  It was an event – not just a meal.  We had a long counter where all the dumpling wrappers would be laid out – we would scoop some filling into the center of each, then take some water – and with our fingers dab water on the edge of half the circle.  We would seal them up – then store them on a cookie sheet.  We would make tons of them – and then they would go into the steamer, batch after batch, and we would eat as much as we possibly could.

I could have lived on dumplings as a kid.  I remember when I moved away from home to a new city – I was on a quest to find dumpling wrappers – at that time you couldn’t get them in the regular grocery store – so I took a field trip down to the Chinese section of town, and found a grocery store that sold only Asian products.  I searched and searched until I found them – and then bought tons of the frozen wrappers to keep in my freezer.  My friends were so impressed that I knew how to make these delicious morsels.

I can’t believe it has been so long, but I finally decided to make them for my kids.  Fortunately I didn’t have to travel far to find the wrappers – they were in the refrigerated section at Whole Foods.  This time the wrappers were square instead of circular, but they tasted just as good.  I prefer the thin wrappers, and that’s what they had.  My kids LOVED them – we ate the entire batch – and cooked them 3 different ways – we steamed them, boiled them, and fried them.  I liked the steamed the best – the girls liked the fried.  Any way you serve them though, they are delicious – and so much fun to make!

Ingredients

Dumplings

  • 1 garlic clove
  • 1 lb. ground pork
  • 1/2 can water chestnuts
  • 1 tablespoon ginger
  • 1 egg white
  • 2 tablespoon rice wine
  • 1 tablespoon corn starch
  • 1/2 teaspoons sugar
  • 2-3 tablespoons soy sauce
  • 4 tablespoons minced scallions
  • 2 tablespoons sesame oil
  • 1/4 teaspoon black pepper
  • 2-4 tablespoons cilantro
  • 1 package dumpling wrappers

Dipping Sauce

  • soy sauce
  • rice vinegar
  • scallions
  • ginger

Preparation

Place the garlic in the food processor while it is running.  Add the rest of the ingredients and process until well blended.  Place about 1/2 tablespoon of filling onto the center of each dumpling wrapper.  Dip your finger into a small bowl of water, and trace half of the outer edge of the wrapper.  Fold the wrapper over and seal.

Place the sealed dumplings on a cookie sheet lined with parchment paper.  At this point you can either place them into a freezer until frozen then store them in a plastic bag until you are ready to cook – or you can cook them immediately.

For steamed dumplings, line the steamer with cabbage leaves or parchment paper, and place a single layer of dumplings once the water is boiling.  Steam fresh dumplings for approximately 12 minutes – frozen dumplings will take about 20 minutes.

Serve the dumplings with a dipping sauce made of one part soy sauce, one part rice vinegar, and one part water.  Add some sliced scallions and minced ginger into the sauce.

For a printer-friendly version of this recipe, please click here:  Steamed Chinese Dumplings

Add to FacebookAdd to DiggAdd to Del.icio.usAdd to StumbleuponAdd to RedditAdd to BlinklistAdd to TwitterAdd to TechnoratiAdd to Yahoo BuzzAdd to Newsvine

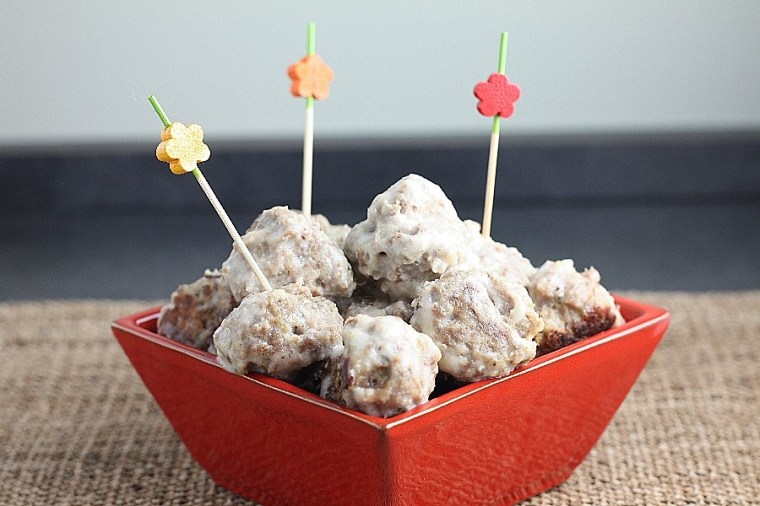
Swedish Meatballs

I have never been to Sweden – it is on my list – but I haven’t made it there yet.  Of course whenever I travel, I focus on the food. Sweden is one place that I don’t have a good sense as to the food theyeat – I know they eat a lot of fish (herring) – and some really good pastries (based on some Swedish bakeries I have been to), but as far as other items, Swedish Meatballs is the only thing that comes to mind.  I remember going to IKEA once and noticing the restaurant – and they definitely had Swedish Meatballs on the menu, but nothing else sticks with me.

I have tried a lot of Swedish meatballs over the years, but none as good as this recipe from The Big Book of Casseroles.  I love how all the flavors melt together and form a delicious ball of goodness. Unfortunately I didn’t have any beef broth in the house when I made these, so I used chicken broth instead.  The sauce was not as dark as it usually is, but they still tasted amazing.  The kids love them, and just keep popping more in their mouth.  It is a really easy dish to make for a hot appetizer, or for a meal – served with noodles or rice.

Someday I will make it to Sweden, and since I can’t eat fish, at least I can count on eating some Swedish Meatballs – and hopefully lots of other delicious goodies – with the flavor combinations in these meatballs, I have a feeling that Swedish food is pretty darn scrumptious.

Ingredients

  • 1-1/2 pounds lean ground beef
  • 1/2 pound bulk sausage or ground veal
  • 1/2 cup finely chopped yellow onion
  • 2 eggs, beaten
  • 1 cup dry bread crumbs
  • 1/2 cup milk
  • 1 teaspoon salt
  • Freshly ground pepper to taste
  • 1/4 teaspoon ground nutmeg
  • 1/2 teaspoon ground ginger
  • 1/4 teaspoon dried dill weed
  • 1/2 teaspoon ground allspice
  • 1/4 teaspoon ground cardamom
  • 1/4 cup Beef Stock or canned beef broth
  • 1/2 cup light sour cream

Preparation

In a large bowl, mix meats and onion. Add eggs, bread crumbs, milk, and seasonings. Mix well with a large spoon or your hands. Cover and refrigerate for 1 hour for easier handling. In the meantime, preheat oven to 400 degrees F.

Shape meat mixture into 1-inch balls and arrange on a baking sheet with a rim. Bake until lightly browned, about 10 minutes. Transfer meatballs along with juices and beef stock to a 2-1/2-quart casserole dish lightly coated with cooking spray or oil.

Reduce oven temperature to 350 degrees F. Cover and bake meatballs until heated through, about 30 minutes. Stir in sour cream and bake, uncovered, until heated through once again, 10 minutes longer.

Note:
For an hors d’oeuvre, transfer meatballs to a chafing dish and serve with toothpicks.

For a printer-friendly version of this recipe, please click here:  Swedish Meatballs

Add to FacebookAdd to DiggAdd to Del.icio.usAdd to StumbleuponAdd to RedditAdd to BlinklistAdd to TwitterAdd to TechnoratiAdd to Yahoo BuzzAdd to Newsvine

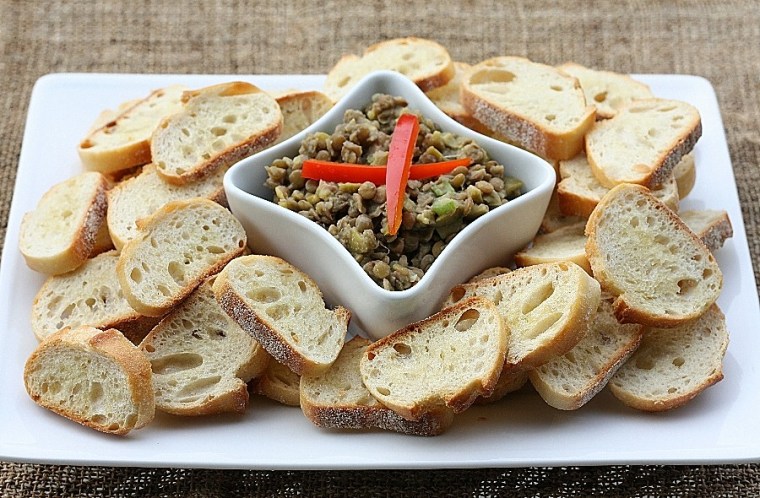
Crostini with Lentil and Green Olive Salad

Everyone has a safe place – mine just happens to be in the kitchen.  I feel the same way about yoga, but fortunately the kitchen is in our home, so I never have to travel far to completely escape all the stresses of life.  The kitchen has been such a big part of my life, no wonder it is my safe place – my husband proposed to me in the kitchen; I remember with my younger daughter, when she couldn’t sleep, I would bring her down to the kitchen, put her in a bouncy chair on the counter, and I would cook.  She would stop crying, and just watch me chopping away. Oh, and then the countless meals and treats I have made over the years that have brought such happiness to my family and friends.  I have such wonderful memories of the kitchen, and I look forward to many more.

The problem  is that I am so used to cooking in my own kitchen that when I happen to be somewhere else and I need to cook, my safe place gets a little chaotic – and that is never fun.  Part of my brain is telling me to calm down, you are in the kitchen, have fun – while the other side of my brain has no idea where anything is, how the stove works, whether the oven is on the warm side or the cold.  It is times like that which remind me how important it is to be agile.  It is something I deal with at work constantly – the ability to deal with ambiguity,  and I at work, I am actually pretty good at it.  I actually crave it – because it makes my day interesting.  Cooking though is different – I like going through the motions – the ones I know so well – it is comforting, and cathartic.

Usually my stories have something to do with what I am cooking – but this time I decided to change it up a bit.  I found this recipe in Food and Wine magazine many years ago, and never made it.  I was  looking for an appetizer that could sit in the refrigerator for a few days so I could get multiple uses out of it – and this was perfect.  If you like lentils, this is a wonderful healthy spread to go on crispy pieces of bread or crackers.  The green olives give it a nice subtle flavor.  I actually thought it was so good, I was eating it with a spoon.  Now, back to agility.  It took me a while to figure out – but this year that will be my focus – but not just at work…this year in the kitchen.

Ingredients

  • 1/2 pound lentils, preferably from Abruzzi, rinsed and picked over
  • 1 small onion
  • 1 garlic clove
  • 1 bay leaf
  • 1/2 dried red chile
  • 1/2 pound green olives, pitted and coarsely chopped
  • 1 large celery rib, thinly sliced
  • 1 large shallot, minced
  • 1/4 cup extra-virgin olive oil, plus more for drizzling
  • 1 1/2 tablespoons red wine vinegar
  • Salt and freshly ground pepper
  • 24 small thin slices crusty country bread
  • 1 small fresh red chile, very thinly sliced lengthwise

Preparation

Preheat the oven to 400°. In a medium saucepan, generously cover the lentils
with water. Add the onion, garlic, bay leaf and dried chile and bring to a
simmer. Cover and cook over low heat until the lentils are tender, about 30
minutes. Drain the lentils, reserving 1/4 cup of the cooking liquid; discard the
bay leaf and chile.

In a medium bowl, mash 1 cup of the lentils with a potato masher, then stir
in the remaining lentils. Add the olives, celery, shallot, 1/4 cup of olive oil
and the vinegar. Season with salt and pepper and stir in the reserved 1/4 cup of
cooking liquid.

Arrange the bread slices on a cookie sheet and bake for about 8 minutes or
until thoroughly crisp. Drizzle the crostini with olive oil and generously spoon
the lentil salad on top. Garnish the crostini with slivers of red chile and
serve.

For a printer-friendly version of this recipe, please click here:  Crostini with Lentil and Green Olive Salad

Add to FacebookAdd to DiggAdd to Del.icio.usAdd to StumbleuponAdd to RedditAdd to BlinklistAdd to TwitterAdd to TechnoratiAdd to Yahoo BuzzAdd to Newsvine

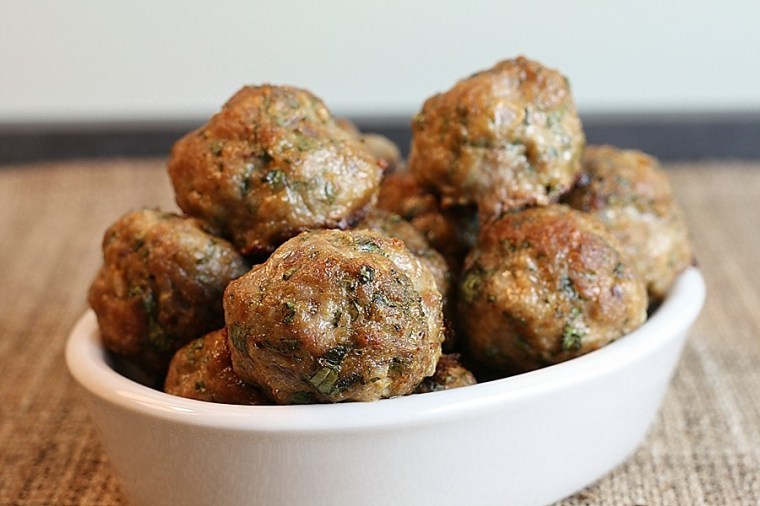
Gingery Pork Meatballs

Meatballs, my family cannot get enough of them.  One day my older daughter came home and announced that her favorite meal of all time is spaghetti with meatballs and parmesan cheese with garlic bread.  In reality though, it is all about the meatballs.

I saw this recipe in Cooking Light – and it seemed exactly like something my family would devour.  The only problem was that I couldn’t decide if I should serve it with rice noodles, or steamed rice – both seemed like such great options.  I decided that I would make a huge batch, and serve them with rice noodles one night, then steamed rice the next.  The problem was that they were so good – we only had 4 leftover.  The fresh ginger mixed with the ground pork and cilantro couldn’t be any better.  These will definitely go on my short list of what to make for dinner – they were easy and delicious – my two favorite words.

Ingredients

  • 1/2 cup chopped fresh cilantro
  • 1/4 cup dry breadcrumbs
  • 1/4 cup finely chopped red onion
  • 2 tablespoons lower-sodium soy sauce
  • 2 teaspoons grated peeled fresh ginger
  • 3 garlic cloves, minced
  • 1 pound lean ground pork
  • 1 large egg, lightly beaten

Preparation

Place a foil-lined jelly-roll pan in the oven.  Preheat oven to 450 degrees.

Combine the first 8 ingredients in a large bowl; stir gently just until blended.  Cover and chill 30 minutes.  Divide pork mixture into 20 equal portions; shape each portion into a meatball.  Arrange meatballs in a single layer on the preheated pan.  Bake at 450 for 20 minutes or until done.

Serve with rice or rice noodles and bell pepper strips.

Serves 4 as a main dish.

For a printer-friendly version of this recipe, please click here:  Gingery Pork Meatballs

Add to FacebookAdd to DiggAdd to Del.icio.usAdd to StumbleuponAdd to RedditAdd to BlinklistAdd to TwitterAdd to TechnoratiAdd to Yahoo BuzzAdd to Newsvine

Pita Crisps


The other week we took our kids to an Indian/Mediterranean restaurant for dinner.  I usually stay away from combo places like that, but this place in the University District just rocks.  The indian food is fantastic, and the humus is amazing, go figure.  We ordered mostly indian food, except that my older daughter was not sold on the chicken tandoori or chicken tikka masala – she wanted to try the mediterranean food.  So, she ordered a gyro plate – and except for the tahini sauce drizzled all over the meat, it was a winner.  On the side, she was served – no joke – at least an entire package of pita bread.

We ended up taking home a lot of food that night (we ordered way too much because we weren’t sure what the kids would like – turns out the chicken tikka masala was the big winner of the night) – and I decided to take home the pita bread as well.  I knew they wouldn’t serve it again, and heck, there was a ton of it that would have gone to waste.

The next few weeks went by, and I kept staring at the pita bread in the refrigerator – wondering when I was going to use it up.  Then I remembered what my grandmother used to do – make pita crisps!  I decided to try something new, and spray them with olive oil spray, instead of brushing them – it was much easier, and much healthier.  They were delicious!  In fact, they didn’t even last long enough to put in the pantry – they were gone almost instantly.  We just ate them plain, but they would have been amazing with this, this or this – the possibilities are endless!

Ingredients

  • Pita Bread, cut into wedges and separated
  • Olive Oil spray
  • Kosher salt

Preparation

Preheat the oven to 350 degrees.  Line the pita triangles onto a cookie sheet lined with foil.  Spray the pita with the olive oil (or Pam) – then sprinkle with kosher salt.  Bake for around 10 minutes or until lightly golden – but keep a watchful eye – once they start browning they go fast.

For a printer-friendly version of this recipe, please click here:  Pita Crisps

Add to FacebookAdd to DiggAdd to Del.icio.usAdd to StumbleuponAdd to RedditAdd to BlinklistAdd to TwitterAdd to TechnoratiAdd to Yahoo BuzzAdd to Newsvine

Guacamole

I love Guacamole – and I have been making it for years – but until last year I was making it the wrong way.  Last year for a team morale event, we went and took a cooking class taught by a local chef.  We chose a mexican theme – and made tamales.  As an added bonus – she showed us how to make some pretty spectacular fresh salsa and guacamole.  When she pulled out the food processor to make the guacamole, I thought there was something wrong.  I had never heard of making guacamole in a food processor.  For some reason, I thought that grinding avocado up would result in somewhat of an avocado disaster.  Boy was I wrong.  It made the creamiest, most delicious guacamole I had ever tasted.

When I am lazy, and I don’t feel like washing a lot of dishes, I still smash the avocados the old-fashioned way…but when I have some fresh cilantro, and I am looking to really make something special,  I use the food processor – and I always vow to never go back again.  The recipe below is the very mild version that I make.  If I am making it for adults only, I add a jalapeno pepper.  If you are looking for some serious heat – add a serrano pepper.

Ingredients

  • 3-4 ripe avocados
  • 1 large garlic clove
  • 1 jalapeno or serrano pepper, seeds removed (optional)
  • 1/4 cup fresh cilantro leaves
  • 1/2 tablespoon fresh lime juice
  • salt and pepper

Preparation

While the food process is on, drop the garlic into the feeding tube and wait until the garlic is finely minced.  If you are looking for some heat, add the chile pepper.  Add the avocado, cilantro and fresh lime juice.  Mix with the food processor until nice and creamy.  Add salt and pepper to taste.

For a printer-friendly version of this recipe, please click here:  Guacamole

Add to FacebookAdd to DiggAdd to Del.icio.usAdd to StumbleuponAdd to RedditAdd to BlinklistAdd to TwitterAdd to TechnoratiAdd to Yahoo BuzzAdd to Newsvine

Haitian Chicken Puffs

I love miniatures – it really doesn’t matter what the item is – if it is a smaller version, I love it.  My daughters are the same way.  Although, I can understand why kids love miniatures – because they are mini themselves.  My daughters are half the size of me – and I have to remember when I serve them a hamburger that is the same size as mine, it is gigantic in their minds. 

A couple of months ago Cooking Light did a section on food in Haiti.  Haiti has been a topic of conversation in our house quite a bit because of the earthquake, so I figured the girls would enjoy eating some food local to that region.  I have actually been to Haiti, and sadly, I did not see a lot of homes that had a proper kitchen to prepare foods like this, but I won’t go there today.

 This recipe was meant to be an appetizer, but I thought it would make a great mini-meal for the girls (without the habanero).  They were actually not as easy to make as I had hoped – the little pieces of puffed pastry were so small, they were hard to manage – but somehow I was able to stuff them and use the majority of the filling.  As you can see by the picture, my closing skills were not perfect, but they still tasted great.  One of my girls liked them, the other took a “no thank-you bite” and that was the end of that.  She then proceeded to eat around the filling.  Oh well – at least I was at 50%.  The four of us (ok, really 3 of us) polished off the entire batch, along with some vegetable sides, so I would say it was a successful mini meal.  Next time I make these though, I will cut the dough into 9 squares, and make these into big triangles. Not only will the process go faster, you will get a much bigger chunk of filling with your pastry.

Ingredients

  • 1  habanero pepper
  • Cooking spray
  • 1/4  cup  chopped yellow onion
  • 2  teaspoons  minced garlic
  • 1/2  pound  ground chicken breast
  • 1/4  cup  shredded carrot
  • 2  teaspoons  no-salt-added tomato paste
  • 2  teaspoons  fresh lime juice
  • 1  teaspoon  cider vinegar
  • 1  tablespoon  chopped green onions
  • 1  tablespoon  chopped fresh parsley
  • 1  teaspoon  chopped fresh thyme
  • 1/2  teaspoon  freshly ground black pepper
  • 1/4  teaspoon  salt
  • 1/8  teaspoon  ground cloves
  • 1/8  teaspoon  grated whole nutmeg
  • 1  (14-ounce) package frozen puff pastry, thawed (such as Dufour)
  • 1  large egg
  • 1  tablespoon  water

Preparation

Cut habanero in half. Seed one half of pepper, and leave seeds in other half. Mince both pepper halves. Heat a large nonstick skillet over medium-high heat. Coat pan with cooking spray. Add minced habanero, onion, and garlic to pan; sauté 3 minutes or until tender, stirring frequently. Add chicken; cook 5 minutes or until browned, stirring to crumble. Add carrot; cook 2 minutes. Add tomato paste; cook 1 minute, stirring constantly. Add lime juice and vinegar, scraping pan to loosen browned bits. Add green onions and next 6 ingredients (through nutmeg); stir well. Remove from heat; cool mixture to room temperature.

Place cooled chicken mixture in a food processor; process until almost smooth (mixture will begin to clump).

Preheat oven to 400°.

Roll puff pastry into a 15 x 12–inch rectangle on a lightly floured surface. Cut puff pastry into 20 (3-inch) squares. Combine egg and water, stirring with a whisk. Brush egg mixture along edges of pastry squares; spoon about 1 scant tablespoon filling in center of each pastry square. Fold each pastry square in half; press edges closed with tines of a fork. Brush top with egg wash; arrange 1 inch apart on a baking sheet. Bake at 400° for 20 minutes or until puffed and golden brown.

Makes 20 small puffs.

For a printer-friendly version of this recipe, please click here: Haitian Chicken Puffs

Add to FacebookAdd to DiggAdd to Del.icio.usAdd to StumbleuponAdd to RedditAdd to BlinklistAdd to TwitterAdd to TechnoratiAdd to Yahoo BuzzAdd to Newsvine

Roasted Red Pepper Spread

What do you do with a bunch of already roasted red peppers and left over baguette from the meatball grinders?  All I could think about were appetizers – maybe because I was thinking finger food, or maybe because I was hungry and I was looking for something quick to make.  I also had some left over cream cheese in the refrigerator that had to be used as well – so it was decided, a spread.  I guess I could have just made my life even easier and spread some cream cheese on bread, then top it with the roasted red peppers, but then I wouldn’t have been able to try this recipe I had my eye on.  Basically I made in about 5 minutes what they charge $4 at the fancy bagel stores – and I have to say that mine was pretty delicious.  I saw this recipe in Maryanna Vollstedt’s book titled, The Big Book of Potluck.  You really just need to have a blender or food processor to make this quick – and seriously you are finished in a blink of an eye.  If you are not starting with already roasted peppers, then it may take you a little more time…but it is worth it – freshly roasted peppers are delicious and add a smokey flavor to this already flavorful spread.

Ingredients

  • 1 large roasted red pepper
  • 2 garlic cloves, coarsely chopped
  • 3 ounces cream cheese at room temperature, cut into chunks
  • 2 parsley sprigs
  • 1/4 teaspoon dried oregano
  • 1/4 teaspoon dried basil
  • 1/4 teaspoon paprika
  • 1/4 teaspoon salt
  • 2 drops of Tabasco sauce

Preparation

Put all ingredients in a food processor or blender and blend until smooth.  Transfer to a bowl, cover, and refrigerate several hours or until well chilled.  Or if you were like me and didn’t have a few hours, just stick it in the freezer for a 1/2 hour, and call it good.

For a printer-friendly version of this recipe, click here:  Roasted Red Pepper Spread

Add to FacebookAdd to DiggAdd to Del.icio.usAdd to StumbleuponAdd to RedditAdd to BlinklistAdd to TwitterAdd to TechnoratiAdd to Yahoo BuzzAdd to Newsvine

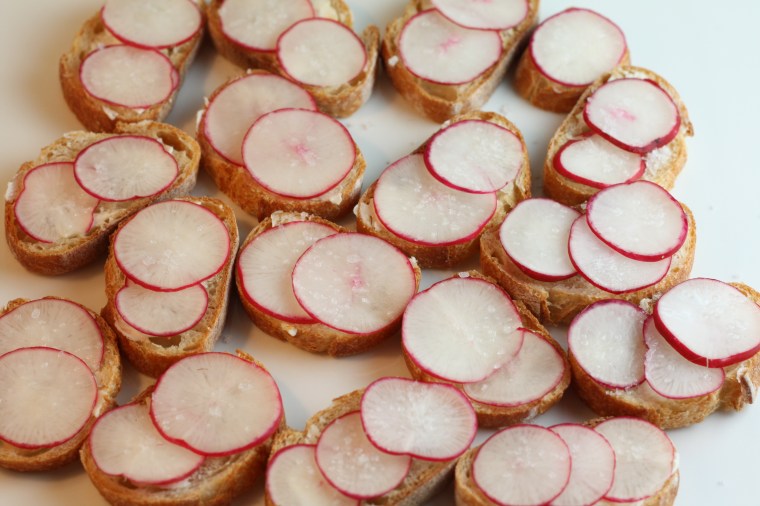
Radish Toasts

I feel like radishes are one of those vegetables that people either love or hate.  I fall into the love category.  My favorite radishes are those that are pickled – what I consider to be the “japanese way.”  Adding vinegar and salt to radishes basically turns them into crunchy matter (in a way like cucumbers) that can take on any flavor.  I recently read Molly Wizenberg’s book,  A Homemade Life and there was a recipe for radishes made the “french way.”  I was very intrigued by this recipe – first of all because you don’t see a lot of recipes with radishes as the main ingredient, but also, because I basically love anything french.  We had some friends coming over for dinner, so I decided to make them as an appetizer – these friends love fresh vegetables, so I was sure they would be a hit.  As it turns out, I was the only one of all of us (8 including kids) that liked radishes – but let me tell you – even my husband that wouldn’t eat one if I paid him, loved this preparation.  The sea salt just melts into the radishes and the butter just gives them an incredible flavor – they were amazing, and we ate them all up.  So – for all of you that are not so keen on radishes, you have not tried them the “french way.”

Ingredients

  • 1 bunch of fresh radishes
  • 1 loaf of french bread (baguette)
  • Unsalted butter, room temperature 
  • Fine sea salt

Preparation

Preheat the oven to 350 degrees.  Slice the baguette into thin slices – a little less than 1/2″ thick.  Place them on a cookie sheet and bake them in the oven until crisp on the outside.  I do this in 3 minute increments to make sure they don’t get too brown – it should take about 10 minutes total depending on your oven.

While the bread is cooling, thinly slice the radishes – almost like a wafer.  Take a piece of bread and spread a thin layer of butter.  Layer some radishes on top in a single layer (overlapping slightly) and sprinkle with some sea salt.

For a printer-friendly version of this recipe, click here:  Radish Toasts

Add to FacebookAdd to DiggAdd to Del.icio.usAdd to StumbleuponAdd to RedditAdd to BlinklistAdd to TwitterAdd to TechnoratiAdd to Yahoo BuzzAdd to Newsvine