Browned Butter Chocolate Chip Cookies

Browned Butter Chocolate Chip Cookes 
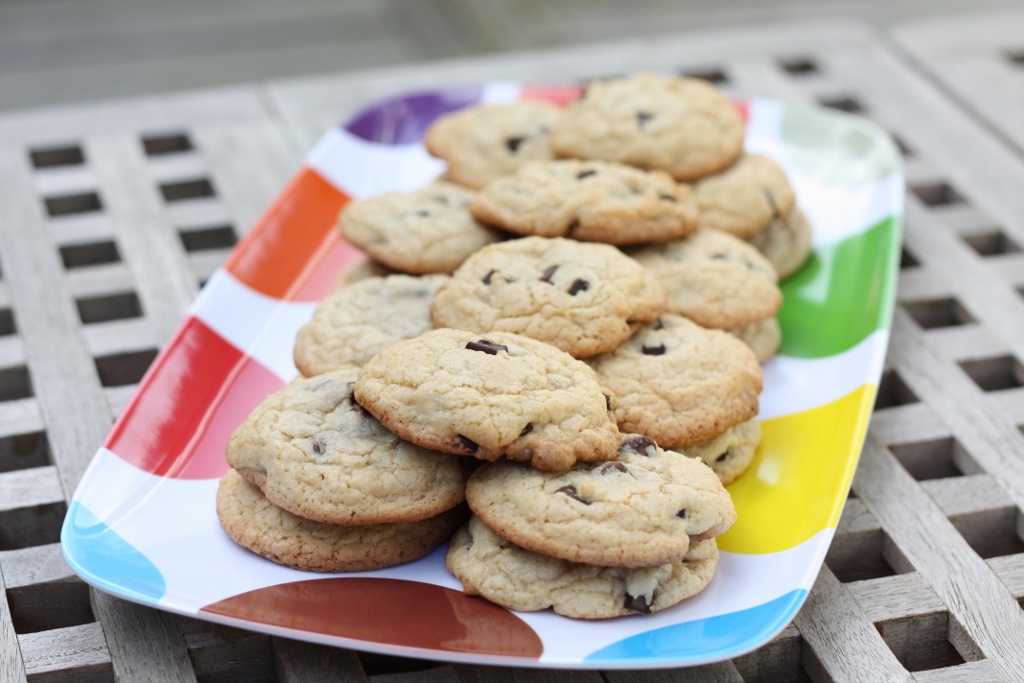
Change is good – sometimes it is hard, but in the end, it helps us grow and learn.  I actually look forward to change – most of the time.  There are facets of my life that need to be in a constant state of change, and others that need to hold steady.  For example – I have some friends that feel the need to rearrange the furniture in their homes all the time.  I never know  just where the couch is going to be when I enter the living room.  That would drive me nuts.  Fortunately for my husband, I like to place the furniture once – and unless I have a really good reason – I leave it there.  It’s funny, last summer I decided to rearrange the outside furniture – it had to be done.  The girls came outside, and my younger one actually started crying.  Too much change is hard…good thing she eventually got used to it, just like I told her she would. At work, I need change.  I am always looking for the next shake-up.  It actually keeps things interesting – because I have a history of getting bored pretty easily.  Fortunately I work at the right company, because things are always changing.  You just have to blink, and everything turns upside down.  We use the word agile a lot – I love that word, it is a delicate version of the word change.  It makes it seem elegant, in a very smooth way.  I’m sure the next time one of my daughters throws a fit about things being off – if I ask them to be agile, they will instantly calm down. Another part of my life that needs constant change – is food.  I almost never make the same dish twice – and if I do, it is an exceptional recipe.  Last night I made refrigerator casserole – I just took everything from the refrigerator that I had to use up – put it into a pan with some rice, and made a delicious meal.  My husband loved it – and asked if we would ever have it again.  I laughed. Chocolate chip cookies are a staple – yet I always seem to find one more version that I have to try.  This recipe from Cooking Light was no exception.  Brown butter…now seriously, how can that be anything but amazing?  Let me tell you – these were just about the best chocolate chip cookies I have ever made.  Let alone the fact that one of these babies had less than 100 calories a piece.  I promise you these will be made again – that is until I find an even better recipe.  So – go change something in your life – not everything, but try for something new every day.  It will keep you on your toes – and you might even end up with something better than you started with.  What a novel idea.

Ingredients

  • 6 tablespoons unsalted butter
  • 2 tablespoons canola oil
  • 5.6 ounces all-purpose flour (about 1 1/4 cups)
  • 3.3 ounces whole-wheat flour (about 3/4 cup)
  • 1 teaspoon baking powder
  • 1/2 teaspoon kosher salt
  • 3/4 cup packed light brown sugar
  • 2/3 cup granulated sugar
  • 1/2 teaspoon vanilla extract
  • 2  large eggs, lightly beaten
  • 1/2 cup semisweet chocolate chips
  • 1/3 cup dark chocolate chips (such as Hershey’s Special Dark)

Preparation

Preheat oven to 375°. Heat butter in a small saucepan over medium heat; cook 5 minutes or until browned. Remove from heat; add oil. Set aside to cool. Weigh or lightly spoon flours into dry measuring cups; level with a knife. Combine flours, baking powder, and salt, stirring with a whisk. Place butter mixture and sugars in a large bowl; beat with a mixer at medium speed until combined. Add vanilla and eggs; beat until well blended. Add flour mixture, beating at low speed until just combined. Stir in chocolate chips. Drop by level tablespoonfuls 2 inches apart onto baking sheets lined with parchment paper. Bake 12 minutes or until bottoms of cookies just begin to brown. Cool slightly.
For a printer-friendly version of this recipe, please click here:  Browned Butter Chocolate Chip Cookies
BB CC Cookies 3

Speculoos Buttons

Speculoos Cookies

There are so many different words to describe a good “spiced” treat.  Of course the obvious is just to use the word “spice” – like spice cookies or spice cake.  Of course, then there is the word “ginger” – which is my favorite (gingerbread) – and then came speculoos.  A few years ago, I was visiting my cousins in Belgium.  They were living there for a couple of years right after they got married.  What a way to start a life together!  Well, they took me to their favorite chocolate shop.  This place was amazing.  The chocolates were not only delicious, they were spectacular looking – like a piece of art.  I remember looking at the different types, and one of them was “speculoos.”  I asked them what that was, and both their eyes just rolled backwards – they loved that type.  They explained to me that it was cinnamon ginger spice.  That was the first time I had heard that word, but I guess it is pretty common, I then found a speculoos flavored macaroon, and some ice cream on the same trip.  It was so odd that I travelled all over Europe as a college student, but never encountered that word then.

Fast forward a few months, and I was reading emails on our company’s internal alias for “Food and Wine Enthusiasts” – and someone was looking for those “Biscoff” cookies that Delta Airlines carries on certain flights.  I didn’t realize they were such a hot commodity.  That conversation quickly turned to the “speculoos spread” – basically a spice spread, with a similar consistency to peanut butter.  Who knew they actually carried it at Trader Joes!  I swear this speculoos thing has almost a cult following!

A few months ago I was reading my Bon Appetit, and came across this recipe.  I almost went to the kitchen right then and there – but I had a lot going on so decided to save it for another time.  That time finally came – and you know why?  I was looking for a cookie that I could give my new mommy friends with their Shepherd’s Pie – something that could sit in the freezer until they were craving something sweet – almost like a roll of Pillsbury cookie dough.  When I saw that these cookies made three rolls – it was too good to be true.  One roll for each of my friends, and one roll for me…  OMG – AMAZING!!!!  First of all, the smell that these cookies give your house – just the perfect fall/holiday smell – ok, it is March, but who doesn’t love their house smelling like that?  They tasted great – not too sweet, but just sweet enough.  You can’t just stop at one.

So – I thought it was only fitting to post these tonight – as I sit hear waiting for my Delta flight – where I am sure I will get some of those Biscoff cookies.  Seriously though, those are good – but these mean business.  Everyone should have a roll waiting for them, without having to get on an airplane.

Ingredients

  • 2 cups all-purpose flour
  • 1 tablespoon ground  cinnamon
  • 3/4 teaspoon ground ginger
  • 1/2 teaspoon fine  sea salt
  • 1/2 teaspoon freshly  grated nutmeg
  • 1/8 teaspoon ground  cloves
  • 1/2 cup (1 stick) unsalted butter, room temperature
  • 1/2 cup (packed) light brown sugar
  • 1/4 cup sugar
  • 2 tablespoons mild-flavored  (light) molasses
  • 1 large egg, room  temperature
  • 1 teaspoon vanilla  extract
  • 1 large egg white
  • Sanding or turbinado sugar

Preparation

Whisk first 6 ingredients in a medium bowl; set aside. Using  an electric mixer at medium speed, beat butter in a medium bowl until smooth,  about 2 minutes. Add both sugars and molasses; continue to beat until mixture is  smooth and creamy, about 3 minutes. Beat in egg and vanilla; mix for 2 minutes.  Reduce speed to low; add dry ingredients and mix to blend well.

Scrape dough from bowl and divide into thirds. Using your  palms, roll each piece of dough into an 8-inch log. Wrap logs tightly in plastic  or parchment paper and freeze for at least 3 hours. (For neater edges, remove  logs from freezer after 1 hour and roll on counter.)

DO AHEAD:  Dough can be made up to 2 months ahead. Keep  frozen.

Arrange racks in top and bottom thirds of oven; preheat to  375°. Line 3 baking  sheets with parchment paper or silicone baking  mats.

Whisk egg white in a small bowl to loosen; lightly brush all  over 1 log. Sprinkle with (or roll in) sanding sugar. Using a long, slender  knife, slice off a sliver of dough from each end of log to make ends flat. Cut  log into 1/4 inch-thick rounds. Transfer to 1 baking sheet, spacing 1/2 inch  apart; place in freezer while you cut the next log. (The cookies hold their  shape better if you bake when dough is cold.) Repeat with remaining  dough.

Bake 2 sheets of cookies, rotating the sheets from top to  bottom and front to back after 6 minutes, until tops are golden brown and  centers are almost firm, 11-13 minutes. Transfer cookies to wire racks and let  cool. Repeat with third sheet of cookies.

DO AHEAD: Cookies can be baked 2 days ahead. Store airtight at room  temperature.

For a printer-friendly version of this recipe, please click here:  Speculoos Buttons

Salty Chocolate Chunk Cookies

Salty Chocolate Chunk Cookies

I am becoming a chocolate snob – ok, maybe I am already a chocolate snob, but I am finally able to admit it.  This has been a long time coming – it probably started when I was in high school, and visited England for the first time.  We had a few hours free, and I ventured to Harrod’s and went to the Food Halls.  Yes, at 14 – I was already obsessed with visiting special food places when I travelled.  Chocolate was just about the only thing I could afford, so I bought some Cadbury bars…wow, they really put Hershey’s to shame.  Now, at that point in my life, milk chocolate was all I really enjoyed, and even that was a stretch, but I would take a Cadbury bar any day of the week.

I have told the story already about the chocolate when I studied in France during college – and my friends and I found the Cote D’Or factory in Brussels – I swear we smelled our way to that pot of gold.  Still, my favorite chocolate in Europe was Lindt.  I was so excited when I found some Lindt bars in the US, only to discover that they don’t export the same quality chocolate as they have in Europe.

For some reason, even though I knew what good chocolate tasted like – I continued to use Nestle’s chocolate chips when I made cookies.  When I first moved to Seattle, a friend of mine asked if I wanted to share a CostCo sized Nestle bag of chips – of course I couldn’t say no – and much to my disbelief, it took no time at all to go through all those chips.  It only took a few times of sharing before I realized I had to start buying my own bag.  And would you believe that I only baked with these?  No, they were not getting eaten any other way.  It was only recently that I stopped buying the big bag at Costco – that was when I discovered the dark chocolate chunks I found at Whole Foods – this was real chocolate – real dark chocolate.  Dark chocolate that I have begun to really love.  And now I can’t go back…

I found this recipe in Bon Appetit and I loved how you used good quality chocolate and chopping it coarsely.  That is definitely the way to do it.  Not only are the big chunks better, the smaller chunks really get integrated into the batter.  The salt on these cookies were the best part.  I swear these were some of the best cookies I have made in a while.  They didn’t rise as much as I had expected (probably because of the type of butter I used), but they were still amazing.

Whether you are a chocolate snob or not, you will love these cookies – and if you are just starting out on the chocolate road of life – go ahead and use any type you want – even Nestlé’s will make a great cookie.  Just don’t blame me if you happen to use some good quality chips for this batch, and then you can’t go back.  Not only is it an expensive habit…it is hard work chopping up those delicious bars!

Ingredients

  • 1 1/2 cups all-purpose  flour
  • 1 teaspoon baking  powder
  • 1/2 teaspoon kosher  salt
  • 1/4 teaspoon baking  soda
  • 1/2 cup (1 stick) unsalted butter, room temperature
  • 3/4 cup (packed) light brown sugar
  • 1/2 cup sugar
  • 1/4 cup powdered sugar
  • 2 large egg yolks
  • 1 large egg
  • 1 teaspoon vanilla  extract
  • 8 ounces semisweet or bittersweet chocolate (do not exceed 72% cacao),  coarsely chopped
  • Maldon or other flaky sea  salt

Preparation

Place racks in upper and lower thirds of oven and preheat to  375°. Whisk flour, baking powder, kosher salt, and baking soda in a medium bowl;  set aside.

Using an electric mixer on medium speed, beat butter, brown  sugar, sugar, and powdered sugar until light and fluffy, 3-4 minutes. Add egg  yolks, egg, and vanilla. Beat, occasionally scraping down the sides of the bowl,  until mixture is pale and fluffy, 4-5 minutes. Reduce mixer speed to low; slowly  add dry ingredients, mixing just to blend. Using a spatula, fold in  chocolate.

Spoon rounded tablespoonfuls of cookie dough onto 2 parchment  paper-lined baking sheets, spacing 1-inch apart. Sprinkle cookies with sea salt.

Bake cookies, rotating sheets halfway through, until just  golden brown around the edges, 10-12 minutes (the cookies will firm up as they  cool). Let cool slightly on baking sheets, then transfer to wire racks; let cool  completely. DO AHEAD: Cookies can be made 1 day ahead.  Store airtight at room temperature.

For a printer-friendly version of this recipe, please click here:  Salty Chocolate Chunk Cookies

Salty Chocolate Chunk Cookies 3

Potato Chip Cookies

Potato Chip Cookies

I am officially exhausted.  I am holding up the white flag.  So much for 2013 being the year of simplification – the last two weeks have been anything but that.  I think I knew that was going to be the case, and was trying to convince myself if I just focused on simplifying, everything would be ok.  Well, I survived.  I got through the last two weekends of visitors, 20 hours of rehearsals (for my older daughter), 5 performances of Bye-Bye Birdie (which she performed and I attended), and a surprise project at work that definitely had my mind working in overdrive.  I am really looking forward to normalcy, let alone simplification.  Normal sounds about perfect right now.

So what exactly is normal anyway?  I certainly don’t operate under normal conditions in any part of my life – particularly when it comes to food.  For those of you who follow this blog, you know I love a good twist on a recipe – candy sushi and meatloaf cupcakes are just a few of my favorites.  So – when my best friend from high school sent me this recipe for Potato Chip Cookies that she got from The Chew – even among all the craziness in my life the past couple of weeks – I just couldn’t put off making them.  Of course, I cut corners when it came to taking this picture, but I had to simplify somewhere, right?  These cookies were something else – and they got better the longer they sat – they were like a salty sweet shortbread cookie that was perfectly crunchy.  You either couldn’t live with the dark chocolate side, or you couldn’t live without it – I had both reactions from people.  Either way, this recipe is definitely a keeper.

So – I am signing off now, and heading to bed.  I hope when I wake up tomorrow, I feel like a new person – without a white flag attached to the top of my head.  I am allowed to dream, right?

Ingredients

  • 1 cup butter, softened
  • 3/4 cup sugar
  • 2 cups all-purpose flour
  • 1 teaspoon vanilla
  • 1 1/4  cups coarsely crushed potato chips, divided
  • 1/4 cup confectioner’s sugar
  • 7 oz. dark chocolate, melted

Directions

Preheat oven to 350 degrees.

In a large mixing bowl cream butter and sugar until fluffy.  Reduce mixer speed to low, and add 3/4 cup of crushed potato chips and mix well.  Add vanilla, then add the flour and mix just until combined, do not over mix the dough.

Use a spoon to scoop small 1-inch balls of dough onto a lightly greased or parchment lined cookie sheets, 2 inches apart.  Dust each cookie with a bit of confectioners sugar, and press flat.  Bake 10-15 minutes, or until light brown around the edges.  Remove to wire rack to cool.

Dip each of the cookies in the melted chocolate.  While the chocolate is still soft, place the chocolate covered portion into the rest of the crushed potato chips to lightly coat.  Allow to set before serving.

Makes about 3 dozen.

For a printer-friendly version of this recipe, please click here:  Potato Chip Cookies

Rosemary Cornmeal Biscotti

Biscotti

In Seattle, the trees and flowers never seem to stop growing.  Now before I really get into this post – I want to explain something – I am not a gardener.  That is my husband’s area.  I focus on the inside of the house – he deals with the outside.  I have never really had an interest in flowers or flowering trees – the only plants I really get into growing are herbs, and that is purely because I can use them in the kitchen.  It is so nice to always have fresh herbs to cook with.  So – it annoys me at times that in Seattle, there is always something blooming.  I just looked out the kitchen window the other day, and yes, in the dead of the winter, there are flowers starting to bloom.  At least I actually noticed them – I remember when I was in college, my mother asked me to water the flowers outside while they were away.  They came home, and the flowers were dead.  She was livid – and would you believe that I didn’t even realize there were flower boxes on attached to the house that she wanted me to water?  I just thought she was talking about the big pot outside the front door.

One of the most prolific plants out here is rosemary – I have actually seen it used as a hedge – it grows that much.  Rosemary is awesome, I love having a fresh rosemary plant that I can use whenever I am roasting meat, potatoes, vegetables – the sky is the limit.  But, I don’t often bake with rosemary – that was until I made these at The Pantry.  These were such a unique cookie – they were sweet, crunchy and herbaceous – which is really not how I have ever described a cookie before.  I couldn’t stop eating them because they were so unique.  So – if you are sick of looking at that overgrown rosemary plant in your back yard, here is an idea – instead of using it for your roasted chicken, how about a batch of these?  They almost made me appreciate my garden just a little bit more – which is a good thing – I think.

Ingredients

  • 2 ¼ ounces (1/2 cup) coarsely chopped almonds
  • 1 ounce (1/4 cup) coarsely chopped hazelnuts
  • 2 ounces (4 tablespoons) unsalted butter
  • 1 ½ tablespoons finely grated orange zest
  • 1 tablespoon minced fresh rosemary
  • 4 ½ ounces (1 cup) all-purpose flour
  • 2 ½ ounces (1/2 cup) coarse yellow cornmeal
  • 3 ¾ ounces (1/2 cup) sugar
  • 1 teaspoon baking soda
  • 1 teaspoon anise seeds
  • ¼ teaspoon kosher salt
  • 2 large eggs
  • Egg wash made with 1 egg and 1 tablespoon water

Preparation

Preheat oven to 350 degrees.  Spread the nuts on a baking sheet and toast them in the oven until they are lightly golden, about 8-10 minutes.  Set aside to cool; keep oven on.

In a small saucepan, melt the butter over medium heat.  Remove from heat and add orange zest and rosemary.  Set aside to cool.

In the bowl of a mixture, mix the flour, cornmeal, sugar, and baking soda, anise seeds and salt.  Add the eggs one at a time, mixing well after each egg.  Add the cooled butter mixture and mix to combine.  Stir in the nuts, then let rest for a few minutes.

With wet hands, form the dough into a log 2 inches wide and place it on a parchment-lined baking sheet.  Brush the log with the egg wash and bake until it is a deep golden brown, about 30 minutes.  Let it cool on a wire rack.  Reduce oven to 200 degrees.

Once cooled, using a serrated knife, slide the log on the diagonal into ¼ inch slides.  Arrange the biscotti on two parchment-lined baking sheets and bake until crisp, about 1 hour.

Cool completely before storing in an airtight container.

Makes about 30 biscotti.

For a printer-friendly version of this recipe, please click here:  Rosemary Cornmeal Biscotti

Cocoa Nib Pecan Shortbread

Pecan Shortbread

We made it – the kids are done with school, the gifts have been delivered, and now we can sit back and relax.  It’s amazing how this year I really thought I was doing everything ahead of time with all the jam sessions, but I was still scrambling up until the last week.  So – I am hear to write about one more delicious gift from the kitchen – knowing that some of you out there may be looking for just one more thing.
I have never been a huge nut person when it comes to baking – I love eating nuts as snacks, but I like my baked goods pure.  I omit the nuts in my banana bread, as well my chocolate chip cookies.  Even when I bake with peanut butter, I always use creamy.  Heck – I prefer creamy peanut butter just about always.  So – when I saw we were making these Pecan Cocoa Nib Shortbread at The Pantry’s Holiday Gift Making class, I was a little hesitant.
Well – this recipe was different – it really needed those nuts – and the secret?  Chopping those nuts up into really small pieces. It made all the difference.  Basically the nuts were not only used for flavor, but just a hint of texture.  Oh, and the cocoa nibs?  Out of this world.  If you don’t have cocoa nibs though, just chop some high quality chocolate up into small bits.
Now – if you have kids – I highly suggest these – although this recipe is also extremely easy.  You will just have to help with the chopping.  Now go get moving, and hopefully you can carve out some downtime as well this holiday.

Ingredients

  • 3 ½ ounces pecans
  • 8 ounces all-purpose flour
  • 2 ounces whole wheat flour
  • ½ teaspoon kosher salt
  • 8 ounces butter, soft
  • 5 ounces sugar
  • 1/3 cup cocoa nibs

Preparation

Toast the pecans in a 325 degree oven (300 convection) for about 8 minutes.  Remove from the oven and cool until cook enough to handle.  Chop into small pieces.

Whisk together the flours and the salt.  Set aside.

In a stand mixer with the paddle attachment, mix the butter and sugar on low speed until smooth.  Add the chopped pecans and cocoa nibs and mix until just incorporated.  Add the flour mixture and mix on low until just incorporated.

Roll the dough into logs and chill for several hours.  Slice into cookies and chill until ready to bake.

Bake at 350 degrees (325 convection) until browned, about 16-18 minutes.

Makes about 30 shortbread cookies.

For a printer-friendly version of this recipe, please click here: Pecan Cocoa Nib Shortbread

Chocolate Sandwich Cookies

Chocolate Sandwich Cookies

Is it Friday yet?  Boy, what a week, I still feel like I am recovering from the bunnies this weekend!  I am definitely looking forward to a bunny-free weekend.  After all, it is December – time to really start some serious baking.  I am still on the fence as to whether I am going to go with my old standbys, or if I am going to try out some new stuff.  Knowing me, I have to try at least a few new things, but I am also looking forward to these and definitely these.

I have always secretly been intrigued with sandwich cookies.  It has taken me years to figure out why – and I think I finally nailed it.  It is also why my kids seem to go nuts with them as well.  Cookies are great, but sandwich cookies are awesome – you get double the cookie with a bonus of filling.  As a kid, who never got any cookies – to get a sandwich cookie was really hitting the jack pot.  Normally I only let my kids pack one cookie in their lunch as dessert – but when I have sandwich cookies in the house – they get two cookies in one!  Wow, how has this been staring me in the face all this time?

I saw these cookies in Cooking Light, and thought these would be great to kick-start the holiday season.  The chocolate filling was delicious and rich, and the cookies were nice and chewy soft.  Plus, at 156 calories per sandwich, you are really getting a good deal.  You can choose any cookie cutter that floats your boat – we chose hearts and stars.  Then you can make baby cookies out of those shapes – just don’t let them burn, they cook faster than the bigger round cookies.  Now is it Friday yet?

Ingredients

Cookies:

  • 8 ounces cake flour (about 2 cups)
  • 1/2 teaspoon salt
  • 1/4 teaspoon baking powder
  • 1 cup powdered sugar
  • 1/2 cup butter, softened
  • 2 tablespoons 2% reduced-fat milk
  • 1 1/2 teaspoons vanilla extract

Filling:

  • 1 1/2 ounces bittersweet chocolate, finely chopped
  • 2 tablespoons 2% reduced-fat milk
  • 1/2 cup powdered sugar
  • 2 tablespoons Dutch process cocoa
  • Dash of salt

Preparation

Preheat oven to 350°.

To prepare cookies, weigh or lightly spoon flour into dry measuring cups; level with a knife. Combine flour, 1/2 teaspoon salt, and baking powder, stirring with a whisk. Place powdered sugar and butter in a large bowl. Beat with a mixer at medium-high speed until well blended. Add 2 tablespoons milk and vanilla; beat 1 minute or until well combined. Add the flour mixture; beat on low-speed until just combined.

Shape the dough into a 6-inch disk. Cover tightly with plastic wrap; chill 30 minutes. Discard plastic. Roll dough to a 1/4-inch thickness on a lightly floured surface. Cut out 36 (2-inch) round cookies, rerolling scraps as necessary. Using a small decorative cookie cutter, cut a heart-shaped opening in 18 rounds. Place cookies 1 inch apart on baking sheets lined with parchment paper. Bake at 350° for 14 minutes or until lightly browned. Cool on a wire rack.

To prepare filling, combine chocolate and 2 tablespoons milk in a microwave-safe dish; microwave at HIGH for 1 minute or until melted, stirring every 15 seconds. Stir just until smooth. Combine 1/2 cup powdered sugar, cocoa, and dash of salt in a bowl, stirring well with a whisk. Add chocolate mixture to sugar mixture; stir just until smooth. (Mixture will thicken as it cools.) Divide chocolate mixture evenly among 18 whole cookies; spread in a thin, even layer. Top each cookie with a cut-out cookie.

For a printer-friendly version of this recipe, please click here:  Chocolate Sandwich Cookies

Mormon Molasses Spice Cookies

My older daughter is growing up before my eyes – and it is amazing to watch.  I am not in the teenage years yet, when things might get a bit hairy – now it is just plain innocent fun.  The other week she came home and said that they were having a party in her class.  Normally, that is then followed by a barrage of emails first from the room mother asking for a bunch of supplies/food, and then all the parents replying all with what they can commit to bringing.  I love those emails.

This was different – and I could tell that the times were changing.  She told me that she signed up to bring cookies to the party, and that she would make them by herself.  Wow!!  So, she spent a lot of time combing through my cookbooks and recipe files, looking for the perfect recipe.  She didn’t want anything frosted, because someone else was bringing those – but something that fit the season.  I suggested that she find some spice cookies, and she loved that idea.  She found a rather interesting looking recipe in the “got milk?  the cookie book” by Peggy Cullen.  I have had this cookbook forever – in fact, it might even be one of my first cookie books.  I think I chose it because it had nice pictures.

She decided she would make the dough on Sunday and bake the cookies on Tuesday night, so they would be fresh for the party on Wednesday.  I started to help her, and she told me she wanted to do it herself.  She told me to go in the other room, and she would call me if she needed help.  At that point, I actually had to leave and get my haircut – so I called my mother and asked her to call and check in on her to see if she had questions.  Things went splendidly.  The cookies were fantastic – especially right out of the oven.  Tons of flavor, and nice and chewy.  I think she is almost ready for her own blog!

Ingredients

  • 3/4 cup (1 1/2 sticks) unsalted butter, cut in pieces
  • 1/4 cup dark unsulphered molasses
  • 1 teaspoon vanilla extract
  • 2 cups all-purpose flour
  • 1 cup granulated sugar, plus 1/3 cup for rolling cookies
  • 2 teaspoons of baking soda
  • 2 teaspoons ground ginger
  • 2 teaspoons ground cinnamon
  • 1/4 teaspoon nutmeg
  • 1/4 teaspoon ground cloves
  • 1/4 teaspoon of salt
  • 1 large egg, lightly beaten

Preparation

In a medium saucepan, melt the butter over low heat.  Remove from the heat, and stir in the molasses and vanilla.  Set aside to cool.

In a medium bowl, sift the flour with 1 cup of the sugar, the baking soda, ginger, cinnamon, nutmeg, cloves, and salt.  Whisk to combine.

Add the beaten egg to the cooled butter mixture and mix well with a fork.  Using a rubber spatula, fold the flour mixture into the butter mixture.  Cover the bowl and refrigerate until firm enough to form ball, about 15 minutes.  Preheat oven to 375°F.

Place remaining 1/3 cup of granulated sugar in a shallow bowl.  Working with 1 Tbsp of dough each time, roll dough into 1-inch balls.  Roll balls in sugar and place on ungreased cookie sheets, spacing them 1 1/2 to 2 inches apart.

Bake until the outer edges of the cookies begin to set and centers are soft and puffy, about 12 to 15 minutes.  Cool cookies on sheets for about 5 minutes before transferring them to cooling racks.  Store in an airtight container for up to 2 days, or freeze for up to 2 weeks.

Makes about 4 dozen cookies.

For a printer-friendly version of this recipe, please click here:  Mormon Molasses Spice Cookies

Brookies

Remember this commercial?  I actually don’t, but the saying is something I will never forget.  Each one is delicious on its own, but when you put them together – WOW!

When I started this blog, I was taking a leap.  I was doing something that was bottled up in my head for years, and I was finally getting it out.  As I have written before, most of my good friends enjoy their food, in fact I can even go as far as to say that many of them LOVE their food.  But there is a difference – I am consumed by food, and in a good way.  I have not let it affect my life in a negative way, but it brings me an immense amount of joy.  I love cooking and baking for my family – and with my family – and I love sharing what I make with others.

I remember when I started the blog, people started to find me.  I started to find people who were like me – they had regular jobs and families, but who loved food – they were obsessed like me.  I remember going to one of my first food photography classes at The Pantry, and finding out that there were a ton of people just like me.  It was great to be able to bond with them.  One of the people who found me was Keren Brown.  Her story is amazing – she was new to Seattle, and created a blog to connect with the Seattle food scene – and what a scene there is.  I had no idea.  I was so flattered that she invited me to one of her food events, it was like a dream come true.  Unfortunately I don’t get to participate as much as I would like to – my job is just slightly demanding (ha!), and when I am not working, I am spending time with my family – but occasionally I do something just for me – and it is pretty incredible.  She calls her events Foodportunity  – and they are just that – they are an opportunity to be surrounded by food.  Food to eat, food to discuss, and people to meet who are obsessed with food.  It is food attached to people who love it – getting them eating and talking about food, the perfect combination.

My mother sent me this recipe, and I was hitting myself for not thinking of this myself.  This recipe comes from the Brooklyn bakery Baked – and boy have they got a winner here.  Two great tastes that taste great together – is it a cookie or a brownie, no wait – it is both!!!  It was almost like someone dropped chocolate chip cookie dough onto a brownie, and it was genius – just like those Reese’s Peanut Butter Cups were.  Personally, I prefer a Brookie.  In a way, it was like a Foodportunity.  An opportunity to be surrounded by two of the most classic american baked goods, and opportunity to taste two favorites as one, and boy will this get people talking about food…

Ingredients

chocolate chip cookie dough

  • 1 cup plus 2 tablespoons all-purpose flour
  • 1/2 teaspoon fine grain sea salt
  • 1/2 teaspoon baking soda
  • 1/2 cup (1 stick) unsalted butter, softened
  • 1/2 cup packed dark brown sugar
  • 1/4 cup white sugar
  • 1 large egg
  • 1 teaspoon pure vanilla extract
  • 6 oz. semisweet chocolate chips

brownie batter

  • 1/2 cup (1 stick) unsalted butter, cut into 1-inch cubes, plus more for muffin tin
  • 3/4 cup all-purpose flour
  • 1 tablespoon dark cocoa powder
  • 1/2 teaspoon fine grain sea salt
  • 5 oz. dark chocolate (top quality, 60 to 72 percent cacao), coarsely chopped
  • 3/4 cup white sugar
  • 1/4 cup light brown sugar
  • 3 large eggs, room temperature
  • 1 teaspoon pure vanilla extract

Instructions

Using butter or nonstick spray, grease the bottom and sides of a 24 cup mini-muffin tin.  Set aside.

chocolate chip cookie dough

Add flour, fine grain sea salt and baking soda to a large bowl, whisking to combine. Set aside.  In the bowl of an electric mixer fitted with the paddle attachment, mix together butter, white sugar and dark brown sugar on medium speed until smooth and creamy. Using a spatula, scrape down the sides of the bowl. Add the egg and beat until light and fluffy. Add vanilla and mix until just incorporated. Add half of the flour mixture to bowl. Mix for a few seconds on low then increase the speed to medium. Beat until just combined (15 – 20 seconds). Add the remaining flour mixture and repeat the process above. Do not overmix here. Gently fold in the chocolate chips.  Cover bowl, transfer to the refrigerator and chill for at least 3 hours before using.

brownies

Add flour, fine grain sea salt and cocoa powder to a medium bowl, whisking to combine. Set aside.

Bring a large pot filled with 2 inches of water to a simmer. Set a heatproof bowl on top of the pot, but make sure the bottom of the bowl is not touching the simmering water. Add butter and chocolate to the bowl, stirring until melted and combined. Turn off the heat, but keep the bowl on the pot. Whisk white sugar and light brown sugar into the chocolate mixture. Remove the bowl from the pot and let cool to room temperature.  Add eggs to the chocolate mixture, whisking until just combined. At this point, switch from a whisk to a spatula. You want to avoid adding extra air to the batter. Add vanilla and stir until just combined. Gently fold flour mixture into the chocolate mixture until just incorporated. Do not overmix here.

Fill each well of the muffin tin halfway with batter. Transfer muffin tin to the refrigerator and let chill for at least 1 hour. Both the cookie dough and brownie batter must be well chilled before baking to insure even cooking.

Preheat your oven to 375°F and place a rack in the center of the oven (please see notes above regarding cooking times and temperatures).

Once thoroughly chilled, take the muffin tin from the refrigerator. Using a small spoon, scoop out a small amount of chilled cookie dough. Using your hands, shape dough into ball then slightly flatten it into a disk. The disk should be a bit smaller than the top of the muffin tin wells. Gently press the disk into one of the wells of batter. Repeat this process with remaining 23 wells.*

Place the muffin tin in the oven and bake until the cookies are golden brown ( 11 – 13 minutes), rotating the muffin tin halfway through.

*You will have extra chocolate chip cookie dough leftover. Don’t throw this out. Make cookies. Roll remaining dough into balls. Slightly flatten the balls into disks and place on a cookie sheet lined with a silpat or parchment paper. Bake in a 375 oven until golden brown (9 – 11 minutes depending on the size of your disks). Let cool for a minute on the baking sheet then transfer to a wire rack to cool completely. Or enjoy warm.

For a printer-friendly version of this recipe, please click here:  Brookies

Chocolate-Mint Pinwheel Cookies

It is funny to watch my children grow up right before my very eyes.  My husband and I always chuckle when they do something exactly like we would do – they are watching and learning, and it is amazing. This past weekend we received some sad news about my older daughter’s best friend.  It was bad enough a few months ago when we found out she would be moving to the east coast.  My daughter was very sad to be losing her best friend, but she actually understood why – it hit a little close to home.  Her best friends parents are scientists (like my husband), and science jobs are not easy to come by in Seattle.  Her father’s job was eliminated a few months ago – and he found a job in Boston, where it was also easy for her mother to transfer.  This weekend’s news though was a lot more scary.  Before moving to Boston, her best friend was in Italy on vacation with her parents, and she got hit by a taxi in Naples.  Fortunately she is going to be ok, but she suffered a bad fracture in her leg.  They made it back to the states today, and my daughter is so anxious to see her tomorrow.

We immediately started thinking about what we could do when they come back, and my daughter went straight to food.  She went to the cook books and found a recipe in Kitchen for Kids by Jennifer Low – she even checked to make sure we had all the ingredients.  This is basically a blog first – but I had no part in baking these cookies – I was at work when she was slaving away with the babysitter.  Supposedly she made these all by herself – and for a 10-year-old, I am seriously impressed.  I know her friend is going to love these tomorrow – I truly believe that good food can make just about anything a little better…and it is so amazing to see that my daughter feels the same way.

Ingredients

  • 1 cup unsalted butter, soft
  • 1 cup white sugar
  • 1 large egg
  • 3 tablespoons corn syrup
  • 1/2 teaspoon baking soda
  • 1/8 teaspoon salt
  • 1 teaspoon peppermint extract
  • 8 drops of green food coloring
  • 1 1/4 cups all-purpose flour
  • 1 teaspoon vanilla extract
  • 1/4 cup unsweetened cocoa powder
  • 1 2/3 cups all-purpose flour

Preparation

Line an 8×8 square pan with plastic wrap and lots of overhang.  Line a baking sheet with parchment paper.

To make the butter mixture, in a large bowl, use a baking spatula or wooden spoon to cream the butter and sugar.  Add the egg, corn syrup, baking soda and salt.  Mix well.

To make the mint dough, measure out 1/2 cup + 1/3 cup of the butter mixture into another large bowl and add a drop of green food coloring to it.  Set aside.

To make the chocolate dough, use the butter mixture in the bowl that does not have the food coloring.  Add the vanilla and cocoa powder.  Mix well.  Gradually stir in 1 2/3 cups flour.  When the dough gets too stiff, use your hands to knead it into a smooth ball, working inside the bowl.  If the dough is too sticky, knead in a teaspoon of flour.

Pinch off and drop big blobs of the chocolate dough into the lined pan.  Press them down to cover the bottom of the pan in a thin layer.  Dust hands with flour, if needed.  Chill the pan for about 10 minutes.  (Don’t leave it for much longer or it will get too stiff to roll.)  Wash your hands.

While the chocolate dough chills, finish making the mint dough.  Stir the peppermint extra and another seven drops of green food coloring into the butter mixture for a bright color.  Mix well.  Gradually stir in 1 1/4 cups flour.  When the dough gets too stiff, use your hands to knead it into a smooth ball, working inside the bowl.  The dough might seem crumbly at first, but keep squeezing and it will soften.

After chilling the chocolate dough, drop blobs of mint dough on top and press to cover the chocolate dough.  Dust hands with flour, if needed.

Use the plastic to lift the square of dough out of the pan and onto your work table.  Keep the plastic under the dough.  To make it easy to roll, use the heels of your hands to flatten one side of the dough to 1/4 inch thick.  Place this flattened strip in front of you to begin rolling.  Lift the plastic to help you roll the dough into a tight cylinder.  Pat the ends in.  Wrap the dough in the plastic.  If the cylinder is fatter in some parts than others, roll the fatter parts a few times to even it out.  You should have a cylinder that is 2 1/2 inches in diameter.  Chill 30 minutes.

Preheat the over to 350 degrees.

After chilling, remove the plastic, then use a dinner knife to cut the cylinder into 1/2-inch thick rounds – or a grown-up can cut it with a sharp knife.  If the dough is too stiff to cut, let it warm up a little first.  Place the rounds on a lined baking sheet at least 3 inches apart.

Bake the cookies, about 16 minutes, or until the edges are firm, the tops are no longer shiny and the green dough is still green.  (If baked too long, the green dough will turn golden.)  They might be slightly soft in the middle, but will firm up once cooled.  Cool completely on the sheet.

For a printer-friendly version of this recipe, please click here:  Chocolate-Mint Pinwheel Cookies